
How Does a Freezer Work | The Science of Heat Removal
This post contains affiliate links. As an Amazon Associate, we earn from qualifying purchases.
A freezer works by using a closed-loop system of refrigerant to absorb heat from inside the cabinet and release it outside. A compressor pumps pressurized refrigerant gas to a condenser coil, where it loses heat and becomes a liquid. This liquid then expands through a valve, rapidly cooling and evaporating inside an evaporator coil, absorbing latent heat from the freezer’s interior. A thermostat cycles the compressor to maintain a set temperature, typically -18°C (-0.4°F).
That’s the core mechanism. The magic isn’t in making cold, but in moving heat.
The real question focuses on why your freezer behaves the way it does—why it runs constantly when first plugged in, why overloading it makes ice cream soft, and why a feature called “super freeze” needs a 24-hour head start on some models to work correctly. The physics of heat transfer dictate every quirk and specification.
What follows: a breakdown of the four-step cycle, the components that make it happen, and the manufacturer-specific rules that turn the theory into reliable frozen food.
Key Takeaways
- The compressor is the pump and the heart of the system; its failure means no cooling.
- Refrigerant doesn’t “contain cold”; it absorbs heat as it evaporates inside the evaporator coils, a process called the latent heat of vaporization.
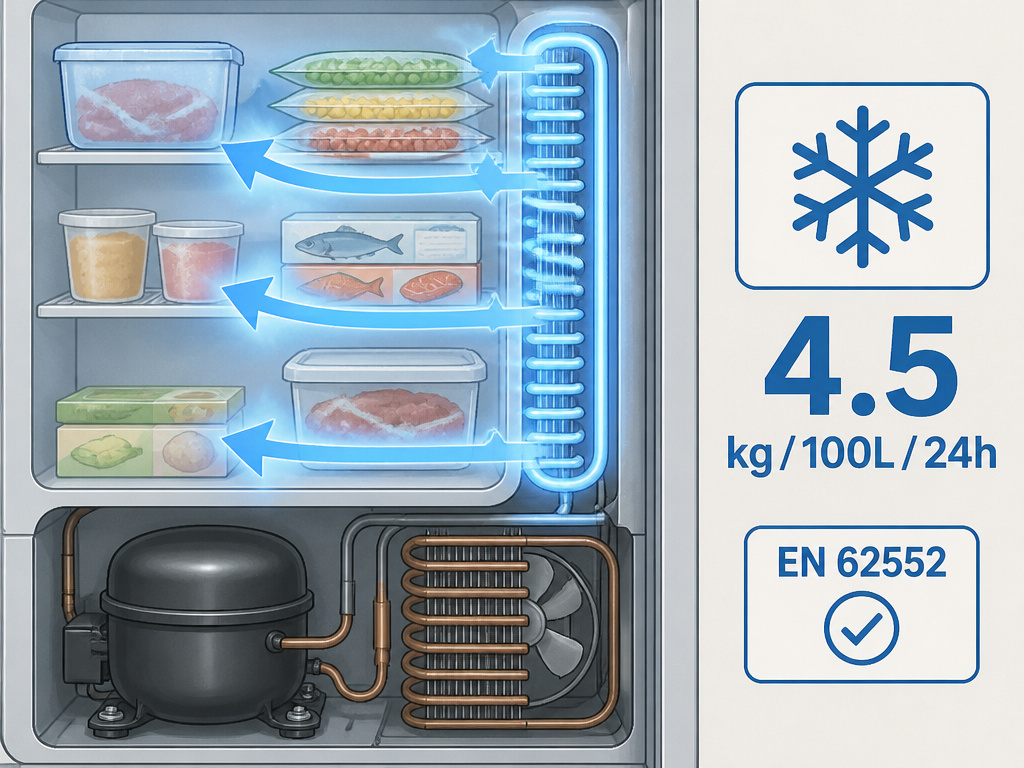
- The EN 62552 standard requires a freezer to freeze at least 4.5 kg of fresh food per 100 liters of capacity in 24 hours at 25°C room temperature—a benchmark for comparing real performance.
- Functions like Bosch’s “Super Freezing” must be activated 24 hours in advance to pre-chill the entire thermal mass of the cabinet for maximum freezing capacity.
- Insulation doesn’t cool; it only slows the inevitable heat leak. The rate of that leak determines how often and how long your compressor runs.
The Four-Step Refrigeration Cycle
A freezer functions as a heat relocation device. The refrigeration cycle is a continuous loop where a chemical refrigerant changes state from gas to liquid and back, moving thermal energy from the inside of the box to the outside.
The cycle hinges on a physical principle: a liquid absorbing heat to become a gas (evaporation) cools its surroundings, and a gas releasing heat to become a liquid (condensation) warms its surroundings.
The Refrigeration Cycle: 1. Compression: The compressor pumps low-pressure, warm refrigerant gas, squeezing it into a high-pressure, hot gas. 2. Condensation: This hot gas flows through the condenser coils (usually on the back or bottom), releasing its heat to the surrounding air and condensing into a high-pressure liquid. 3. Expansion: The liquid passes through a narrow expansion valve, causing its pressure to plummet. 4. Evaporation: The cold, low-pressure liquid enters the evaporator coils inside the freezer cabinet, where it absorbs heat from the interior and evaporates back into a gas, restarting the cycle.
Step 1: Compression – The Heart of the System
The compressor is a sealed, electric pump. When the thermostat calls for cooling, it activates.
It sucks in the cool, low-pressure refrigerant gas that has just finished absorbing heat inside the freezer. By compressing this gas, it does two critical things: it significantly increases the gas’s pressure, and in doing so, its temperature skyrockets. You’re turning a tepid gas into a hot one, not by adding a flame, but by squeezing it.
This is the only part of the cycle that adds significant energy (from your wall outlet). Every other step just manipulates what the compressor started.
Step 2: Condensation – Rejecting the Heat
The now hot, high-pressure gas is forced into the condenser coils. These are the black grille-like tubes typically located on the back or built into the walls of the unit.
As the hot gas travels through these coils, it comes into contact with the cooler room air. The heat energy flows from the hot refrigerant into the cooler air—this is why the back or sides of a running freezer feel warm. As the refrigerant loses this heat, it undergoes a phase change, condensing back into a liquid. It’s still under high pressure, but it’s now a warm liquid ready for the next step.
Step 3: Expansion – The Pressure Drop
The warm, high-pressure liquid refrigerant reaches the expansion valve (or capillary tube). This is a deliberate restriction in the line.
Think of it like putting your thumb over the end of a garden hose. The valve meters a precise amount of liquid through a very small opening. This sudden drop in pressure is what makes the magic happen. The refrigerant flashes from a warm liquid to a cold, low-pressure mixture of liquid and gas.
Step 4: Evaporation – Making Cold Inside
This cold mixture is now routed into the evaporator coils. These are the coils hidden behind the interior walls or panels of the freezer.
Where this goes sideways: Blocking airflow over the evaporator coils with overpacked food. The refrigerant can’t absorb heat efficiently, so the compressor runs longer, food at the center stays warmer, and frost builds up faster on the exposed coils.
Here, the refrigerant is colder than the air and items inside the freezer. Heat naturally flows from the warmer interior (your food) to the colder refrigerant. This influx of heat causes the remaining liquid refrigerant to completely evaporate, turning back into a cool, low-pressure gas. By absorbing this latent heat of vaporization, it literally pulls the thermal energy out of the cabinet. This gas then returns to the compressor to start the cycle anew.
Core Components Beyond the Cycle
The refrigeration cycle needs a framework to function in a controlled box. These parts manage the process and contain the cold you’ve paid to create.
| Component | Primary Function | What Happens If It Fails |
|---|---|---|
| Thermostat | Senses interior temperature and turns the compressor on/off. | Compressor won’t cycle; freezer either runs continuously (stuck on) or not at all (stuck off), leading to thawing. |
| Evaporator Fan (Frost-Free models) | Circulates cold air from the coils throughout the cabinet. | Cold air stagnates; temperature stratification occurs (warm spots), and frost builds rapidly on the coils. |
| Condenser Fan | Pulls room air across the condenser coils to aid heat rejection. | Condenser overheats; compressor works harder, trips on thermal overload, and shortens its life. |
| Door Gasket | Magnetic seal that prevents warm, moist room air from entering. | Warm air leaks in, causing the compressor to run excessively and rapid frost/ice buildup inside. |
| Insulation (Polyurethane foam) | Slows the conduction of heat from the outside environment into the cabinet. | The compressor cycles far more frequently to keep up with the heat leak, skyrocketing energy use. |
The Role of the Thermostat and Insulation
The thermostat is the brain’s connection to the heart. It’s a temperature-sensitive switch. When it detects the interior has warmed above its set point (e.g., -17°C), it closes the circuit to the compressor. The cycle runs until the interior is cooled back down, then the thermostat opens the circuit, stopping the compressor.
Insulation is the unsung hero. The thick polyurethane foam in the walls and door is a poor conductor of heat. Its sole job is to slow down the rate at which warmth from your kitchen seeps back into the frozen cabinet. Better insulation means the compressor runs less often and for shorter periods.
Freezer Performance & Standards
 Not all freezers are created equal. Two identical-looking 15-cubic-foot models can have wildly different abilities to freeze food quickly and hold temperature under load. Manufacturers use specific functions and adhere to standardized tests to quantify this.
Understanding Freezing Capacity
How much fresh food can it freeze, and how fast? This is where the EN 62552 standard provides a clear, comparable metric.
The standard mandates that a freezer must be able to freeze a minimum of 4.5 kg of food per 100 liters of its volume within 24 hours, with the room temperature held at 25°C (77°F). A 300-liter freezer, therefore, must freeze at least 13.5 kg (about 30 lbs) in a day under these test conditions.
This number on a spec sheet tells you the freezer’s muscle. A higher number means a more powerful cooling system relative to its size.
The “Super Freeze” or “Quick Freeze” Function
This is a deliberate override of the thermostat.
When you activate Super Freeze (called SuperFreeze on Miele models, Quick Freezing on Beko), the compressor runs continuously, ignoring the thermostat’s call to stop. It drives the evaporator coils as cold as they can get, often down to -28°C or lower, creating a massive “cold sink” in the cabinet.
Common mistake: Adding a large batch of warm food and then hitting Quick Freeze. The thermal mass of the food overwhelms the system, raising the cabinet temperature and potentially thawing existing items.
The critical timing from the manuals: for freezing the maximum capacity, this function must be activated 24 hours in advance (Bosch, Miele). This pre-chills the air, shelves, walls, and thermal mass of the appliance itself. For smaller loads (under 2 kg), you might only need 6 hours of lead time or no function at all.
How Design Affects Operation
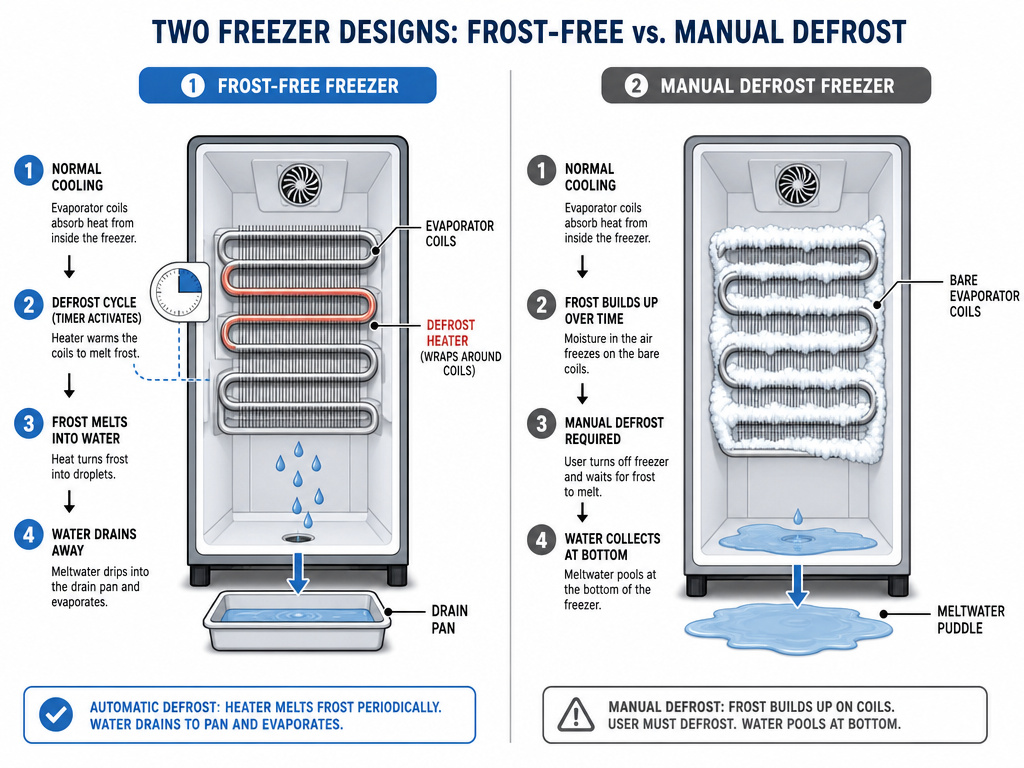 The basic cycle is universal, but its implementation creates the two main freezer types you’ll choose between.
Frost-Free vs. Manual Defrost
This is the biggest practical division.
A frost-free freezer has a small heater wrapped around the evaporator coils and a timer. Every 6 to 12 hours, the timer activates the heater for 15-30 minutes, melting any frost that accumulated. The water drains into a pan at the bottom, where it evaporates. The convenience is obvious: you never have to manually defrost. The trade-off is slightly higher energy use, more complex parts, and slightly drier air that can accelerate freezer burn if food isn’t wrapped well.
A manual defrost freezer has no heater. Frost builds up on the coils over time, acting as insulation and forcing the compressor to work harder. You must periodically unplug it, remove the food, and let the ice melt. These units are simpler, often more energy-efficient when frost-free, and are the standard for most chest freezer or deep freezer designs. The defrosting process is a required maintenance task.
Upright vs. Chest Freezers
The shape dictates physics. An upright freezer opens like a fridge, letting cold air spill out. A chest freezer opens from the top; cold air, being denser, stays pooled inside when the lid is opened. This makes chest freezers more energy-efficient for long-term storage and less prone to temperature fluctuation during loading.
However, uprights are easier to organize. The choice between them often comes down to whether you prioritize accessibility or maximum efficiency and bulk storage capacity.
Frequently Asked Questions
Why does my freezer run all the time when I first plug it in?
It’s working exactly as designed. An empty freezer is full of room-temperature air. The compressor must run continuously for several hours—often 4 hours or more as stated in GE and Electrolux manuals—to remove enough heat to bring the entire thermal mass of the cabinet and its contents down to -18°C. This initial cool-down period is the hardest work it will ever do.
What is the liquid inside the pipes?
It’s the refrigerant. Modern home freezers primarily use R-600a (isobutane), a hydrocarbon that is environmentally friendly (low global warming potential) but flammable. Older units used R-134a. The system is sealed under pressure; you should never see or smell the refrigerant. A leak means a professional repair is required.
Can I put warm food directly into the freezer?
You can, but you shouldn’t. The large heat load forces the compressor into a long, hard run. This raises the temperature inside the cabinet, potentially thawing the edges of already-frozen items. It also wastes energy. Let food cool to room temperature first. For large batches, use the Super Freeze function as your manual dictates.
How does a freezer make ice?
The freezer makes ice by providing a cold environment (typically -18°C or below). An automatic ice maker has its own separate water supply line and a small thermostat. When the ice bucket is empty and cold enough, a valve opens, filling a mold with water. The freezing-cold air in the freezer then freezes that water. A heater briefly warms the mold to release the cubes into the bucket.
Why is the back or sides of my freezer warm?
That’s the condenser coils doing their job. They are rejecting the heat absorbed from inside the freezer into your kitchen. This warmth is normal and a sign the system is operating. Ensure there’s at least a few inches of clearance around these areas for proper airflow, or the heat won’t dissipate and the compressor will overwork.
The Bottom Line
A freezer works on a simple, elegant principle of physics: moving heat from one place to another. The compressor, condenser, expansion valve, and evaporator perform a continuous dance of pressure and phase changes to make that happen.
The practical takeaway is in the details. Respect the initial 4-hour cool-down. Understand what the EN 62552 freezing capacity figure really means. Use the Super Freeze function 24 hours ahead for big grocery hauls. And know that the difference between a frost-free and a manual defrost freezer is a fundamental choice between convenience and efficiency.
That knowledge lets you use the appliance effectively, whether you’re storing seasonal produce, meal-prepping, or just keeping ice cream at the perfect texture. It turns the humming box in your garage or kitchen from a mystery into a predictable tool.
