
How to Defrost a Freezer Properly to Maintain Peak Efficiency
This post contains affiliate links. As an Amazon Associate, we earn from qualifying purchases.
Defrost your freezer when frost reaches ¼ inch thick. Unplug it, remove all food, and let the ice melt naturally with the door open. Use towels to catch water and a plastic scraper only on soft frost. Never use sharp tools or boiling water, as both can permanently damage the interior lining and cooling coils.
That ¼ inch rule isn’t a suggestion. It’s the thickness where frost starts acting as an insulator, forcing the compressor to run longer. Your energy bill climbs about 20% for every 2mm of ice beyond that point. The job looks messy, but it’s straightforward if you follow the sequence.
What follows: the exact steps that prevent a flooded kitchen floor, how to handle rock-hard ice, and the two mistakes that ruin a freezer’s seal.
Key Takeaways
- Defrost when frost is ¼ inch thick, waiting longer can increase energy use by 20% or more.
- Never use knives, screwdrivers, or boiling water to chip ice; you will puncture the sealed cooling system.
- Use hot tap water under 120°F in bowls to speed up melting for glazed ice, never pour it directly.
- A manual defrost cycle takes 4-8 hours; rushing it with heat guns or hairdryers risks warping plastic.
- Dry the interior completely before restarting to prevent immediate frost from reforming.
Why ¼ Inch of Frost Is the Real Deadline
That thin white layer isn’t just ugly. It’s a thermal blanket. Frost is porous and full of air pockets, which are excellent insulators. Once it builds to about ¼ inch, it significantly impedes the transfer of cold from the metal coils to the freezer’s air space.
The compressor then has to run longer and harder to maintain the set temperature. According to analysis from appliance efficiency studies, a 2mm layer of frost can increase energy consumption by roughly 20%. Most people have way more than that before they notice.
Where this goes sideways: Letting frost build past half an inch. At that point, the ice can begin to warp plastic shelves and baskets from the pressure of expansion. It also drastically reduces usable storage space.
The goal isn’t a perfectly ice-free freezer every day. It’s to intervene before the efficiency penalty hits and before the ice becomes a structural problem. Check the upper walls and around the door seal monthly, that’s where warm, humid air enters most often, so frost forms there first.
How Often Should You Defrost?
It depends entirely on humidity, usage, and your freezer type. In a dry climate with a tightly sealed door, you might only need to defrost a manual defrost freezer once or twice a year. In a humid kitchen where the door is opened frequently, it could be every three months.
Forget arbitrary calendars. Use the visual test.
| Frost Thickness | Action Required | Consequence of Waiting |
|---|---|---|
| Less than ¼ inch | Monitor. No action yet. | Minimal efficiency loss. |
| ¼ to ½ inch | Schedule a defrost soon. | Energy use climbs 20-40%. Space is reduced. |
| Over ½ inch | Defrost immediately. | Risk of damaged shelves. Compressor strain shortens appliance life. |
Manufacturers like GE and Electrolux state this clearly in their manuals. The GE FCM16 chest freezer manual advises not permitting more than ¼ inch of frost for efficient operation. Their smaller FCM5 model allows up to ½ inch. When in doubt, use the stricter ¼ inch rule.
If your freezer frosts up extremely quickly, within a week or two, you have a different problem. A faulty door gasket or a bad seal is letting in a constant stream of moist air. No amount of defrosting will fix that underlying issue.
The Step-by-Step Defrost
This isn’t a race. Rushing leads to broken plastic and water damage. Plan for the process to take most of a day.
Before you start: Unplug the freezer. Water and electricity are a lethal combination. Place towels around the base, you will have more meltwater than you think. Have a large shallow container or a wet/dry vacuum ready to manage it.
1. Empty the Freezer
Remove all food, shelves, and baskets. If you have a second freezer, transfer items there. If not, group perishables in coolers with ice packs. Meat and dairy should stay frozen solid; if anything begins to thaw, plan to cook it within 24 hours.
2. Contain the Meltwater
This is the step everyone underestimates. Place several thick bath towels on the floor in front of and under the freezer. Put a large, shallow plastic bin or tray inside the empty freezer to catch the initial drip. For a chest freezer, you’ll need to siphon or sponge out water periodically.
3. Accelerate Melting (The Safe Way)
Simply leaving the door open works, but slowly. To speed it up safely, place a few bowls or pans of hot tap water (under 120°F) on the freezer shelves. Close the door for 15-20 minutes. The steam will loosen the ice. * Do NOT use boiling water. It can crack plastic liners. * Do NOT use a heat gun or hairdryer. The intense, localized heat can warp or melt interior plastic parts you can’t replace. * A fan blowing room-temperature air into the freezer is a safe, effective middle ground.
4. Remove the Ice
Once the ice is soft and cracking away from the walls, you can gently encourage it. Use a plastic scraper or a silicone spatula. Work from the top down as water drips.
Common mistake: Stabbing at hard ice with a knife or screwdriver. The evaporator coils are often embedded in the freezer walls. Puncturing one releases the refrigerant, and the freezer is totaled. The repair cost exceeds a replacement.
For stubborn, glazed ice at the bottom, be patient. Reapply the hot-water-bowl method. Never chip at it.
5. Clean and Dry
With all ice gone, you have a clean, empty box. This is the perfect time to clean your freezer. Mix a solution of mild dish soap and warm water. Wipe down all interior surfaces, including the door gasket. Rinse with a cloth dipped in clean water. Then, the critical step: dry everything thoroughly with a clean towel. Any leftover moisture will turn into the first layer of your next frost problem.
6. Restart and Reload
Plug the freezer back in. Set the thermostat to your normal setting. Let it run empty for at least an hour, or until it reaches its proper temperature (usually indicated by a light or alarm). This ensures the system is stable. Then return your food and shelves.
What to Do With Your Food During Defrost
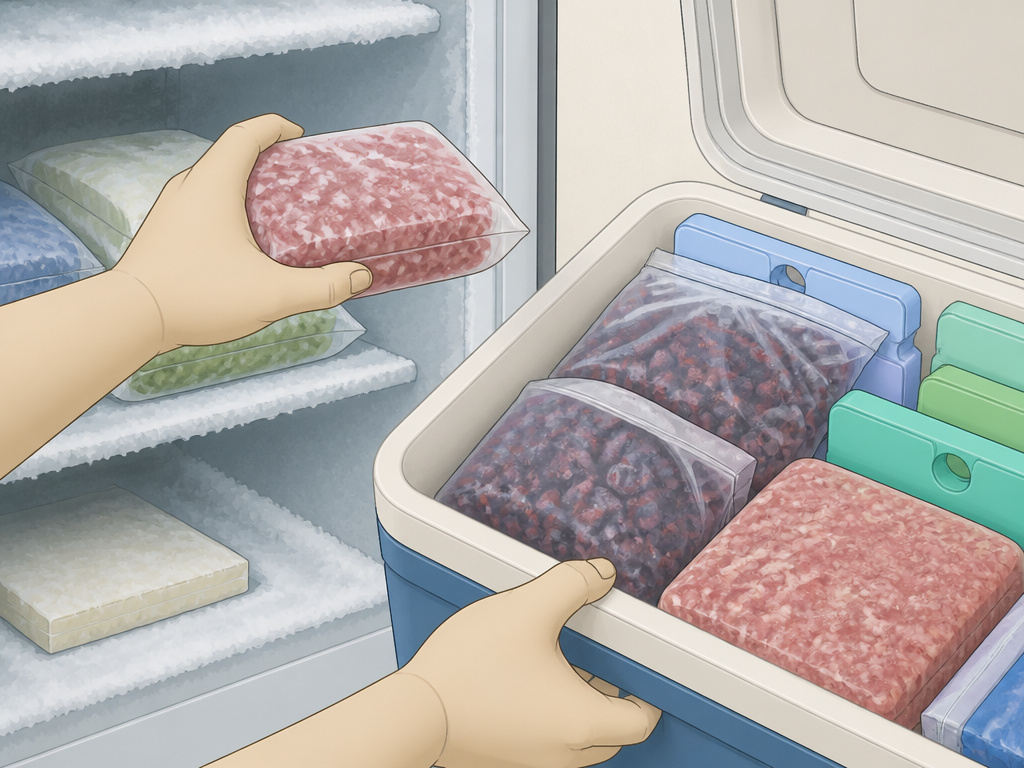
The logistics of food storage stop more people than the defrosting itself. You have three realistic options, listed from best to worst.
Option 1: The Second Freezer or Fridge Freezer
This is ideal. Simply shift everything over. It adds no time pressure.
Option 2: Coolers with Ice Packs
Use multiple coolers to keep foods organized. Pack them tightly, the mass of frozen food helps keep itself cold. A full cooler stays cold far longer than a half-empty one. Keep them in the coolest part of the house, out of the sun.
Option 3: The Quick Defrost and Repack
This is a gamble. If you’re using accelerated methods and the frost is thin, you might complete the job in 3-4 hours. Your food, packed tightly in coolers, will likely stay frozen. But have a meal plan for any items that soften, like ground meat or berries. Never refreeze meat that has risen above 40°F.
This is also the time to audit for freezer burn. Toss anything that’s been in there too long or is poorly packaged.
Manual Defrost vs. Frost-Free Freezers
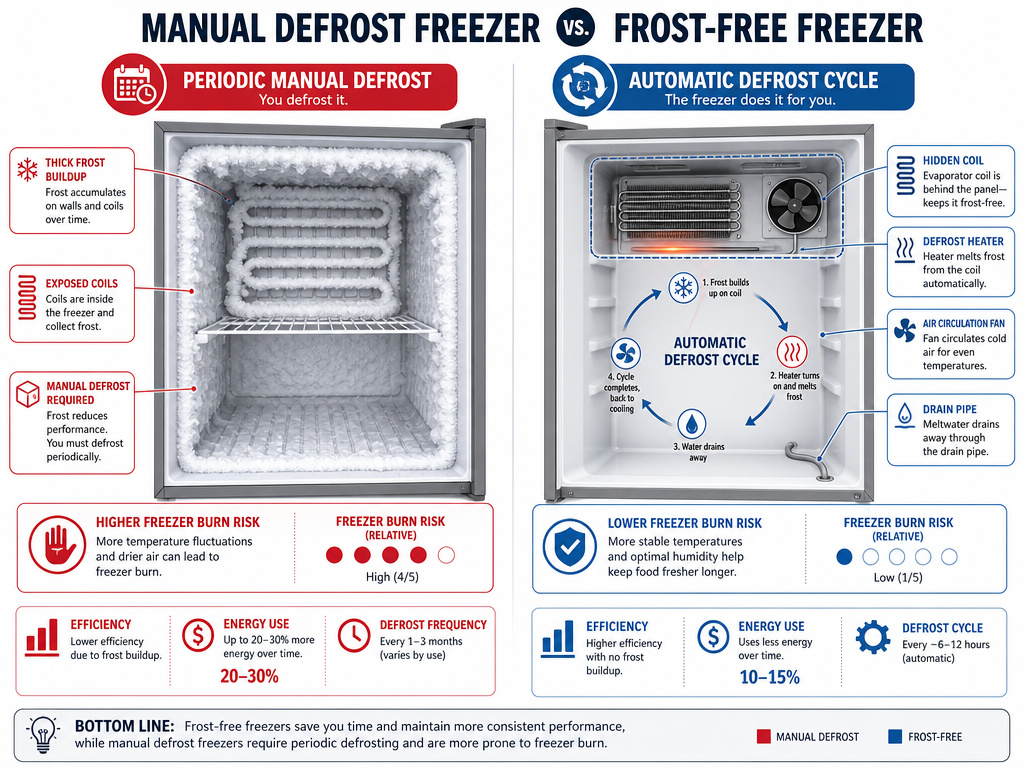
Not all freezers require this ritual. Knowing which one you have changes everything.
A manual defrost freezer has a simple cooling coil inside the main compartment. Frost builds directly on it. These are most common in chest freezers, garage freezers, and older models. They are generally more energy-efficient when well-maintained because they don’t have the complex heater and fan system of frost-free models. But they demand your time.
A frost-free freezer uses a small heater and a fan to periodically melt frost off the hidden evaporator coil. The water drains away, and you never see it. Models with this feature, like many Beko Frost-Free freezers, market it heavily.
| Feature | Manual Defrost Freezer | Frost-Free Freezer |
|---|---|---|
| Frost Buildup | Visible on walls and coils. | None visible in food compartment. |
| Maintenance | Requires periodic manual defrosting. | No manual defrosting needed. |
| Energy Efficiency | Potentially higher (simpler system). | Slightly lower due to defrost cycle. |
| Food Drying Risk | Lower (stable, dry cold). | Higher (cyclic temperature swings can cause freezer burn faster). |
| Cost | Often lower upfront. | Premium for the convenience feature. |
If you hate defrosting, your next purchase should be a frost-free model. But if you store food for very long periods, a manual defrost model’s steadier temperature is better for preservation.
How to Prevent Frost Buildup
You can’t stop it entirely, but you can slow it down dramatically.
Seal the Door
A worn gasket is the number one cause of rapid frost. Test the seal by closing the door on a dollar bill. If you can pull it out easily, the seal is weak. Clean the gasket with soapy water. If it’s cracked or stiff, you need a gasket replacement.
Let Food Cool
Never put hot or even warm food directly into the freezer. The steam it releases turns directly into frost. Cool food to room temperature, then refrigerate it until cold, before freezing.
Pack It Tight and Dry
Moisture inside packaging migrates out and becomes frost. Use vacuum sealers or airtight freezer bags. Squeeze out as much air as possible. For items like ice cream, press a piece of plastic wrap directly onto the surface before sealing the lid.
Keep the Freezer Full
A full freezer retains cold better than an empty one. The mass of frozen items stabilizes the temperature. If yours is often empty, fill plastic jugs with water and freeze them to take up space.
Frequently Asked Questions
Can I use a hairdryer to defrost my freezer faster?
You can, but you shouldn’t. The intense, focused heat from a hairdryer can easily warp or melt the plastic interior liner of your freezer. Once that plastic deforms, it’s impossible to repair and can create crevices that are hard to clean. It also poses an electrical risk near water. Using bowls of hot tap water is slower but completely safe.
What happens if I don’t defrost my freezer?
Two things happen, both expensive. First, your energy bill rises because the frost insulation makes the compressor work harder, about 20% harder for just 2mm of ice. Second, the excessive ice takes up storage space and can physically damage wire shelves or plastic bins by pushing them out of shape. Over years, the constant strain can shorten the life of the compressor.
How do I get rid of the water from defrosting?
For upright freezers, contain it with towels and a shallow pan inside. For chest freezers, it’s trickier. Use a large sponge or a small hand pump to transfer water into a bucket. Some newer chest freezer models, like certain Electrolux units, have a drain plug specifically for this purpose. Check your manual.
Why does frost build up so fast in my freezer?
Rapid frost buildup almost always points to a bad door seal. Warm, humid air is constantly leaking in. Test and clean the gasket. The second most common cause is leaving the door open too long or opening it too frequently, which lets a blast of humid kitchen air inside each time.
Is it okay to eat food that got slightly warm during defrosting?
It depends on the food and the temperature. If frozen meat, poultry, or seafood has thawed completely and warmed above 40°F for more than two hours, discard it. If items like vegetables, bread, or pre-cooked meals are still cold with ice crystals in the center, they can be refrozen or cooked immediately. When in doubt, throw it out.
The Bottom Line
Defrosting a freezer is a messy, boring chore. But it’s not complicated. Unplug it, empty it, and let time and hot water bowls do the work. The only tool you should wield is a plastic scraper.
The real cost isn’t the afternoon you spend. It’s the extra money on your power bill every month you postpone it. Watch for that ¼ inch line on the back wall. When you see it, pick a day, grab some towels, and get it done. Your freezer, and your wallet, will run cooler for it.
