
How to Clean Your Freezer’s Ice Maker in a 70-Minute Cycle
This post contains affiliate links. As an Amazon Associate, we earn from qualifying purchases.
To clean an ice maker in a freezer, you need the manufacturer-approved cleaner, the automatic cleaning cycle, and a six-month schedule. For KitchenAid and Whirlpool models, use one 16-ounce bottle of affresh® Ice Machine Cleaner (part W11179302), run the 70-minute clean cycle, and repeat every six months, or every three months with hard water. This removes mineral scale before it damages the evaporator plate and kills ice production.
The 70-minute cycle is non-negotiable. It’s an automated flush that pumps cleaner through the internal water lines and evaporator plate, then rinses the system eight times. Skipping to a manual vinegar soak leaves acid residue that pits brass fittings, and using the wrong chemical voids the warranty on brands like Sub-Zero.
What follows: the exact cleaner specs for four major brands, the one visual check that proves the cycle worked, the separate 10-minute task that doubles efficiency, and the hard-water warning that changes the schedule from “maybe” to “must.”
Key Takeaways
- Use only the cleaner specified by your brand. KitchenAid/Whirlpool’s affresh® W11179302 or Sub-Zero’s #7013400. Wrong chemicals cause warranty-voiding damage.
- The automatic clean cycle takes about 70 minutes (30 for Sub-Zero) and includes its own rinse phase. If solution remains in the drain pan afterward, run it again.
- Clean every six months minimum. With visible mineral buildup or known hard water, move to a three or four-month schedule immediately.
- Cleaning the front-facing ice bin and scoop with a bleach solution is a separate, weekly task from descaling the internal machine.
- Vacuum the condenser coils twice a year. Clogged coils make the compressor overwork, which can prematurely kill the ice maker motor.
Why a Freezer Ice Maker Needs a Specific Cleaner
Scale is the problem. Water contains dissolved minerals like calcium and magnesium. When water freezes in your ice maker, these minerals are left behind, plating onto the evaporator and the tiny water inlet tube. This is a rock-like insulator, not a surface stain.
The evaporator plate is the cold surface that freezes water into ice. A 1/16-inch layer of scale acts like a blanket, cutting efficiency by nearly 40 percent. The machine runs longer to make less ice, stressing the compressor.
The approved cleaners, affresh® for KitchenAid, Whirlpool, and many GE models, or Sub-Zero’s proprietary solution, are acidic formulations designed to dissolve calcium carbonate (lime scale) without corroding the food-grade plastics, rubber seals, and brass fittings inside the water system. White vinegar is acetic acid, which works on scale but is less controlled. It can linger in low spots, leading to pitting. Harsher acids like CLR (Calcium, Lime, Rust remover) are too aggressive and will damage components.
Using the wrong chemical has a tangible consequence. Sub-Zero’s service manual explicitly states that damage from incorrect chemical usage is not covered under warranty. For other brands, a technician can detect acid damage during a repair, which gives them grounds to deny a warranty claim.
| Brand | Approved Cleaner | Key Spec / Note |
|---|---|---|
| KitchenAid / Whirlpool | affresh® Ice Machine Cleaner | Part # W11179302. One 16oz (473 mL) bottle per clean cycle. |
| Sub-Zero | Ice Machine Cleaner #7013400 | 4 oz (118 mL) of undiluted cleaner poured into spray area for in-place cycle. |
| GE (Various Models) | GE Appliance Cleaner (Part WX03X10033) or affresh® | Check manual; some GE nugget ice makers require descaling every 4 weeks. |
| Generic / Aftermarket | NSF/ANSI Standard 42 certified ice machine cleaner | Must be certified for plastics safety; avoid vinegar-based “home recipes.” |
The schedule comes from the manufacturer for a reason. KitchenAid and Whirlpool program their indicator lights to illuminate after 9 months. Sub-Zero mandates a minimum of every six months. These are the intervals at which their engineers have calculated scale will begin to impair function, not mere suggestions. If you have hard water, that timeline collapses.The manual says cleaning may be needed as often as every six months if mineral buildup is observed. In practice, with very hard water, that means every three to four months.
The Core Cleaning Procedure for KitchenAid/Whirlpool Models
Most built-in freezer ice makers follow a similar process. This walkthrough uses the KitchenAid/Whirlpool standard because it’s the most common. If you have a different brand, the principles are identical: evacuate ice, drain, add approved cleaner, run the automated cycle, verify drainage.
Before you start: Unplug the refrigerator or turn off its circuit breaker. The cleaning cycle uses water and electricity. While a short is unlikely, it’s a five-second step that eliminates the risk.
-
Empty the Ice Bin. Let the machine run for 5-10 minutes so any ice in the evaporator grid drops. Remove all ice from the storage bin. Discard it.
- Consequence if skipped: The cleaning solution will dilute and freeze onto existing ice, making the cycle ineffective and leaving cleaner residue in your next batch.
-
Locate and Drain the Water Pan. Inside the empty ice bin, find the small water pan (a plastic trough) and unscrew its drain cap. Let all water drain completely into a towel or shallow container. Replace the cap and ensure it’s snug. > Common mistake: Leaving the drain cap loose. The pan won’t hold water, so the machine can’t draw solution into the system. You’ll get thin, hollow ice or none at all after the cycle.
-
Add the Approved Cleaner. Use one full 16-ounce bottle of affresh® Ice Machine Cleaner. Pour it directly into the empty water pan. Fill the empty bottle with tap water twice and pour that in as well to dilute and increase volume for the pump.
- Consequence if skipped: Using less than the full bottle means the solution becomes saturated with minerals before the cycle ends, leaving scale partially dissolved.
-
Initiate the Clean Cycle. Press and hold the “Clean” button on the control panel until the indicator light begins to blink. The cycle will now run automatically for approximately 70 minutes. It will pump the solution through the system, then initiate a series of rinse flushes.
- This is not a timer you watch. The machine controls the entire sequence.
-
Verify the Cycle Worked. After the light turns solid green (or the cycle otherwise indicates completion), remove the drain cap again. Look into the water pan. It should be completely empty.
- If you see any leftover cleaning solution, the internal drain or pump may be clogged with scale, or the cycle was interrupted. Re-cap the pan and run the clean cycle a second time with a fresh bottle of cleaner. Severe scale often needs two passes.
The machine is now descaled internally. Plug the refrigerator back in. It will resume normal ice production, but the first batch or two should be discarded as a final rinse.
Don’t Forget the Condenser (And Why It Matters)
The condenser has nothing to do with water scale. It’s the radiator-like set of coils, usually on the back of the fridge or behind the front kickplate, that releases heat from the compressor. When it’s clogged with dust and pet hair, the compressor can’t shed heat efficiently.
An overworked compressor raises the temperature inside the freezer compartment. The ice maker’s thermostat senses this warmer air and thinks the ice is done freezing too soon. It ejects a batch of half-frozen, wet slush that clumps together in the bin. You’ll blame the ice maker, but the root cause is ten feet away.
Where this goes sideways: Vacuuming the condenser fins against their direction. The thin aluminum fins bend easily, permanently restricting airflow. Always vacuum in the direction the fins run (usually vertically).
The task is simple and separate from the descaling: 1. Unplug the refrigerator. 2. Locate the condenser (consult your manual, it’s often behind the lower front grille). 3. Use a vacuum cleaner with a brush attachment. 4. Gently vacuum the face of the coils, moving the brush in the same direction as the fins. 5. Replace the grille and plug the unit back in.
GE recommends doing this twice a year. Sub-Zero says every six months. Do it when you change your smoke alarm batteries and you’ll never forget.
Sanitizing the Ice Bin and Scoop (A Different Job)
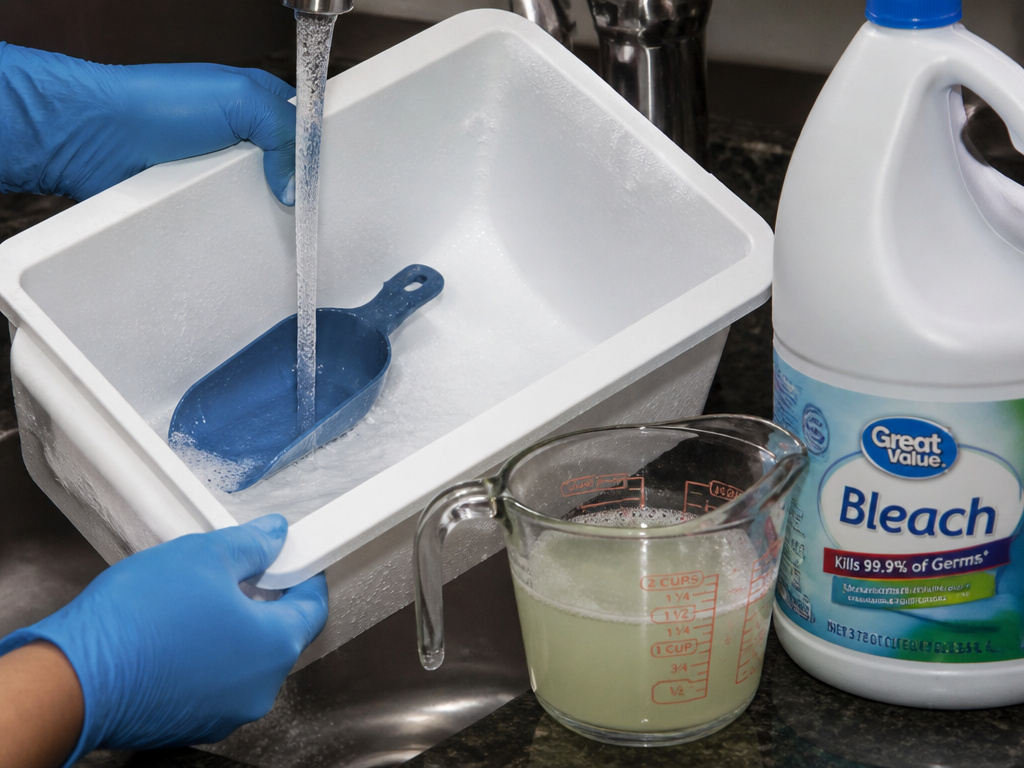 The internal cleaning cycle descales the machine’s plumbing. It does not sanitize the ice bin, scoop, or door gaskets that you touch. Bacterial growth like mold or slime occurs here, in the visible parts, not inside the sealed water system. This is a weekly or bi-weekly task.
The manufacturer-approved method is a mild bleach solution: one tablespoon (15 mL) of household bleach in one gallon (3.8 L) of warm water. 1. Remove the ice bin and scoop. 2. Wash them with mild dish soap and warm water. Rinse. 3. Submerge or wipe all surfaces with the bleach solution. This includes the bin, scoop, the interior door liner, and the rubber door gasket. 4. Let the solution contact surfaces for at least one minute. 5. Rinse thoroughly with clean water and dry with a clean towel.
This kills odor-causing bacteria and prevents pink or black mold spots from forming in the bin corners. Never store the ice scoop inside the bin; keep it in a separate drawer or holder. This prevents cross-contamination from hands.
What If Your Model Doesn’t Have a Clean Button?
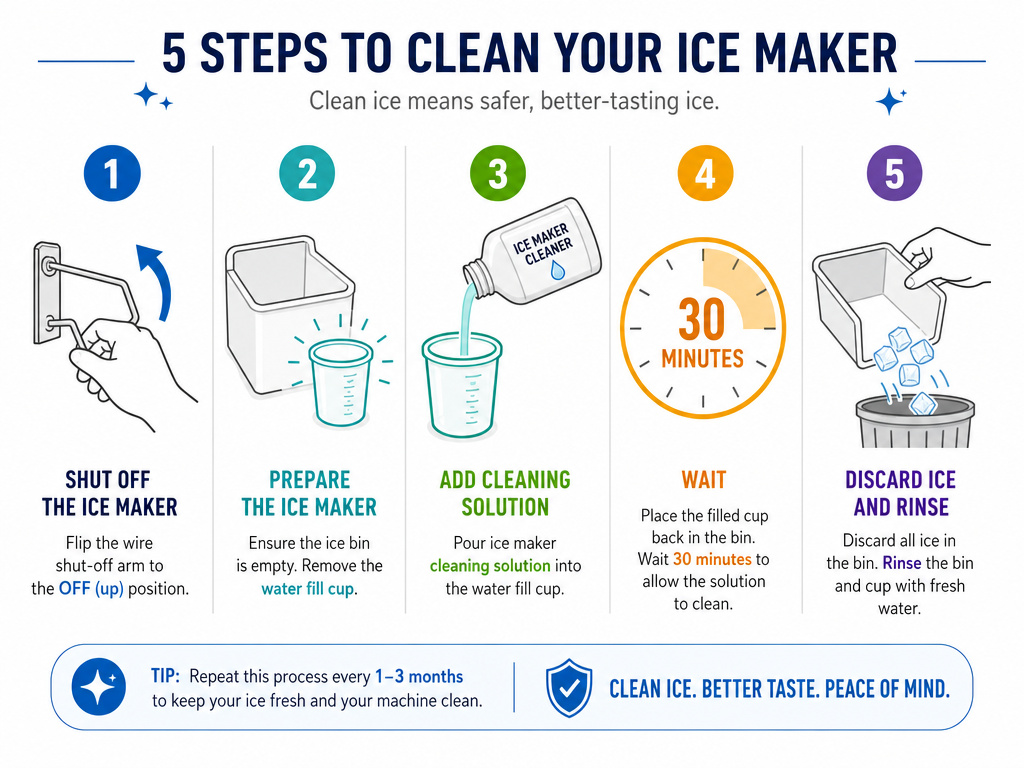 Older or basic models lack an automated cycle. The principle remains: get cleaner into the water system. For these units, you often use a manual “fill and sit” method described in the manual. The steps generally involve:
1. Turning the ice maker off (usually a wire shut-off arm or a switch).
2. Emptying the bin and locating the water fill cup.
3. Pouring the approved cleaner mixture into the cup.
4. Letting it sit for the prescribed time (often 15-30 minutes) to soak the evaporator.
5. Manually flushing the system by turning the ice maker back on and discarding multiple batches of ice.
Older or basic models lack an automated cycle. The principle remains: get cleaner into the water system. For these units, you often use a manual “fill and sit” method described in the manual. The steps generally involve:
1. Turning the ice maker off (usually a wire shut-off arm or a switch).
2. Emptying the bin and locating the water fill cup.
3. Pouring the approved cleaner mixture into the cup.
4. Letting it sit for the prescribed time (often 15-30 minutes) to soak the evaporator.
5. Manually flushing the system by turning the ice maker back on and discarding multiple batches of ice.
The lack of a pump means flushing is less thorough. You may need to discard the first 4-5 batches of ice to ensure all cleaner residue is gone. Consult your specific owner’s manual; many are available as PDFs online using your model number.
Troubleshooting: When Cleaning Doesn’t Restore Performance
You ran the cycle, but ice production is still slow or the ice is thin. The problem is likely downstream of the ice maker itself.
| Symptom | Likely Cause | Next Step |
|---|---|---|
| No ice after cleaning, motor hums. | Frozen water inlet line. | Check for a kinked or frozen supply line at the back of the refrigerator. You may need a hairdryer to thaw. |
| Ice is small, thin, or hollow. | Low water fill. Could be a clogged inlet screen, faulty water valve, or loose drain cap (from Step 2). | Verify drain cap is tight. Check and clean the small filter screen at the water inlet to the ice maker. |
| Machine makes ice but doesn’t eject it. | Faulty heater or thermostat. | This is a component failure. The cleaning cycle won’t fix it. Time for a service call. |
| Musty odor in ice. | Contamination in ice bin or water filter. | Sanitize bin as above. Replace the refrigerator’s water filter. Stale filters harbor bacteria. |
If you’ve addressed these and issues persist, the scale buildup might be so severe it requires professional disassembly. As one technician noted in a widely-shared video, disassembling a built-in ice maker is complex and risks breaking plastic clips or water lines. For a unit over five years old in a hard-water area, sometimes replacement is more economical than an expensive service visit.
The bottom line: Consistent, scheduled cleaning with the right product is far cheaper than a repair. It’s the one maintenance task that directly determines the lifespan of your ice maker.
Frequently Asked Questions
How often should I clean my freezer ice maker?
Clean it every six months as a baseline. If your “Clean” indicator light comes on sooner, or you see white chalky residue in the ice bin, clean it immediately. In areas with hard water, plan on cleaning every three to four months. GE recommends descaling its countertop nugget ice makers every 4 weeks under hard water conditions.
Can I use vinegar instead of ice machine cleaner?
You can, but you shouldn’t. White vinegar is acetic acid, which is less effective at dissolving scale and can linger in the system, potentially damaging components. More critically, using a non-approved chemical like vinegar can void the manufacturer’s warranty if damage occurs. The cost of a bottle of affresh® is less than the risk.
Is it safe to drink the ice after a cleaning cycle?
Yes, but discard the first full batch. The automated cleaning cycle includes multiple rinse flushes designed to remove all cleaner residue. After the cycle completes, the machine makes ice as normal. Throw away that first bin of ice as a final precaution, then the ice is safe.
Why is there still water in the pan after the clean cycle?
Residual water means the cycle didn’t complete properly or the drain is partially clogged with scale. Ensure the drain cap was secure during the cycle. If water remains, run the clean cycle a second time with fresh cleaner. Persistent standing water indicates a clog that may require manual clearing or professional service.
Do I need to clean the ice maker if I have a water filter?
Yes. A water filter reduces minerals and chlorine taste, but it does not create pure water. Scale will still form, just more slowly. A filter also doesn’t prevent microbial growth in the ice bin. You must still follow the regular cleaning and sanitizing schedule. Replace your water filter every six months as well, a clogged filter reduces water flow to the ice maker.
Before You Go
Cleaning your freezer’s ice maker is about preventing the slow death of a $300 component by mineral buildup, not about sparkle. The process is methodical: get the right cleaner for your brand, commit to the 70-minute automated cycle, and mark your calendar for every six months.Pair that with biannual condenser cleaning and weekly bin sanitizing, and the machine will outlast the refrigerator around it. Ignore the schedule, and you’ll be buying bags of ice long before you planned to.
