
How a Chamber Vacuum Sealer Works: A Complete Visual Guide
This post contains affiliate links. As an Amazon Associate, we earn from qualifying purchases.
A chamber vacuum sealer works by placing a food-filled pouch inside an airtight chamber, closing the lid, and using a pump to remove air from the entire chamber. This equalizes pressure inside and outside the pouch, so liquids stay put while air is evacuated. Once the target vacuum is reached, a heated seal bar inside the chamber welds the pouch shut, creating an airtight seal before air is let back in.
The equal-pressure principle is what separates it from the suction-style sealers most people know. That difference decides what you can seal, how long it lasts, and which machine you should actually buy for a home kitchen versus a deli counter.
What follows: the three-step cycle in detail, the specs that matter (like the 70-second vacuum limit on a VacMaster VP545), the one setup mistake that ruins half of all first seals, and how to tell if your produce is secretly outgassing after you seal it.
Key Takeaways
- Chamber sealers remove air from the entire chamber, not the bag, which prevents liquids from being sucked into the pump.
- The vacuum pump has a hard limit, most commercial models like the VacMaster VP545 max out at 70 seconds of continuous run time to avoid overheating.
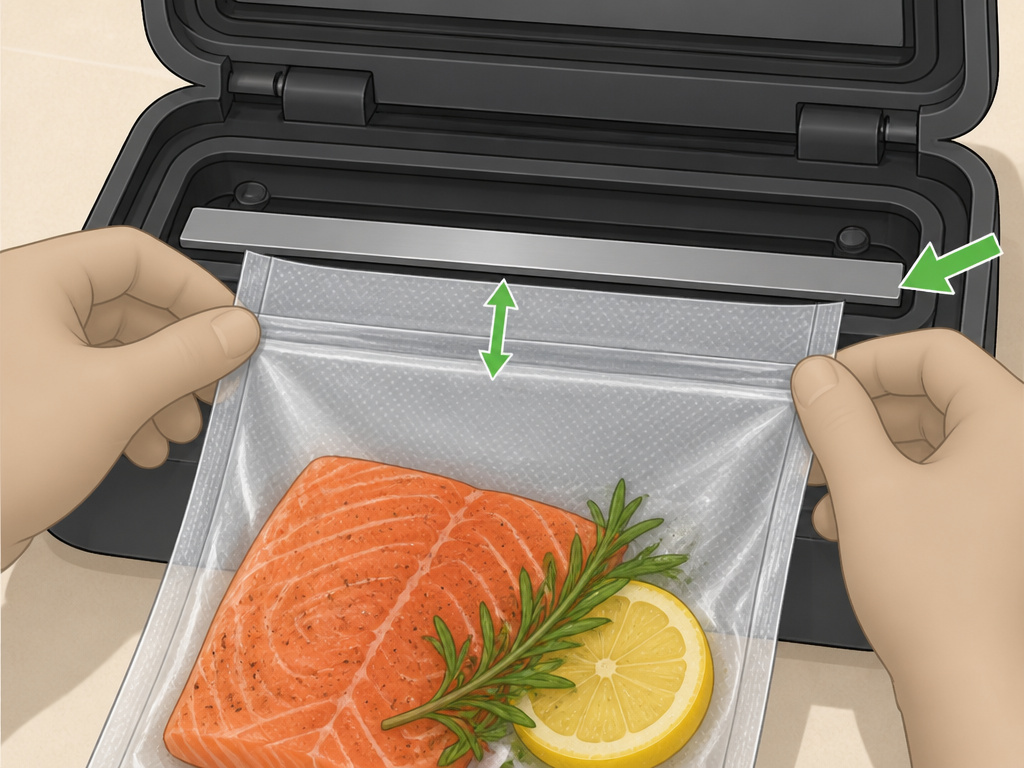
- Pouches need 1–2 inches of empty headspace above the food to lay flat on the seal bar; less than that and the seal wrinkles and fails.
- Blanch vegetables before sealing. Un-blanched produce releases gases (outgassing) that inflate the pouch within days.
- Oil the pump after the first week of use, then every three months or 250 cycles, cloudy or milky oil means change it now.
The Core Mechanism: Equal Pressure, Not Suction
Forget the image of a vacuum cleaner hose. A chamber sealer doesn’t pull air from the bag. It removes air from the room the bag is sitting in.
You load a pouch with its open end laid across a metal heating element, the seal bar, inside a heavy stainless steel box. Close the lid, and a pump starts evacuating air from the chamber. As the chamber pressure drops, the air inside the pouch has nowhere to go but out into the chamber through the open top. The pressure equalizes on both sides of the pouch wall, so there’s no forceful suction pulling the contents toward the opening.
This equal-pressure environment is why you can seal a bowl of soup or a marinating steak without a mess. An edge sealer would suck the liquid straight into its mechanism.
Once the pump hits the preset vacuum level (or after a set time), the machine sends a pulse of electricity through the seal bar. It heats up, melting the inner layers of the plastic pouch together. After a cool-down moment, a valve opens, air rushes back into the chamber, and the now-atmospheric pressure outside crushes the pouch tightly around your food. Open the lid, and you have a perfectly flat, airtight package.
Key Components and Cycle
The cycle hinges on three parts: the chamber, the pump, and the seal bar. Get one wrong, and the seal fails.
- The Chamber: This is the reinforced stainless steel box. Its lid has a thick rubber gasket that compresses to form an airtight seal. The size dictates your maximum pouch dimensions, a VacMaster VP320 chamber fits a 16” x 20” pouch, while a VP220 fits 10” x 13”.
- The Vacuum Pump: This is the heart, usually a rotary oil pump like the 1.5 HP unit in the VP545. It creates the low-pressure environment. The pump has a maximum run time, 70 seconds for the VP545, to prevent motor burnout.
- The Seal Bar: A metal bar inside the chamber, often with one or two heated wires running its length. It’s where the open end of the pouch must sit perfectly flat. Any moisture, crumbs, or wrinkles across this bar cause a weak seal.
The process isn’t just about pushing a button. You have to match the pouch to the chamber, the food to the settings, and the maintenance to the schedule.
What’s the Difference Between a Chamber Sealer and an Edge Sealer?
An edge sealer, or suction sealer, uses a nozzle that goes inside the bag’s opening. A pump sucks air directly out through that nozzle. It’s simpler and cheaper, but it has two hard limits.
First, it struggles with liquids. The suction pulls marinades, soups, or even moist meat juices toward the opening, often stalling the pump or ruining the seal. Second, it can’t achieve the same deep vacuum level. Because air is being pulled through a narrow channel, it leaves more residual oxygen behind.
A chamber sealer has neither problem. Since the entire pouch is under equal pressure, liquids have no directional pull. And because the pump is evacuating a larger volume (the chamber) rather than just the bag, it can pull a harder, more consistent vacuum. This is why commercial kitchens and serious home cooks use chamber vacuum sealers for everything from portioning fresh fish to packaging sous-vide-ready meals.
| Feature | Chamber Vacuum Sealer | Edge/Suction Sealer |
|---|---|---|
| Air Removal Method | Evacuates air from the entire sealed chamber. | Sucks air directly from the bag via a nozzle. |
| Handles Liquids? | Yes, with no special precautions. | No, liquids get sucked into the machine. |
| Vacuum Strength | Very high, consistent. | Moderate, varies with bag fit. |
| Pouch Type | Smooth, single-layer chamber bags. | Textured, multi-layer bags with a channel. |
| Best For | Liquids, marinades, high-volume, long-term freezing. | Dry goods, occasional home use, smaller batches. |
| Cost | Higher initial investment. | Lower upfront cost. |
If you seal more than a few dry items a month, the chamber’s versatility wins. For sealing liquids or anything with moisture, it’s the only tool that works reliably.
The 70-Second Limit and Other Specs That Matter
The numbers on the spec sheet are operating limits.
Take the VacMaster VP545. Its manual states a maximum vacuum ON time of 70 seconds. Run the pump longer, and the oil overheats, the seals degrade, and you risk burning out a $400 motor. Most cycles finish in 20–40 seconds, but that ceiling is there for a reason, it’s the pump’s safety cutoff.
Other specs decide what you can do: * Chamber Size: The VP320 has a 7-inch domed lid height to accommodate taller items. The VP220 chamber accepts pouches up to 10″ W x 13″ L. * Power: The VP545 runs on 110V, 60Hz, drawing 13 Amps. That’s a dedicated kitchen circuit, not a shared outlet. * Weight: At 315 lbs, the VP545 is a floor model you don’t move. The tabletop VP320 is still over 50 lbs. * Certifications: NSF certification means it’s built for commercial food service, the plastics and seals are food-safe and easier to clean.
Common mistake: Setting the vacuum time to “maximum” thinking it will seal better. On a VP545, that can push the pump past its 70-second limit. Set it for what the food needs, not the highest number.
These details determine the difference between a machine that lasts a decade and one that smokes out in year two.
Step-by-Step: How to Use a Chamber Vacuum Sealer Correctly
 The process is simple, but three mistakes account for most seal failures.
- Prep the Pouch and Product. Use a chamber-specific pouch, smooth, not textured. Leave 1–2 inches of empty space at the top. For the VP220, the manual explicitly calls for this headspace so the pouch can lay relaxed across the seal bar. Place the open end fully inside the chamber, ensuring no part hangs out.
- Load and Start. Lay the pouch’s open end flat across the seal bar. Close the lid. The machine will latch automatically on commercial models. Select your vacuum and seal settings. For most foods, the default “Normal” vacuum and a 2.0–2.5 second seal time work.
- Let the Cycle Finish. You’ll hear the pump whirr and see the pouch inflate slightly as air expands, then collapse as the vacuum pulls. Wait for the hiss of air returning to the chamber and the lid unlock. Do not force the lid open early.
What most people get wrong: They overfill the pouch. If the food is pressed against the seal area, the plastic can’t melt together cleanly. You get a wrinkled, weak seal that fails in the freezer. That 1–2 inch headspace isn’t a suggestion.
Troubleshooting Common Problems
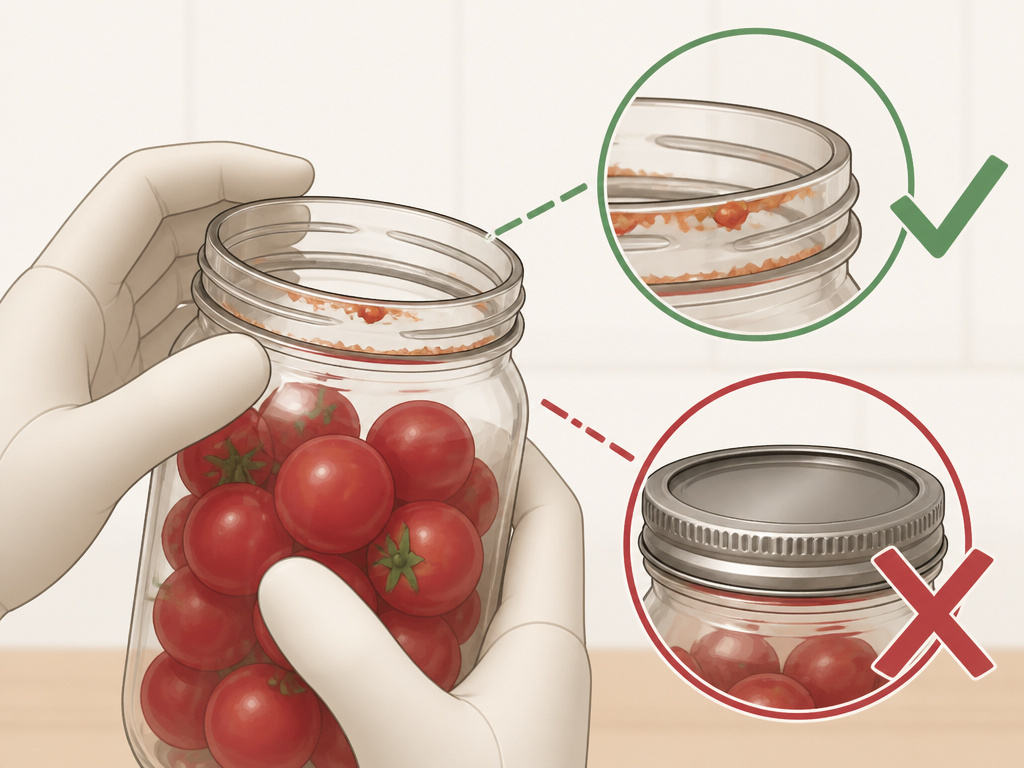 When a seal fails, it’s usually one of four things. The VacMaster VP210 and VP230 troubleshooting guides list them plainly.
| Problem | Most Likely Cause | The Fix |
|---|---|---|
| Won’t turn on / shows ‘F1’ | Lid sensor fault or power issue. | Unplug, ensure lid is fully open, plug back in. Check for a tripped circuit. |
| Weak or no vacuum | Lid gasket dirty, pouch overfilled, or vacuum time too short. | Clean gasket with mild soap. Ensure pouch top is inside chamber. Increase vacuum time by 5-10 seconds. |
| Pouch reinflates after sealing | Food outgassing (unblanched veggies) or a pinhole from a sharp edge. | Blanch vegetables before sealing. Use a VacMaster Bone Guard or paper towel to cover sharp bones. |
| Poor or failed seal | Moisture/debris on seal bar, wrinkled pouch, or seal time too short. | Wipe seal bar and inside of pouch dry. Smooth pouch over bar. Increase seal time by 0.5 seconds. |
Outgassing is the sneaky one. Vegetables and fruits release gases as they age. If you don’t blanch them first to deactivate the enzymes, those gases build up inside the sealed pouch. Within days, it puffs up like a pillow, breaking the vacuum. The fix is always to blanch, boil for 1-3 minutes, then ice-bath, before sealing.
High altitude affects vacuum strength, too. The VP230 manual notes that at elevation, the gauge might not reach the green zone. The solution is to add 5-10 seconds to the vacuum time.
Maintenance Is Non-Negotiable (And What Happens If You Skip It)
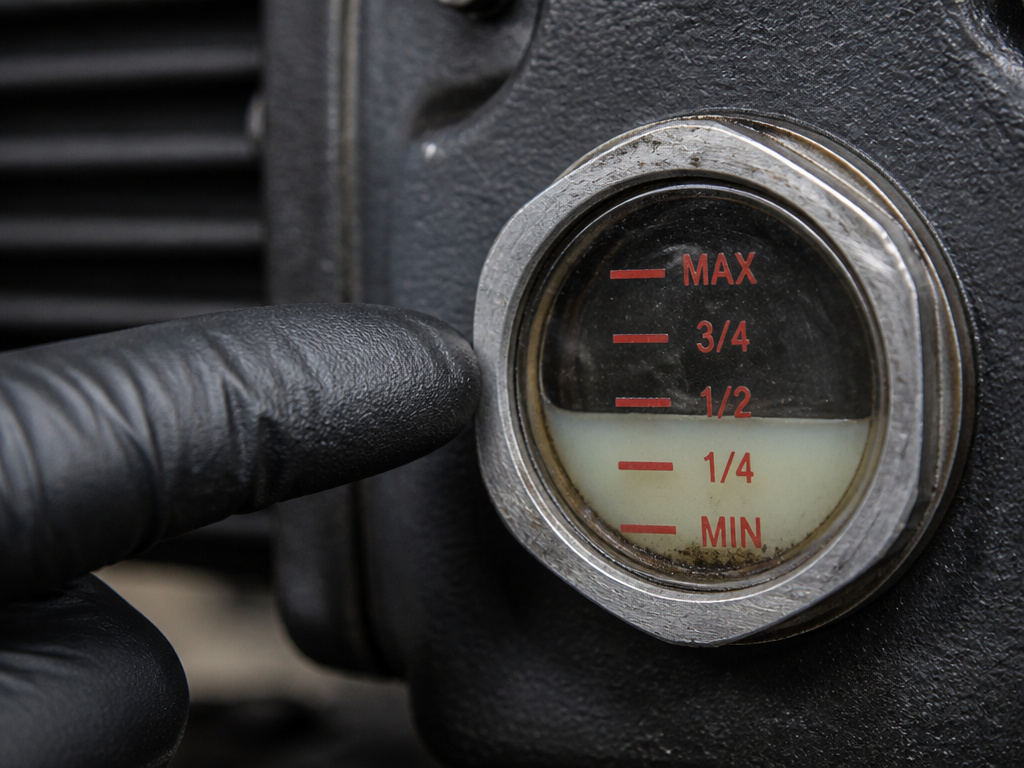 A chamber sealer is a machine with moving parts. The biggest one is the oil pump.
The VacMaster VP545 manual dictates a brutal schedule: first oil change after one week of use. After that, change the oil every three months or 250 cycles, whichever comes first. The VP321 schedule is based on hours: first change at 25 hours, then every 60 hours of operation.
Where this goes sideways: Ignoring the oil. The pump has a sight glass. The oil should stay between the half and three-quarter marks. As it runs, it turns cloudy, then dark, then milky. Milky oil has absorbed moisture and no longer lubricates properly. Run it like that, and the pump seizes. A replacement pump costs more than some entry-level machines.
Other maintenance is simpler but just as critical: * Seal Bar: Clean after every use with a damp cloth. Burnt-on debris creates a cold spot where the seal won’t form. * Chamber & Gasket: Wipe down with mild soap. Never use acetone or abrasive cleaners on the acrylic lid. * Seal Wire & Tape: These are consumables. The manual’s maintenance kit includes replacements for when the wire discolors or the tape adhesive fails.
Treat it like a car engine. Regular oil changes keep it running. Neglect them, and you’re buying a new one.
Frequently Asked Questions
Can you seal liquids in a chamber vacuum sealer?
Yes, that’s one of its main advantages. Because the pressure equalizes inside the chamber, there’s no directional suction to pull soup or marinade out of the pouch. You can seal a bag of stock or a marinating chicken breast directly.
What kind of bags do you need?
You need smooth, chamber-vacuum bags. They lack the textured air channel that edge-sealer bags have. You can use edge-sealer bags in a chamber machine (they’ll work), but you cannot use chamber bags in an edge sealer, the texture is required for the edge sealer’s suction to work.
How long does vacuum-sealed food last?
It varies. In the freezer, vacuum-sealed meat lasts 2-3 years versus 6-9 months with standard wrapping. In the fridge, cooked foods can last 1-2 weeks, and raw meats 4-5 days. Always follow safe food handling guidelines; vacuum sealing slows spoilage but doesn’t stop all bacterial growth.
Is a chamber sealer worth it for home use?
If you process bulk meat, meal prep regularly, cook sous vide, or preserve garden produce, absolutely. The upfront cost is higher, but the bag cost is lower, and the results are more consistent. For someone sealing a few bags of dry goods a year, a quality edge sealer is probably sufficient.
What shouldn’t you vacuum seal?
The VacMaster VP230 manual explicitly warns against sealing soft cheeses, fresh mushrooms, garlic, and onions due to the risk of anaerobic bacteria like botulism. These items can create an oxygen-free environment where dangerous bacteria thrive.
Before You Go
A chamber vacuum sealer is precise engineering. The equal-pressure principle lets it handle liquids that would wreck an edge sealer.The commercial-grade pump pulls a harder vacuum for longer shelf life. But that pump demands care: change the oil after the first week, then every three months.
The real cost is the bags and the time spent blanching vegetables and wiping down the seal bar. Get those right, and a unit like the VacMaster VP320 becomes a ten-year investment.Get them wrong, and you’ll be on the phone with customer support inside a year.
For dry goods and occasional use, a good edge sealer is fine. For everything else, liquids, marinades, bulk meat, sous vide, the chamber is the only tool that does the job cleanly. Just leave that two-inch headspace. Every time.
