
How to Use Chef Preserve Vacuum Sealer: A Complete User Guide
This post contains affiliate links. As an Amazon Associate, we earn from qualifying purchases.
To use a Chef Preserve vacuum sealer, first charge it for a full 24 hours. Place food in a Chef Preserve bag, zip it shut, press the sealer over the valve, and hold the vacuum button until it stops automatically. The unit runs on a rechargeable battery and works with its own line of reusable, resealable bags.
The 24-hour initial charge is non-negotiable. It’s not a suggestion or a best practice — it’s a direct instruction from the manual that conditions the battery for its full lifespan. Skip it, and the battery degrades within months.
What follows is a walkthrough of sealing bags, containers, and jars, the specific foods this system handles well, and the three mistakes that leave you with a bag of air instead of a sealed meal.
Key Takeaways
- The Chef Preserve requires a 24-hour initial charge and a 24-hour top-up every six months to maintain battery health.
- It uses proprietary reusable, resealable bags with a built-in valve; standard vacuum sealer rolls or bags won’t work.
- You can seal containers and Mason jars with the included hose attachment, but you must disassemble the handheld sealer to access the port.
- Never vacuum seal soft cheeses, bread, or pastries without using the manual “seal now” function to prevent crushing.
- For best results with fruits and vegetables, pre-freeze or blanch them first to stop enzymatic activity.
What Makes the Chef Preserve Different
Most vacuum sealers are countertop appliances with cords, sealing strips, and a vacuum channel. The Chef Preserve is a handheld, battery-powered unit that seals through a one-way valve on its own bags. That design shift changes everything about how you use it.
The core mechanism is simple. You put food in a specially designed bag, zip it closed, and press the device’s nozzle over the valve on the bag. The machine sucks the air out through that valve and then heat-seals it shut internally. Because it’s cordless and the size of a large remote, you can seal a bag of trail mix on a camping trip or portion out meal prep directly on the kitchen island without clearing counter space.
The part nobody mentions: That initial 24-hour charge isn’t just for a full battery. It’s to condition the lithium cells for their rated cycle life. Charging it for a standard phone cycle of 2-3 hours might get you a few seals, but the internal battery management system logs it as a partial cycle. Do that ten times, and you’ve shaved months off the battery’s total lifespan before you even notice.
The trade-off is bag dependency. You can’t use a generic vacuum sealer roll or a standard bag. You must use Chef Preserve bags, which have the integrated valve. They are reusable, dishwasher-safe, and often sold in bundles, but forgetting to order more leaves the device useless.
Charging and Setup: The 24-Hour Rule
Plug the USB-C cable into the Chef Preserve and a power source. Leave it alone for a full day. The charging light will stay on, but it doesn’t indicate charge level or turn green when full. After 24 hours, unplug it. The battery is now set.
For long-term health, plug it back in for another 24 hours every six months, even if you haven’t used it. Lithium batteries self-discharge, and a deep discharge below a certain voltage can permanently damage the cell’s ability to hold a charge. The six-month top-up prevents that.
The device has no power button. It wakes up when you press the vacuum button on top. If it doesn’t respond after charging, the battery might be in a protection state; leave it plugged in for another few hours before trying again.
Sealing Chef Preserve Bags Step-by-Step
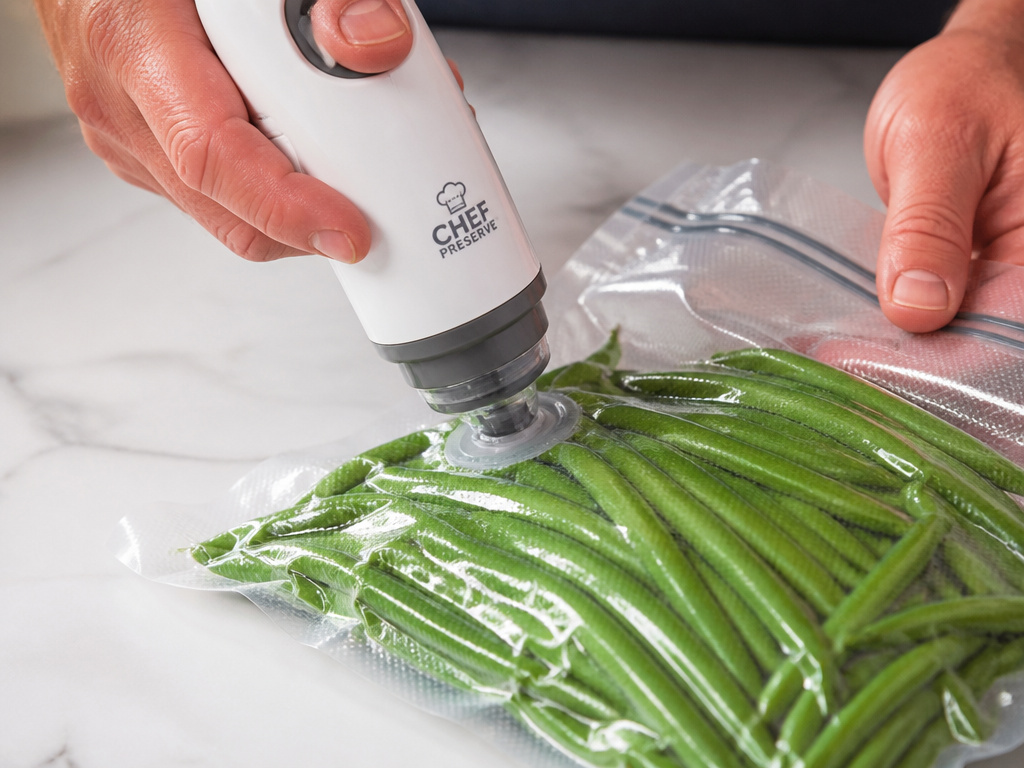
The process is straightforward, but three details decide between a perfect seal and a failed one.
- Prepare the bag. Don’t overfill it. Leave at least two inches of space between the food and the top zipper. For liquids or wet foods like marinades, freeze them first in an ice cube tray, then seal the cubes. The machine cannot extract air from a liquid, and liquid sucked into the valve will damage the internal motor.
- Zip it shut. Run your fingers firmly across the entire zipper track until you feel it catch along its whole length. A gap of even a millimeter will let air back in during the vacuum cycle.
- Seal. Place the Chef Preserve’s nozzle squarely over the circular valve on the bag. Press the vacuum button on top and hold it. The machine will run until the bag is fully compressed, then automatically stop and seal. You’ll hear a faint click and see the bag pull tight.
Let the appliance cool down for 20 seconds after each seal. This is a manufacturer spec for similar handheld units like the FoodSaver VS1185 — the internal heating element needs a moment to reset. Sealing two bags back-to-back can cause a weak second seal that fails in the freezer.
If you’re sealing something delicate like crackers or a soft berry, press the vacuum button and watch the bag. Once the contents start to compress, press the button again to stop the vacuum and trigger the seal immediately. This manual override prevents crushing.
| Bag Type | Best For | Risk If You Skip This |
|---|---|---|
| Small Chef Preserve Bag | Snacks, herbs, small portions of cheese | Overfilling stretches the valve seal, leading to slow air leaks within a week. |
| Medium Chef Preserve Bag | Meal-prep portions, cuts of meat, vegetable packs | Too much surface area means the vacuum can’t pull all the air, leaving pockets that foster freezer burn. |
| Pre-frozen Liquid Cubes | Soups, sauces, stews, marinades | Liquid enters the valve, gums up the pump, and kills the motor. The repair cost exceeds a new unit. |
Using Chef Preserve Containers and Accessories
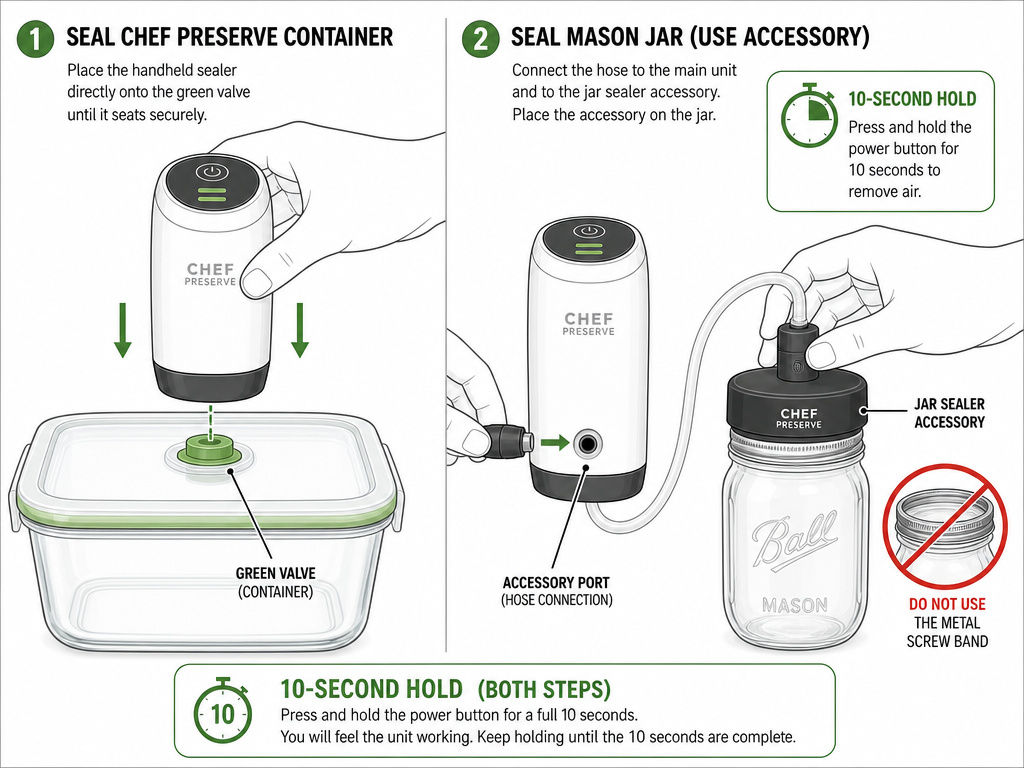
The system includes a hose attachment for sealing containers and jars. The process is different from bag sealing.
For the rectangular Chef Preserve containers, you’ll find a green valve on the lid. Turn the valve to the vacuum position, connect the hose to the main unit’s accessory port, and place the handheld sealer directly onto the valve. Press the vacuum button. The lid’s center will depress with a pop. Hold the button for 10 seconds after that pop — this is critical for a strong seal on rigid containers. Release, disconnect, and turn the valve to the closed position.
To seal a standard Ball or Kerr Mason jar, you need a separate jar sealer accessory. You also must disassemble the handheld Chef Preserve unit. Twist off the clear plastic reservoir at the bottom to reveal a small port. Connect the hose to the main unit, then connect the other end to the jar sealer, which sits on top of the jar lid. Press the vacuum button.
Important: Do not use the metal screw band when vacuum sealing a jar. The vacuum pulls the flat lid down against the jar rim, creating the seal. The band would hold the lid too far away. To open a sealed jar, wedge a spoon under the lid’s edge and twist gently to break the vacuum.
The accessory port is also how you’d connect to other vacuum-sealer accessories, like bottle stoppers for wine or olive oil. The principle is the same: connect, press, hold for a few seconds after the seal engages, then store.
What You Can and Cannot Seal
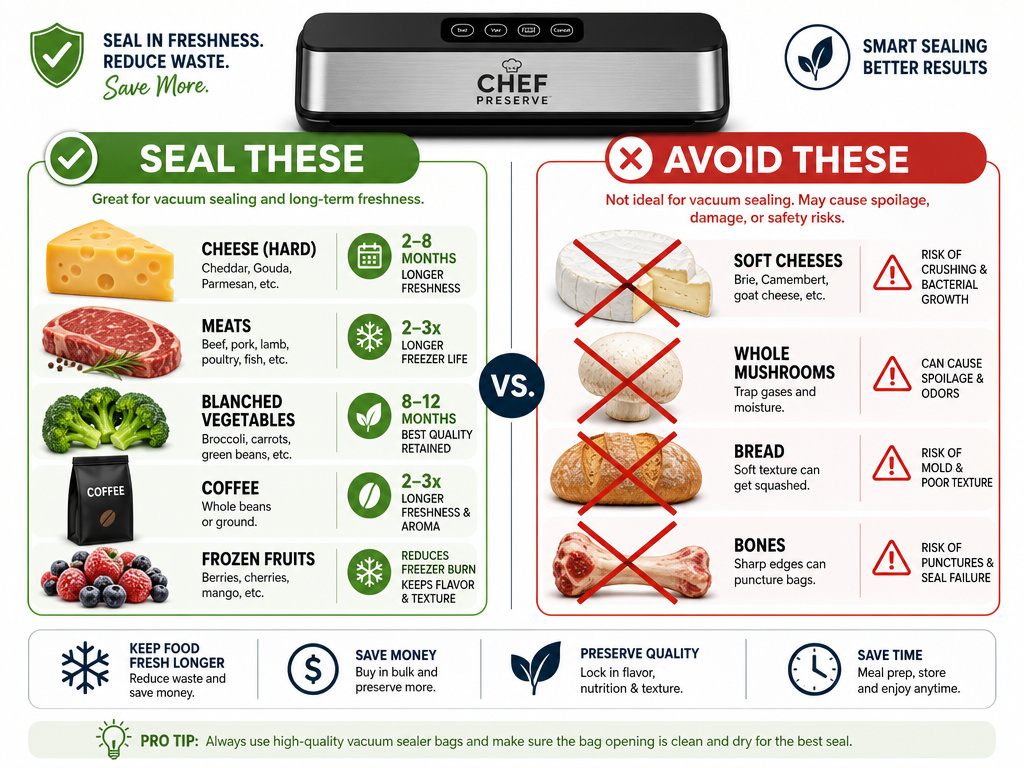
The Chef Preserve handles most dry and solid foods well. Its gentle suction makes it better for delicate items than powerful countertop models.
Seal these confidently:
- Hard cheeses (cheddar, parmesan, gouda). Vacuum package after each use.
- Raw meats and fish. Portion before sealing. For fish, a double-seal (seal, cut, seal again above the cut) prevents juice leaks.
- Blanched vegetables. Drop in boiling water for 1-2 minutes, shock in ice water, pat dry, then seal.
- Dry goods like rice, pasta, flour, coffee, nuts.
- Pre-frozen fruits. Spread berries on a tray, freeze solid, then seal.
Avoid these completely:
- Soft cheeses (brie, camembert, fresh mozzarella). The vacuum pressure crushes them into a paste, and the low-oxygen environment can promote dangerous bacterial growth like botulism.
- Raw mushrooms. They release gases during storage that will break the seal.
- Fresh bread or pastries. Unless you use the manual seal function the instant the bag contracts, they will be crushed.
- Sharp bones or shells. They can puncture the bag from the inside.
Food safety warning: Vacuum packaging is not a substitute for canning. It cannot reverse spoilage or kill bacteria; it only slows down the process by removing oxygen. Always start with fresh, high-quality food, and observe safe storage temperatures. Never vacuum seal raw garlic in oil at room temperature — it creates a low-oxygen environment where botulinum toxin can form.
For best long-term results, especially with produce, refer to a food storage guide that includes blanching times and pre-freezing steps.
Troubleshooting Common Problems
The bag won’t seal.
Check the zipper first. Run your finger over it again. Even a tiny crumb or a grain of rice caught in the track breaks the seal. If the zipper is clean, the valve on the bag might be dirty. Wipe it with a dry cloth. If the machine runs but doesn’t pull a vacuum, the battery is likely depleted. Plug it in for a few hours.
The seal is weak and fails after a day.
You probably didn’t wait the 20 seconds between seals. The heating element needs to cool to reach the correct temperature for a proper bond. Let it sit. Also, ensure the bag material around the valve is completely flat against the sealer nozzle when you press down.
Liquid got into the valve.
Stop immediately. Unplug the device and remove the clear reservoir at the bottom if possible. Let everything air dry completely for at least 48 hours. Do not use heat. The pump motor is likely damaged, but drying it out might save it. Next time, freeze liquids first.
The battery dies too quickly.
This is almost always because the initial 24-hour charge was skipped. The battery never reached its full calibrated capacity. You can try a full 24-hour recharge cycle now, but some capacity loss is permanent. For the next unit, follow the first-charge rule.
Compared to a plug-in Nesco vacuum sealer, the Chef Preserve trades raw power for portability. A Nesco model has a stronger pump for denser packages but needs wall power and counter space.
Maintaining Your Chef Preserve
Maintenance is minimal but specific. Wipe the outside with a damp cloth. Never submerge it. The clear reservoir at the bottom is removable for cleaning—if any liquid or debris gets in, twist it off, rinse it, and let it dry completely before reattaching.
Store the unit with the lid closed to protect the nozzle from dust. If you won’t use it for more than a month, give it a 50% charge before putting it away.
The reusable bags are dishwasher-safe (top rack) or can be washed by hand with warm, soapy water. Make sure they are completely dry before reusing. Check the valve for food debris after each use.
For a deeper clean of the nozzle, use a cotton swab dipped in isopropyl alcohol. Do not use water or soap here.
Chef Preserve vs. Other Vacuum Sealers
If you’re deciding between the Chef Preserve and other types, your choice comes down to volume and portability.
| Sealer Type | Best For | Key Limitation |
|---|---|---|
| Chef Preserve (Handheld) | Small batches, portability, delicate foods, RVs/camping. | Requires proprietary bags; lower suction power. |
| Countertop (e.g., FoodSaver FM2000) | High-volume sealing, bulk meat, meal prep for families. | Large, corded, requires continuous bag rolls. |
| Chamber Vacuum Sealer | Professional kitchens, sealing liquids, maximum shelf life. | Very large, expensive, complex operation. |
| External Pump (e.g., Anova) | Precision control, often used with sous vide. | Usually requires separate bags and a different sealing method. |
The Chef Preserve wins on convenience and size. You can’t beat it for quickly sealing a few leftovers or taking it to a farmer’s market. For sealing dozens of packs of venison or gallon-sized bags of soup, a countertop model like those on a best vacuum sealers list is the better tool. For understanding the heavy-duty alternative, read about how chamber vacuum sealers work.
Frequently Asked Questions
Can you use other bags with the Chef Preserve?
No. The Chef Preserve system relies on bags with a proprietary one-way valve built into the zipper. Standard vacuum sealer bags or rolls lack this valve, so the machine has no way to extract the air. You must use Chef Preserve brand reusable bags.
How long does the battery last on a single charge?
Fully charged Chef Preserve can seal between 30 and 50 bags, depending on bag size and the amount of air removed. After that, it needs a recharge via USB-C. For context, a plug-in Nesco model has unlimited run time but no portability.
Is the Chef Preserve dishwasher safe?
The main body of the sealer is not dishwasher safe. Do not submerge it. The removable clear reservoir at the bottom can be washed by hand. The reusable bags are dishwasher safe (top rack recommended).
Can it prevent freezer burn?
Yes, when used correctly. Vacuum sealing prevents freezer burn by removing the air that contains moisture that sublimates into ice crystals. For the best protection, ensure a tight seal, use appropriately sized vacuum seal bags, and freeze food as flat as possible.
Can you seal Mason jars with it?
Yes, but you need a separate jar sealer accessory. You also must disassemble the handheld unit to access the small accessory port, connect the hose, and follow the steps for how to vacuum seal a Mason jar. Remember not to use the metal screw band during sealing.
Before You Go
The Chef Preserve vacuum sealer is a niche tool that does one thing exceptionally well: quick, convenient, cordless sealing of everyday items. Its success hinges on following the 24-hour charge rule, using the correct bags, and understanding its limits with liquids and soft foods.
For large families or serious food preservation, a dedicated countertop sealer is a more powerful ally. But for cutting down on plastic wrap, saving leftovers, and keeping dry goods fresh, this handheld device is hard to beat. Just keep a box of its bags on hand.
