
How to Make Pantry Shelves That Stay Level & Avoid Sagging
This post contains affiliate links. As an Amazon Associate, we earn from qualifying purchases.
To make pantry shelves that don’t sag, you need three things: a rigid frame (1×2 or 2×2 lumber), a stiff shelf surface (3/4-inch plywood minimum), and support every 36 inches or less. Span a shelf longer than three feet without a middle support, and it will bow under the weight of canned goods within a year.
That gap between “sturdy” and “sagging” is where the whole project lives. The frame carries the load to the wall, the plywood distributes weight across the frame, and the short span keeps deflection under control.
What follows: the exact lumber sizes that match, the one assembly mistake that forces a redo, and how to plan shelf heights around the items you actually store. This is about building a shelf that holds your stuff without bending, not a generic box.
Key Takeaways
- Span dictates thickness. A shelf longer than 36 inches needs 3/4-inch plywood (18mm) or thicker, plus a middle support. Go thinner or longer, and it sags.
- Build the box, then mount it. Assemble the full shelf (frame + plywood top/bottom) before you try to install it between two walls. Trying to slide plywood into a mounted frame is the number one cause of swearing on this project.
- Check door clearance first. Mark your top shelf’s position, then hold a cereal box or tall bottle at that height and swing the pantry door. If it hits, you need to lower the shelf before you drill a single hole.
- Uneven walls are the rule. Your closet corners are likely not perfect 90-degree angles. Cut your shelf frames 1/2-inch narrower than your opening’s narrowest point, or you’ll be trimming them later with the shelf already glued.
- Support heavy loads with a floor frame. For shelves holding more than canned goods, think small appliances or bulk flour, build a simple 2×2 base that sits on the floor and carries the vertical posts. Floating shelves rely entirely on wall studs.
The 3-Step Framework for Sturdy Shelves
Every pantry shelf is a tabletop hung on a wall. The physics are simple: weight pushes down, the shelf wants to bend in the middle, and the wall connection resists. Fail any part of that chain, and the shelf fails.
For a shelf 36 inches wide, 12 inches deep, made of 3/4-inch plywood, and loaded with 50 pounds (about 20 soup cans), the Sagulator, an online deflection calculator, predicts a bow of nearly 1/4 inch. Add a center support, and the bow drops to less than 1/16 inch.
Step 1: Choose the Bones. The frame is the skeleton. 1×2 lumber is the standard (actual size: 3/4-inch x 1 1/2-inch). For heavier loads or if you’re using thicker plywood, step up to 2×2 lumber. The frame’s job is to create a rigid perimeter that screws directly into the wall studs. More frame contact with the wall means more holding power.
Step 2: Choose the Skin. The shelf surface spreads the load. Plywood is the default because its layered construction resists bending better than solid wood of the same thickness. The minimum for a pantry is 3/4-inch (18mm). For shallower shelves (under 10 inches deep) or very short spans, 1/2-inch can work. MDF is a cheaper, smoother alternative for painted shelves, but it sags more than plywood and hates moisture. Don’t use it for a pantry near a sink or in a humid basement.
Step 3: Plan the Support. This is where most DIY shelves fail. Support depends on the distance between the wall brackets, not just the brackets themselves. The maximum span is 36 inches for 3/4-inch plywood.If your pantry is wider, add a vertical support in the middle, creating two bays. – Stud connection: Every long frame member must hit at least two wall studs. A stud finder isn’t a suggestion. – Front edge support: A long shelf with weight on the front edge acts like a lever. A 1×3 board nailed and glued across the front of the frame (called a face cap) adds tremendous stiffness.
Materials & Tools: What You Actually Need
Skip the all-in-one kits. You’ll spend more for less custom fit. Buy these materials separately, and you can build shelves for any space.
Lumber & Sheet Goods
- 1×2 x 8′ boards: For the shelf frames. Pine is fine; poplar is straighter.
- 3/4-inch Sanded Plywood (4×8 sheet): One sheet builds about 16 linear feet of 12-inch-deep shelves. Have the store rip it into 12-inch strips lengthwise.
- 1×3 x 8′ board: For the front face cap. This hides the plywood edge and stiffens the shelf.
- 1/4-inch Plywood (optional): Some builds use it for the shelf bottom to create a “torsion box” for extreme stiffness. For a standard pantry, 3/4-inch top and bottom is simpler and just as strong.
Fasteners & Hardware
- 2 1/2-inch Deck Screws: For securing the frame to wall studs. Coarse thread grips wood best.
- 1 1/4-inch Pocket-Hole Screws: If you’re using a Kreg jig to join the frame. Otherwise, wood glue and 2-inch finish nails work.
- 1 1/4-inch Finish Nails or Brad Nails: For attaching plywood to the frame and the face cap.
- Wood Glue: Essential. The glue bond is stronger than the wood itself.
Tools
- Stud Finder: A basic magnetic one is reliable and never needs batteries.
- 4-foot Level: Crucial for marking and installing.
- Circular Saw or Table Saw: For cutting plywood and lumber to length.
- Drill/Driver
- Pocket-Hole Jig (Kreg): Worth the $40 if you build more than one shelf. It makes strong, hidden joints fast.
- Nail Gun (optional): A brad nailer speeds up assembly, but a hammer works.
Common mistake: Buying only 3/4-inch plywood for the top and skipping the frame. The plywood alone will flex where it screws into the wall, and the screws will slowly tear through. The frame distributes the load across multiple studs.
Step-by-Step Build Guide
Follow this sequence. Out-of-order assembly is the most common reason people end up disassembling their work.
1. Measure and Plan the Layout
Empty the pantry. Now measure the width, depth, and height. Your shelf depth should not exceed 12 inches for a standard closet pantry, any deeper, and items get lost in the back. Write down three numbers: the narrowest width (wall to wall), the shortest depth (back to front), and the usable height (floor to the top of the door casing).
Now, plan shelf heights from the bottom up. Place painter’s tape on the wall to visualize. – Bottom shelf: At least 20 inches from the floor for bulk items or small appliances. – Middle shelves: Space them 12 to 16 inches apart. This fits cereal boxes, cans, and jars. – Top shelf: Keep it within easy reach. If you need a stool, you won’t use it.
Mark the top edge of each shelf frame on the wall. Remember, the frame is 1 1/2 inches tall. Your shelf surface will sit on top of it.
2. Cut and Assemble the Frames
Cut your 1×2 lumber to form a rectangle that is 1/2-inch narrower than your pantry’s narrowest width. If the width is 36 inches, cut the long front and back pieces to 35 1/2 inches. This gap allows for uneven walls.
Assemble the frame with pocket holes and screws, or glue and nails. Drill two pocket holes on each end of the shorter side pieces.
| Frame Piece | Quantity per Shelf | Cut Length |
|---|---|---|
| Front & Back (1×2) | 2 | Pantry Width – 1/2″ |
| Sides (1×2) | 2 | Shelf Depth – 3″ (to account for front cap thickness) |
| Face Cap (1×3) | 1 | Pantry Width (exact) |
Apply glue to the joints, clamp, and drive the screws. Wipe away squeezed-out glue immediately.
3. Attach Plywood and Install
Cut your 3/4-inch plywood to the exact outside dimensions of the frame. Apply a bead of wood glue to the top of the frame, set the plywood on top, and nail it down every 6 inches with 1 1/4-inch brad nails. Flip the assembly over and repeat for the bottom plywood piece. This “plywood sandwich” creates a torsion box.
Now, with the shelf fully assembled, bring it into the pantry. 1. Set the shelf on a temporary support (a scrap 2×4 on the shelf below) at the correct height. 2. Use your level to get it perfectly level side-to-side. 3. Mark through the frame’s back and side pieces onto the wall studs. 4. Predrill holes, then drive 2 1/2-inch deck screws through the frame and into the studs. Aim for at least two screws per frame side that contacts a stud.
Where this goes sideways: Trying to install the frame first, then sliding the plywood in. In a typical pantry, the opening is narrower than the interior. You can’t angle a full sheet of plywood between already-mounted frames. Build the complete shelf unit outside the closet, then install it as one piece.
Attach the 1×3 face cap last. Run a bead of glue along the front edge, set the cap flush with the top, and nail it in place. This covers the plywood edges and ties the whole assembly together.
Design Variations and Solutions
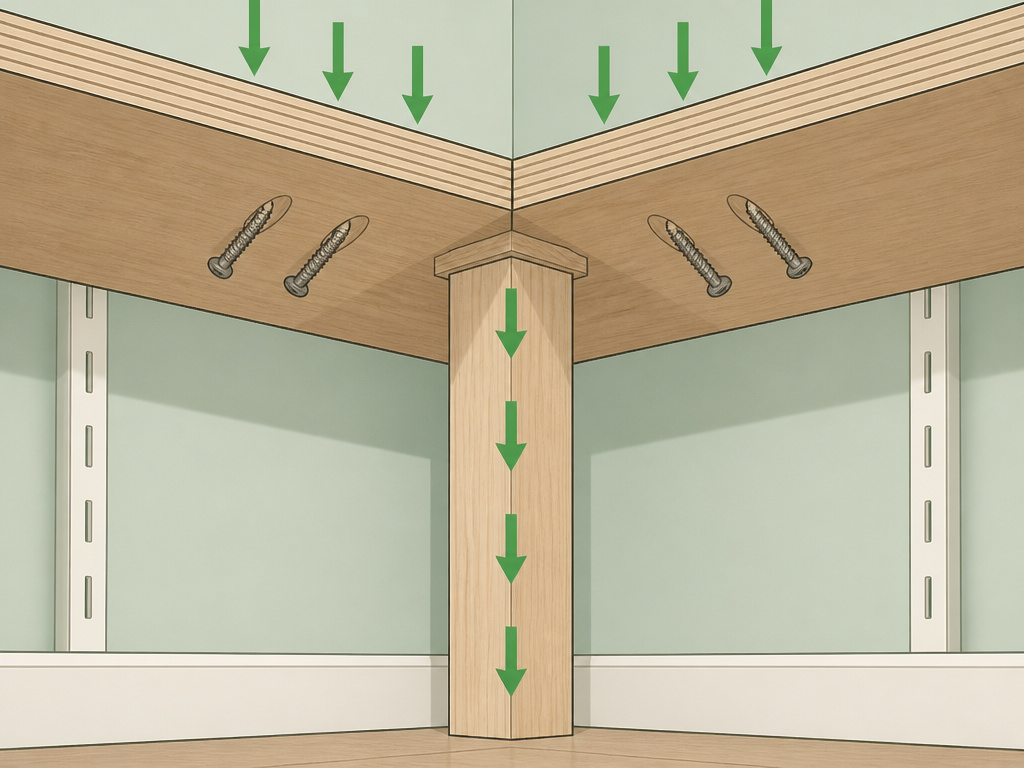
Not every pantry is a simple rectangle. Here’s how to adapt.
For Corner Pantries (L-Shaped Shelves)
The weakest point is the inside corner. Butt-joining two plywood shelves with just screws will wobble. Use a pocket-hole jig to join them from underneath.
- Build two separate shelf frames for each leg of the L.
- Cut the plywood tops as one continuous L-shaped piece if possible, or as two pieces that meet in the corner.
- Join the plywood pieces from underneath with pocket holes and screws, reinforced with glue. Then attach the combined plywood “L” to both frames.
- Add a vertical support post in the corner, running from the floor to the underside of the shelf, to prevent sagging at the joint.
For Heavy Loads or Wide Spans
When your shelves will hold more than canned goods, think grain mills, stand mixers, or a dozen jars of pickles, the standard 1×2 frame on studs might not be enough.
Add a Mid-Span Support: Install a vertical 1×2 or 2×2 between the shelf and the one below (or to the floor). Screw it into both shelf frames.
Build a Floor-Based Frame: Construct a simple box from 2x2s that sits on the floor. Attach vertical 1x2s to this box, then attach your shelves to those verticals. This transfers the weight directly to the floor, not the wall studs. It’s the best approach for a pantry over six feet wide packed with heavy items.
Choosing Between Fixed and Adjustable
Fixed shelves are stronger, cheaper, and look built-in. You commit to the layout.
Adjustable shelves offer flexibility. The trade-off is strength and cost. You need metal standards and brackets, which concentrate weight on small mounting points. For lightweight dry goods, they’re fine. For a pantry full of cans, fixed shelves win.
| Shelf Type | Best For | Strength Limitation |
|---|---|---|
| Fixed (Framed Plywood) | Heavy loads, canned goods, wide spans | Permanent layout |
| Adjustable (Standards & Brackets) | Lightweight items, frequently changed storage | Bracket weight rating (check specs); span between brackets |
Frequently Asked Questions
How deep should pantry shelves be?
Keep pantry shelves between 11 and 12 inches deep. This allows most boxes and cans to sit with their labels visible, and it prevents items from getting lost at the back. A deeper shelf becomes harder to organize and wastes space.
Can I use MDF instead of plywood?
You can, but know the trade-off. MDF paints to a smoother finish and is cheaper, but it sags more than plywood and is ruined by moisture. If you have a very dry pantry and your shelves are less than 30 inches wide with only lightweight items, MDF is an option. For a main kitchen pantry, plywood is the safer, stronger choice.
How do I deal with uneven walls?
Assume your walls are uneven. Cut your shelf frames 1/2-inch to 3/4-inch narrower than the smallest width you measured. During installation, you’ll likely have a gap on one side. This is normal. You can fill the gap with a trim piece later, or simply leave it, it will be hidden by the items on the shelf.
What’s the cheapest way to build pantry shelves?
The most cost-effective method is using “cleats”, 1×2 boards screwed directly into the wall studs, with 3/4-inch plywood shelves resting on top. You lose the enclosed, finished look of a framed shelf, but you gain simplicity and low cost. This is a great solution for a basement or garage pantry.
How much weight can DIY plywood shelves hold?
Well-built shelf with a 1×2 frame, 3/4-inch plywood, and support every 32 inches can safely hold 50-75 pounds per linear foot. That’s 2-3 dozen cans per foot. The failure point is usually the wall connection, not the shelf itself. Always screw into studs, not just drywall.
The Bottom Line
Building pantry shelves is about respecting three numbers: the 36-inch span limit, the 3/4-inch plywood minimum, and the distance between two studs, not about woodworking mastery. Get those right, and your shelves will hold whatever you stack on them.
The one extra step that pays off every time: dry-fit the top shelf with a tall item in hand before you drill. That moment of checking door clearance saves an hour of frustrated disassembly. Your pantry is a tool, not a showroom. Build it like one.
