
How to Clean Refrigerator Shelves: The Tempered Glass Safety Rule
This post contains affiliate links. As an Amazon Associate, we earn from qualifying purchases.
To clean refrigerator shelves, remove them, let tempered glass warm to room temperature, and soak all removable parts in a solution of warm water, dish soap, and vinegar for 20-30 minutes. Scrub, rinse, and dry everything thoroughly before reassembling. The single most important rule is never to wash cold glass with warm water; the thermal shock will shatter it into small, pebble-sized pieces.
That rule about thermal shock isn’t just a suggestion. It’s printed in the service manuals for GE, LG, and Electrolux refrigerators because tempered glass, while strong, has a specific failure point. A temperature difference of more than a few dozen degrees between the shelf and the water hitting it creates internal stress the glass cannot handle. The manuals say it shatters into many small pieces for safety, but you still get a bathtub or sink full of broken glass and a missing shelf.
What follows is a breakdown of that process, the exact cleaning ratios manufacturers provide, and the mistakes that turn a simple chore into a repair bill. You’ll also learn how to handle the fiddly plastic clips that hold safety glass in place and why cleaning the freezer at the same time isn’t optional for a truly fresh fridge.
Key Takeaways
- Let tempered glass shelves sit at room temperature for at least an hour before cleaning. Washing cold glass with warm water causes thermal shock and instant breakage.
- Never put glass refrigerator shelves or plastic parts in the dishwasher. The high heat and harsh detergents can warp plastic and stress glass.
- Clean both the refrigerator and freezer sections during a deep clean. Air circulates between them, so odors transfer freely from one to the other.
- Use a baking soda solution (1 tablespoon per liter of water) for general cleaning and odor neutralization, as recommended by GE.
- Take a photo of your fridge’s interior before removing shelves and bins. It saves frustration during reassembly, especially with adjustable clips and tracks.
Why “Just Soap and Water” Isn’t Enough for Fridge Shelves
Most guides tell you to use mild soap and warm water. That’s fine for a quick wipe-down of a spill. For the grime that builds up over months—dried juice rings, sticky syrup, the mysterious residue from a leaking package—soap alone just smears it. You need a solution that cuts through grease and neutralizes odors at the molecular level.
Acids like vinegar break down organic residues. Baking soda is a mild abrasive and a natural deodorizer. Dish soap emulsifies fats. Combining them works because each agent tackles a different component of the mess. The GE manual explicitly recommends a solution of 1 tablespoon (15 ml) of baking soda to 1 quart (1 liter) of water for cleaning and odor control. That’s a sourced, manufacturer-approved ratio, not a guess.
Where this goes sideways: Using straight bleach or ammonia-based cleaners inside the fridge. These can leave harsh fumes that absorb into plastic and porous glass, tainting food flavors for days. They’re also unnecessary for bacteria—the vinegar and baking soda combo is plenty effective for the cold, dry environment of a refrigerator.
The other non-negotiable is cleaning the entire cavity, not just the shelves you pulled out. Spills run down walls and pool under crisper drawers. If you only wash what you removed, you’re leaving a feast for microbes on the surfaces that touch your food.
The Tools and Solutions You Actually Need (Not a Shopping List)
You don’t need specialty products. You need the right application of basic ones.
- Cleaning Agents: White vinegar, baking soda, and a plain dish soap like Dawn or Seventh Generation. Avoid “antibacterial” soaps for this job; they often leave a filmy residue.
- Containers: A bathtub, a large plastic storage bin, or a clean sink for soaking. The bathtub method from the YouTube transcript is polarizing but effective—it contains splash and lets you subjugate multiple large pieces.
- Scrubbing Tools: A non-scratch scrub sponge (like a Scrub Daddy) for general cleaning. An old toothbrush or a detailing brush for the grooves in shelf tracks and around door gaskets.
- Drying Tools: A stack of clean, absorbent microfiber towels. Drying is the most critical step after cleaning; moisture left in tracks or on glass promotes mold.
- A phone or camera. That pre-disassembly photo is a lifesaver.
For the exterior, especially stainless steel, skip the vinegar. It can react with the alloy and leave streaks or dull the finish. A dedicated stainless steel cleaner or a dab of mineral oil on a cloth works better.
The Step-by-Step Deep Clean (And What Breaks Glass)
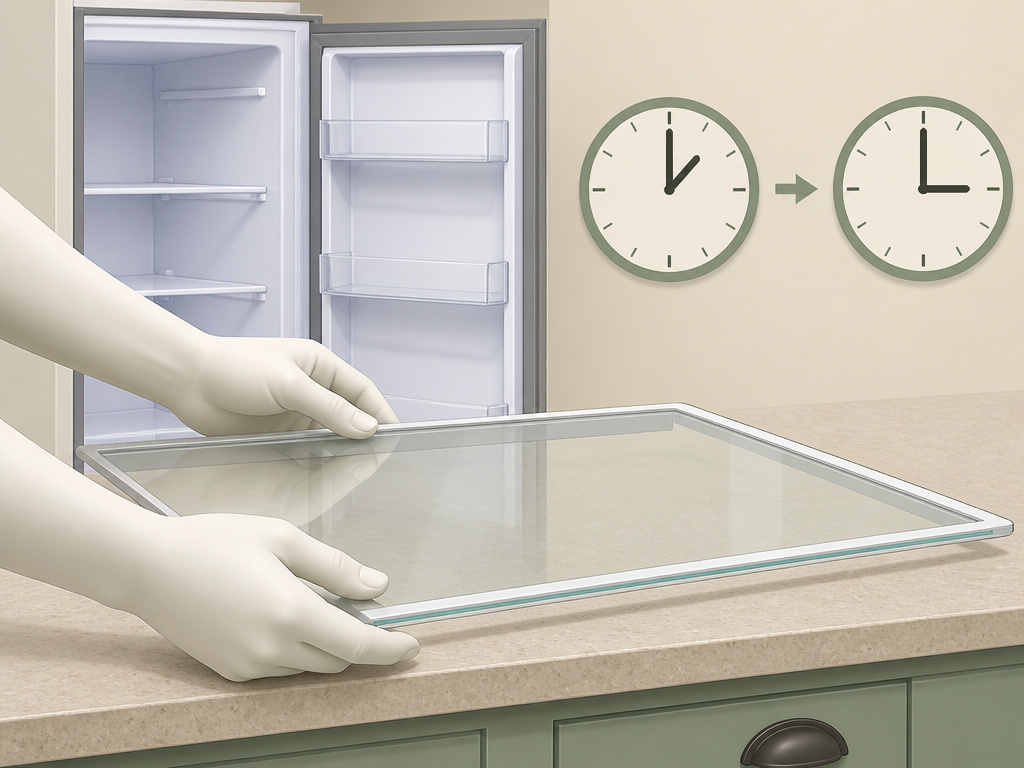
This is the main sequence. Rushing or skipping steps here is how shelves break and odors return within a week.
- Plan and Empty. Do this before a grocery trip when the fridge is least full. Transfer perishables to a cooler with ice packs. As you remove items, check expiration dates and discard anything questionable.
- Photograph the Interior. Snap a clear picture of every shelf, bin, and drawer in place. Pay attention to the orientation of shelf supports and the layout of adjustable door bins.
- Remove All Removable Parts. Take out every shelf, drawer, bin, and divider. Place them on a towel-covered floor or directly into your soaking tub.
- Let the Glass Acclimate. This is the mandatory pause. Leave any glass shelves, covers, or drawers on the counter for at least one hour, preferably two. They must lose their deep chill and reach room temperature. The Electrolux manual states this explicitly: “allow glass shelves to stabilize to room temperature before cleaning.”
- Prepare the Soak. Fill your tub or bin with warm (not hot) water. Add a few teaspoons of dish soap and one to two cups of white vinegar. Submerge all plastic and metal parts immediately. Let the glass join once it’s warmed up.
- Soak for 20-30 Minutes. Let the solution work. For baked-on grime, extend the soak to an hour. The vinegar loosens mineral deposits and kills odor-causing bacteria while the soap tackles grease.
- Clean the Interior Cavity. While parts soak, tackle the empty fridge. Use your baking soda solution or a vinegar/water/soap mix in a spray bottle. Spray all interior walls, the ceiling, the door liners, and the grooves of the door gaskets.
- Focus on shelf tracks and corners, where spills hide. Use your detailing brush here.
- Wipe with a damp microfiber towel, then follow with a dry one to remove all moisture.
- Scrub and Rinse Removed Parts. Pull each piece from the soak and scrub with your non-scratch sponge. Pay special attention to the edges of glass shelves and the bottoms of crisper drawers. Rinse each piece under clean running water.
- Dry Thoroughly. This is not a pat-dry situation. Use dry microfiber towels to wipe away every bead of water, especially from the channels and clips where glass sits. Any remaining water will promote mildew or freeze in the freezer.
- Reassemble Using Your Photo. Refer to your picture to place each shelf, drawer, and bin back in its correct slot and orientation. Ensure all shelf supports are fully seated and drawers glide smoothly.
Common mistake: Putting a slightly damp shelf back into a cold fridge. Condensation will freeze it in place or, worse, create an ice bridge between the glass and the plastic support that cracks the shelf when you next try to remove it. Wait an extra ten minutes. Dry it again.
How to Remove Safety Glass from Clip Tracks
Some shelves have a second pane of glass underneath a plastic grate for safety. The YouTube transcript shows the method: flip the shelf upside down, find the plastic clips at the front and back, wiggle and pull the front clip forward to release the glass, then use your thumbs to gently push the pane out from the back. Clean the inner track with your brush before sliding the glass back in and re-clipping.
| Step | The Right Way | What Happens If You Skip It |
|---|---|---|
| Glass Acclimation | Let sit at room temp 1–2 hours. | Thermal shock from warm water shatters the tempered glass. |
| Soaking | Soak in vinegar/soap solution 20+ min. | Grease and dried residues require heavy scrubbing, risking scratches. |
| Drying | Dry completely with microfiber towels. | Moisture causes mildew spots or freezes shelves/drawers in place. |
| Freezer Cleaning | Clean freezer interior during same session. | Odors from the freezer circulate back into the fridge via airflow. |
The Critical “Don’ts” Straight from Manufacturer Manuals
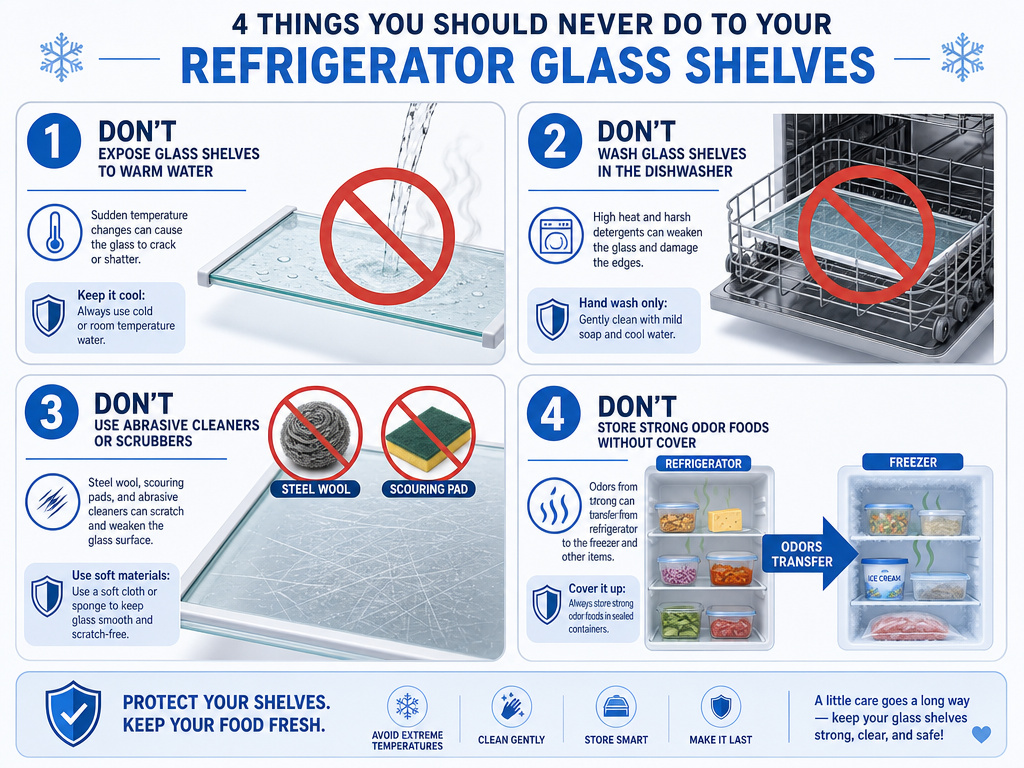
The research pulled direct warnings from OEM service guides. These aren’t tips; they are liability warnings for a reason.
- Don’t wash cold glass with warm water. This is the unanimous warning from GE, LG, and Electrolux. The GE manual states: “Do not clean glass shelves or covers with warm water when they are cold. Glass shelves and covers may break if exposed to sudden temperature changes or impact.”
- Don’t put shelves or plastic parts in the dishwasher. The Electrolux manual explicitly says “Do not wash in dishwasher” for glass. The GE manual extends this to plastic parts. Dishwasher heat can warp plastic supports and stress-tempered glass.
- Don’t use harsh abrasives or steel wool. They will scratch plastic and the delicate surface of tempered glass, creating weak points. A scratched or nicked shelf is more likely to break from minor impact, as noted by Electrolux.
- Don’t ignore the freezer. The KitchenAid manual explains that air circulates between the freezer and refrigerator sections. Odors transfer. A deep clean is only complete if both sides are addressed.
These rules exist because people have broken things in these exact ways. Following them is cheaper than ordering a replacement shelf from an appliance parts website.
How Often Should You Do This? (It’s Less Than You Think)
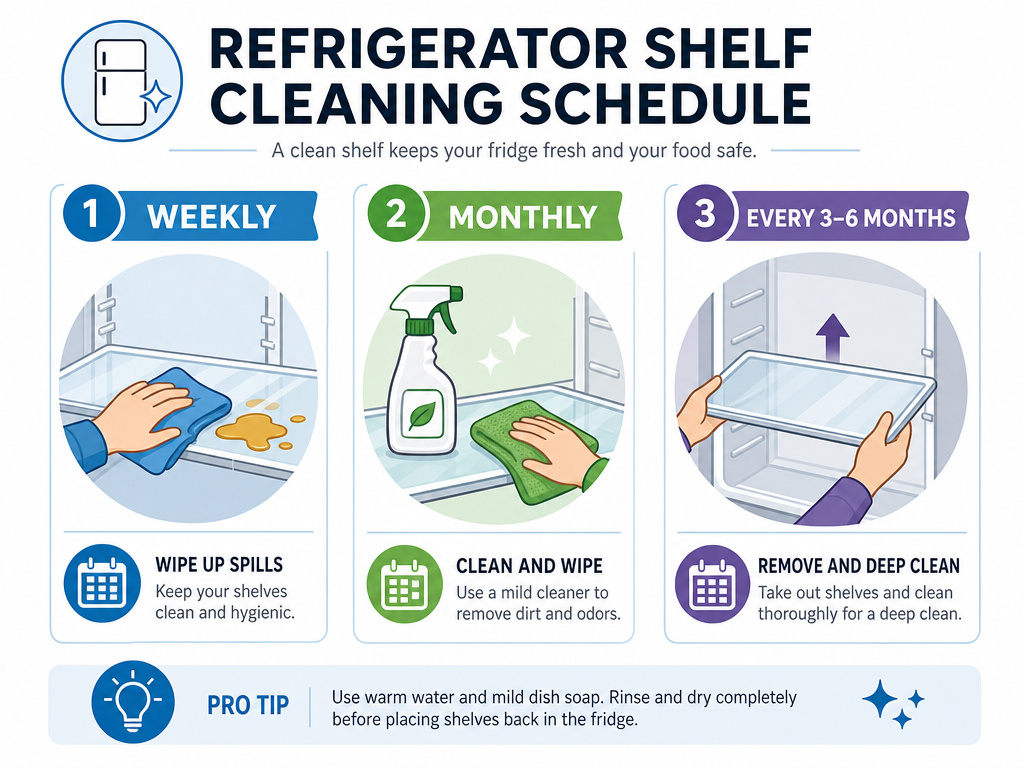
You don’t need to deep-clean monthly. A quick wipe of spills as they happen does most of the work. For the full removal-and-soak procedure, the manuals suggest a rhythm.
The LG manual recommends cleaning both compartments about once a month to prevent odors. That seems aggressive for most households. The Electrolux manual advises cleaning the fresh food and freezer compartments at least twice a year.
A practical schedule: * Weekly: Wipe up visible spills immediately. * Monthly: Do a quick interior wipe-down with your baking soda solution, focusing on shelves that look dirty. * Every 3-6 Months (Seasonally): Perform the full deep clean outlined above. This is the sweet spot for preventing stubborn grime and odors without making the task a chore.
Your nose is a good guide. If you open the fridge and smell “something,” it’s time. If you can’t identify the source after checking for spoiled food, a deep clean is overdue.
Making the Next Clean Easier: Proactive Habits
The goal is to extend the time between deep cleans. A few habits make the next one far less work.
First, contain spills before they spread. Shelf liners are a game-changer. A flexible, waterproof liner catches drips from leaky containers. When a spill happens, you just pull out the liner and wash it, leaving the shelf beneath untouched. It also protects glass from scratches caused by sliding pots and jars.
Second, organize to minimize mess. Use clear storage baskets on shelves to group similar items. A can organizer keeps soda or beans from tipping over. In the refrigerator drawers, use dividers to separate produce and prevent a single rotting strawberry from sliming an entire bin. Organized food is easier to inspect and less likely to create hidden, forgotten spills.
Third, monitor your fridge’s health. An accurate refrigerator thermometer tells you if your appliance is running warm, which can accelerate spoilage and bacterial growth. Knowing your fridge holds a steady 37°F (3°C) gives you confidence in your raw meat storage on the bottom shelf and your raw fish storage plans.
Finally, maintain the appliance itself. Check the door seal periodically for cracks or food debris that prevent a tight close. A good seal keeps the cold in and efficiency up. If you have a garage refrigerator, be aware that ambient temperature swings force it to work harder, potentially causing more condensation and frost inside—it may need cleaning more often.
Bottom line: Clean shelves start with letting glass warm up and using a baking soda or vinegar soak. They stay clean longer with shelf liners and organized bins. The difference between a 30-minute refresh and a 3-hour nightmare is following the manufacturer’s rules on temperature and abrasives.
Frequently Asked Questions
Can you use bleach to clean refrigerator shelves?
You can, but you shouldn’t. Bleach fumes can linger and permeate plastic, affecting food taste. It’s also overkill for the cold fridge environment where most pathogens don’t thrive. A vinegar or baking soda solution is effective and food-safe. If you must disinfect, use a diluted bleach solution (1 tbsp bleach per gallon of water), rinse thoroughly with clean water, and air out the fridge completely before restocking.
Why did my glass refrigerator shelf crack after I cleaned it?
The most likely cause is thermal shock. You washed a cold shelf with water that was too warm, creating a temperature differential that the tempered glass couldn’t withstand. Other causes include a pre-existing nick or scratch (which Electrolux manuals warn about), an impact during handling, or placing the shelf on an uneven surface while it was still hot from dishwasher cleaning (which you should never do).
Is it safe to put refrigerator shelves in the dishwasher?
No. Manufacturer manuals from Electrolux and GE explicitly advise against it. The high heat and harsh detergents in a dishwasher can weaken the tempered glass over time and warp plastic frames and clips. Hand washing with warm, soapy water is the only recommended method.
How do you get rid of a persistent fridge smell after cleaning?
If a deep clean doesn’t remove the odor, the smell is likely in the plastic itself or circulating in the air system. Leave an open box of baking soda on a shelf (replace monthly). Wipe down all plastic surfaces with a straight vinegar solution, then rinse. Check and clean the drip pan under the fridge if accessible. Ensure your refrigerator door seals tightly; a bad door gasket can let in warm, smelly air.
What’s the best way to dry refrigerator shelves quickly?
The fastest method is to use multiple absorbent, clean microfiber towels. Wipe off all standing water, then use a dry towel to buff the surface completely, especially grooves and clip holes. For plastic parts, you can leave them in a dish rack in a warm, dry room with good air circulation for an hour. Never use a hair dryer or place shelves near a heater, as concentrated heat can also damage materials.
Before You Go
Cleaning refrigerator shelves is straightforward if you respect the physics of tempered glass and the chemistry of cleaning solutions. Let glass warm up, soak parts in a vinegar mix, dry everything bone-dry, and put it all back. The manuals from GE, KitchenAid, and others aren’t just paperwork—they are a compiled list of previous owners’ mistakes. Use them.
The real secret isn’t a better cleaner. It’s the habit of using protective shelf liners and organizing bins to prevent big messes in the first place. That, and knowing that a cold shelf and warm water are a combination that always ends the same way: with a sweep-up and a search for a replacement part.
