
How to Organize Your Kitchen Pantry: A Step-by-Step Guide
This post contains affiliate links. As an Amazon Associate, we earn from qualifying purchases.
To organize a kitchen pantry, you need a system built on three rules: declutter everything first, categorize by how you cook, and contain items in clear, labeled bins. This method cuts food waste by making inventory visible and forces you to use older stock first.
The difference between a functional pantry and a cluttered cabinet comes down to visibility. If you can’t see the half-used bag of rice behind the cereal, you’ll buy another. That duplicate purchase is the start of the waste cycle, money spent, food forgotten, space lost.
What follows is a battle-tested method, not just a tidy-up. We’ll walk through the purge, the zone strategy that matches your actual cooking habits, and the specific containers that solve deep-shelf blindness. You’ll also get the university-backed numbers on why temperature matters more than you think, and the one habit that stops insect infestations before they start.
Key Takeaways
- Empty the entire pantry first. Wipe shelves and check every expiration date, this single step reveals what you actually own.
- Create zones based on meal categories (e.g., breakfast, dinner staples, snacks), not generic types (“cans”). This mirrors how you cook.
- Use clear, airtight containers for all dry goods. They block pests, extend shelf life, and make restocking obvious.
- Implement a “First In, First Out” (FIFO) system. When adding new pasta to a jar, put the old pasta on top so it gets used next.
- Control temperature and humidity. Store potatoes, onions, and squash in a cool, dark place, not under the sink or near the oven.
The Real Goal: A Pantry That Cooks With You
Most pantries are organized against their owners. Items are sorted by shape or size, all the cans together, all the boxes stacked high. That looks orderly in a photo, but it falls apart on a Tuesday when you’re trying to get dinner started. You need tomato paste, but it’s behind three cans of beans you won’t use this week. The goal is a space that works at the speed of a hungry family, not a picture-perfect shelf.
A well-organized pantry is defined by its thoughtfully planned details. The door opening, for example, is essential… Lighting is another key factor. Even a pantry with a window benefits from well-placed artificial light to illuminate every corner.
The physical layout dictates your success. Deep shelves, common in standard 60-centimeter cabinets, hide items in the back. Poor lighting lets things fade into shadow. Before you buy a single container, you must solve these two issues. For deep shelves, the answer is pull-out baskets or Lazy Susans, they bring the back to the front with a spin. For lighting, a simple battery-operated LED strip under the shelf above makes every label readable.
This process is about removing the friction between you and a home-cooked meal, not about being a perfectionist. When every ingredient has a clear home, you stop wondering if you have cumin and start cooking with it.
The 3-Step Pantry Reset (Declutter, Categorize, Contain)
This process takes an afternoon, but it pays off for years. Do it right before a grocery trip, when supplies are lowest.
Step 1: The Total Empty and Purge
Pull every single item out onto a counter or table. This is non-negotiable. As you empty, sort into three piles: Keep, Toss (expired or stale), and Donate (unopened items you won’t use).
Check dates ruthlessly. The Texas A&M food storage PDF provides a detailed timetable: white flour lasts 6–8 months, brown rice only 1 year. If your flour bag is older, it’s likely rancid. While everything is out, vacuum the shelves and wipe them down with a damp cloth. You’re starting fresh.
Step 2: Categorize Into Actionable Zones
Now, sort the “Keep” pile into categories based on how you cook, not just what things are. Common zones are: * Breakfast: Oatmeal, cereal, coffee, tea, pancake mix. * Dinner Staples: Pasta, rice, canned tomatoes, beans, broth. * Baking Central: Flours, sugars, chocolate chips, baking powder. * Snack Station: Crackers, nuts, granola bars. * Quick-Meal Supplies: Instant noodles, sauce packets, canned soup.
This zone strategy is the core of a functional pantry organization system. It turns abstract order into a practical map.
Step 3: Select and Fill Your Containers
With your zones defined, you can choose the right storage solutions. For dry goods like flour, pasta, and rice, airtight containers are essential. They keep out moisture and pests. For cans, a tiered can organizer lets you see every label. Use clear bins to group small items within a zone, like all your baking extracts and food coloring.
When filling containers, follow the FIFO rule. Pour the new rice into the bottom of your jar, then put the older rice from your pantry on top. The oldest stock gets used next. This simple habit is the single biggest weapon against waste.
Beating the Pantry’s Worst Enemies: Heat, Humidity, and Pests
A beautiful system can be undone by its environment. Pantry storage isn’t just about placement; it’s about preservation.
The Clemson University pantry storage guide states that high temperature or humidity “can considerably reduce food storage time.” Your pantry should be away from heat sources like ovens, dishwashers, or hot water pipes. The ideal temperature is between 50°F and 70°F.
Some foods have specific needs that break the standard rules: | Food Item | Ideal Storage Temp | Pantry Life (Ideal) | Pantry Life (Room Temp) | Why It Matters | |—————|————————|————————-|—————————–|——————–| | Potatoes | 45–50 °F | 1–3 months | 1 week | Sprout & turn green | | Onions | Cool, dry, dark | 1–3 months | 1–2 months | Become soft & moldy | | Hard-Rind Squash | 60 °F | 1–3 months | 1 week | Rot & dehydrate | | Sweet Potatoes | 60 °F | 1–3 months | 1 week | Sprout & shrivel |
Common mistake: Storing potatoes or onions under the sink. That area is often warmer and more humid from pipe heat, cutting their shelf life by weeks. Find a cooler, darker cabinet elsewhere.
Insect infestation is another silent threat. It targets cereals, flour, spices, and pet food. The best defense is a good seal. Transferring these items into airtight food storage containers serves as a barrier, not just for looks. For extra protection in humid climates, add a bay leaf or a cotton ball with a drop of clove oil to your grain containers.The scent repels moths and weevils.
Advanced Systems for Lasting Order
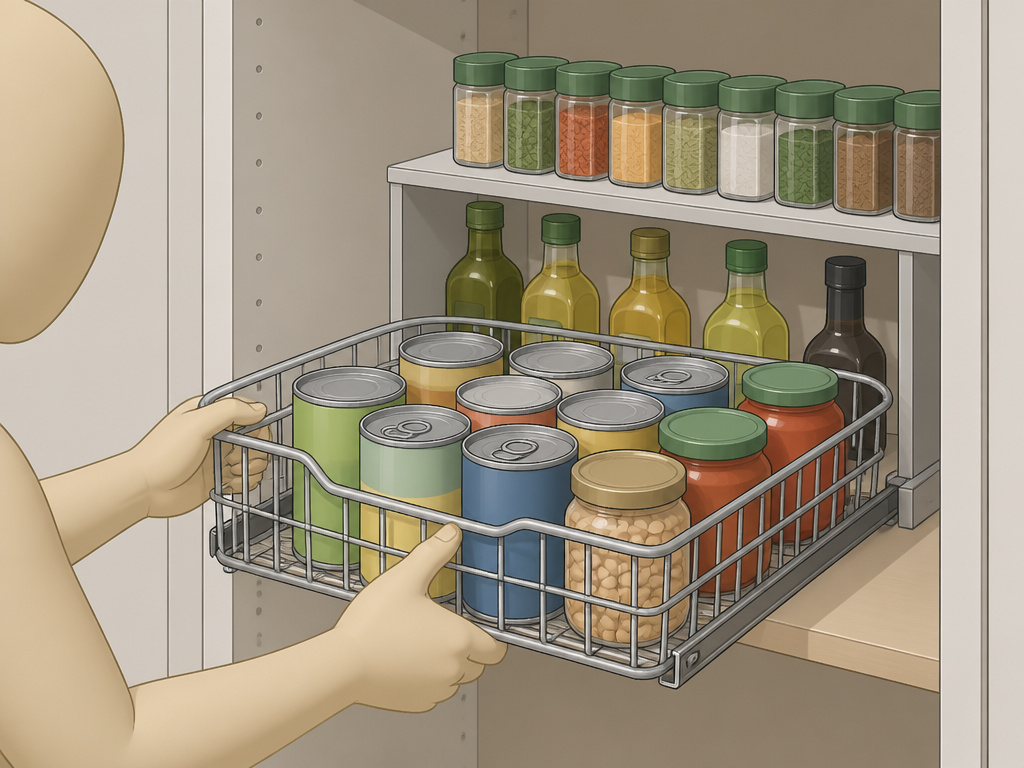
Once the basics are in place, these upgrades solve specific, frustrating problems.
Conquering Deep and Awkward Spaces
Deep shelves are a blessing and a curse. They hold a lot but turn into a black hole. The fix is to create layers. Use shelf risers to double your vertical space within a single shelf, store spices on top, oils below. For the back of deep shelves, pull-out wire baskets or Lazy Susans are game-changers. They give you full access without the archaeologist’s dig.
If you’re working with a small pantry, every inch counts. Don’t forget vertical space. An over-the-door pantry organizer with clear pockets can hold spice packets, tea bags, or wraps. For a pantry with deep shelves, consider installing slide-out shelves. They’re a more permanent solution but eliminate the problem entirely.
The “Use First” Basket and Smart Shopping
Place a small basket or bin in your pantry labeled “Use First.” This is for nearly-empty bags, items nearing their best-by date, or leftovers from a bulk purchase. Scan this basket once a week when meal planning. It turns potential waste into planned meals.
This habit connects directly to your shopping list. Keep a notepad on the fridge or use a notes app. When you take the last of the oatmeal, write “oatmeal” immediately. A list born from an empty container is an accurate list. It prevents overbuying and ensures your new pantry organization sticks.
Frequently Asked Questions
What are the best containers for pantry organization?
Clear, airtight, uniform containers are the gold standard. Glass jars like Mason jars are excellent for aesthetics and cleanliness, but BPA-free plastic bins are lighter and less breakable, ideal for families. The key is uniformity, same-shaped containers stack neatly, maximizing space. Look for ones with wide mouths for easy scooping.
How do I organize a pantry with no shelves?
Use freestanding shelving units or a sturdy bookcase. Then, contain everything. Without built-in shelves, items will slide and topple. Use bins and baskets on each shelf of your added unit to create stable, movable groups. An over the door organizer can also add crucial storage without taking up floor space.
How often should I reorganize my pantry?
Do a full reset (empty and purge) once or twice a year. But maintain it weekly. Spend five minutes after grocery shopping to put new items away using the FIFO method and to tidy zones. A quick monthly check of the “Use First” basket and expiration dates keeps things from slipping.
Are clear containers really necessary?
For dry goods, yes. The visual inventory is the entire point. You immediately see what’s running low. If aesthetics are a concern, you can use opaque bins for non-food items like napkins, foil, and bags. But for food you cook with, transparency saves time and money.
What’s the best way to organize spices?
Ditch the bulky racks that hold 10 jars. Use a spice rack organizer that fits on a shelf or in a drawer. Alphabetical order sounds logical, but it’s slow. Group them by cuisine or use: Italian herbs together, baking spices together, everyday salts and peppers up front. A tiered rack or a drawer insert keeps every label visible.
Before You Go
Organizing a pantry means installing a system that works behind the scenes, not completing a one-day decorating project. Start with the brutal purge, see everything you own.Then, build zones that match your cooking reality, not a magazine spread. Finally, invest in the right tools: clear containers for visibility, risers and turntables for access, and a “use first” basket for mindfulness.
The payoff includes fewer last-minute grocery runs, less money spent on duplicates, and a kitchen that feels ready for anything you want to cook, not just a pretty shelf. Grab a trash bag, clear an afternoon, and reset your pantry.The first meal you make from your new, logical system will show you why the work was worth it.
