
Expert Methods for How to Preserve Lemon Zest Successfully
This post contains affiliate links. As an Amazon Associate, we earn from qualifying purchases.
To preserve lemon zest, you have three reliable paths: freeze it plain in an airtight container for 6-12 months, dehydrate it into a shelf-stable powder, or mix it with sugar (a 1:1 ratio by weight) before freezing to keep it soft and scoopable for over a year. The method you pick depends on whether you need fluffy zest for baking tomorrow or a pantry staple for the next six months.
That “6-12 month” range is the documented outcome from comparing freezer bags against vacuum seals and sugar mixes. Plain frozen zest hits the six-month mark before the vibrant color fades, though the flavor lingers.The sugar method pushes that timeline past a year because the sugar acts as a preservative and anti-caking agent, the zest stays soft enough to scoop straight from the freezer.
What follows: the exact steps for each of those three methods, the tools that actually work (and one that doesn’t), the science behind why zest loses its punch, and how to rescue wax-coated supermarket lemons before you even start.
Key Takeaways
- Freeze plain zest for up to 6 months in a single layer on a tray before bagging to prevent clumping. Use it straight from the freezer.
- For baking-ready zest that lasts over a year, mix it with an equal weight of sugar before freezing. The sugar preserves flavor and prevents ice crystals.
- Dehydrate zest into a powder for indefinite shelf-stable storage. A dedicated dehydrator at 135°F (57°C) for 2-4 hours works best; a low oven risks burning the oils.
- Always zest before juicing. A whole lemon is easy to grip; a juiced shell is slippery and dangerous to grate.
- Remove commercial wax if you see it. Pour boiling water over lemons in a colander and scrub with a vegetable brush. The wax is safe but tastes bitter.
Why Lemon Zest is Worth the Effort
Lemon zest is the concentrated flavor bank of the fruit, holding the essential oils that juice alone can’t provide. In baking, it delivers the aromatic punch in a lemon loaf without adding extra liquid that would throw off the recipe’s balance.In savory dishes, it brightens a sauce or seasoning blend without the sharp acidity of the juice.
The magic is in the oil glands located just beneath the skin’s surface. When you zest correctly, avoiding the bitter white pith underneath, you rupture these tiny sacs and release that potent aroma. That’s why a teaspoon of zest can transform a dish, while a tablespoon of juice might just make it sour. Preserving zest is really about capturing and protecting those volatile oils from air, heat, and time.
Zesting is the process of scraping the colored outer peel of citrus fruit to capture the essential oils. A medium lemon yields about 1 tablespoon of zest, an orange about 2 tablespoons, a lime about 2 teaspoons, and a grapefruit about 3 tablespoons.
The First Rule: Prep Your Lemons Right
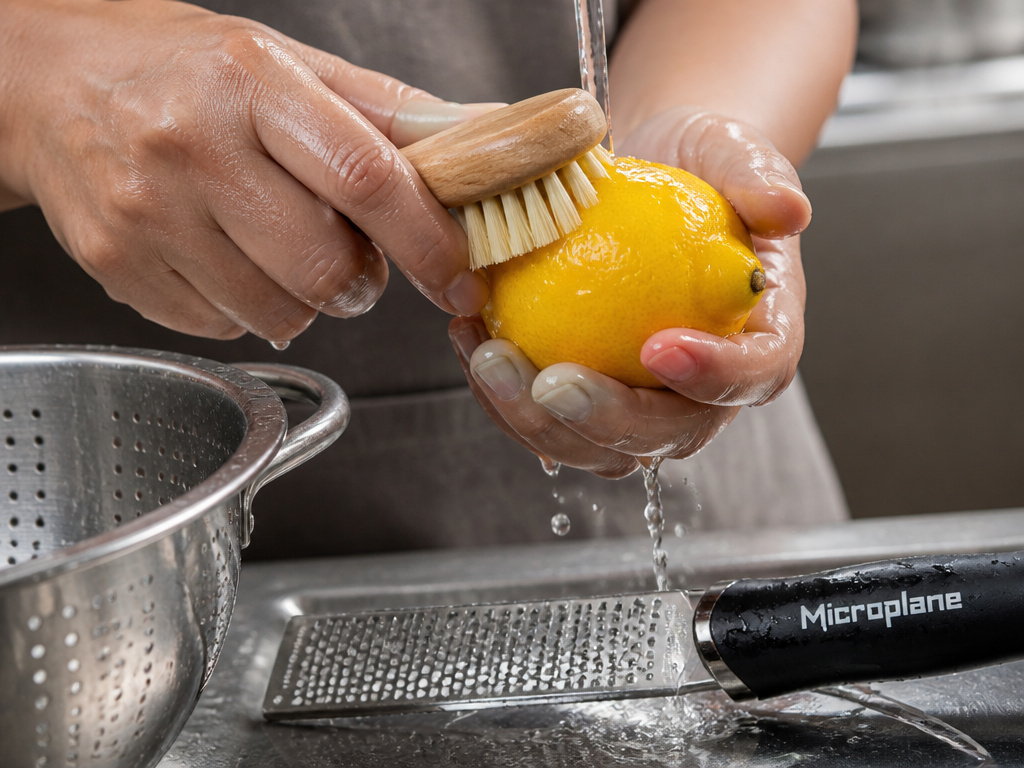 You can’t preserve what you don’t have. Start with firm, heavy lemons that have smooth, bright yellow skin. Dull or wrinkled lemons are past their prime and will yield less zest and flavor.
Most non-organic lemons have a food-safe wax coating. It’s applied after harvest to prevent moisture loss and extend shelf life. While edible, it can impart a faintly bitter taste and may clog the fine holes of a grater. If your lemons feel shiny and slick, remove the wax.
To de-wax lemons: Place them in a colander in your sink. Slowly pour a quart of boiling water over them. Immediately scrub each lemon with a clean vegetable brush under running water. Dry them thoroughly with a towel before zesting. A dry surface gives you the best grip and prevents rust on metal tools.
Your tool choice decides the texture and your safety. A Microplane grater or the fine side of a box grater produces the fluffy, fine zest ideal for folding into batters. A citrus zester pulls off longer strands perfect for garnishes or infusions. Whatever you use, apply light pressure and rotate the fruit constantly. Pressing too hard digs into the white pith, and that bitterness will ruin your preserved stash.
Common mistake: Juicing the lemon before zesting. The remaining slippery, collapsed rind is incredibly difficult and dangerous to grip against a sharp grater. Always zest first, juice second.
The 3 Ways to Preserve Lemon Zest (and Which One Wins)
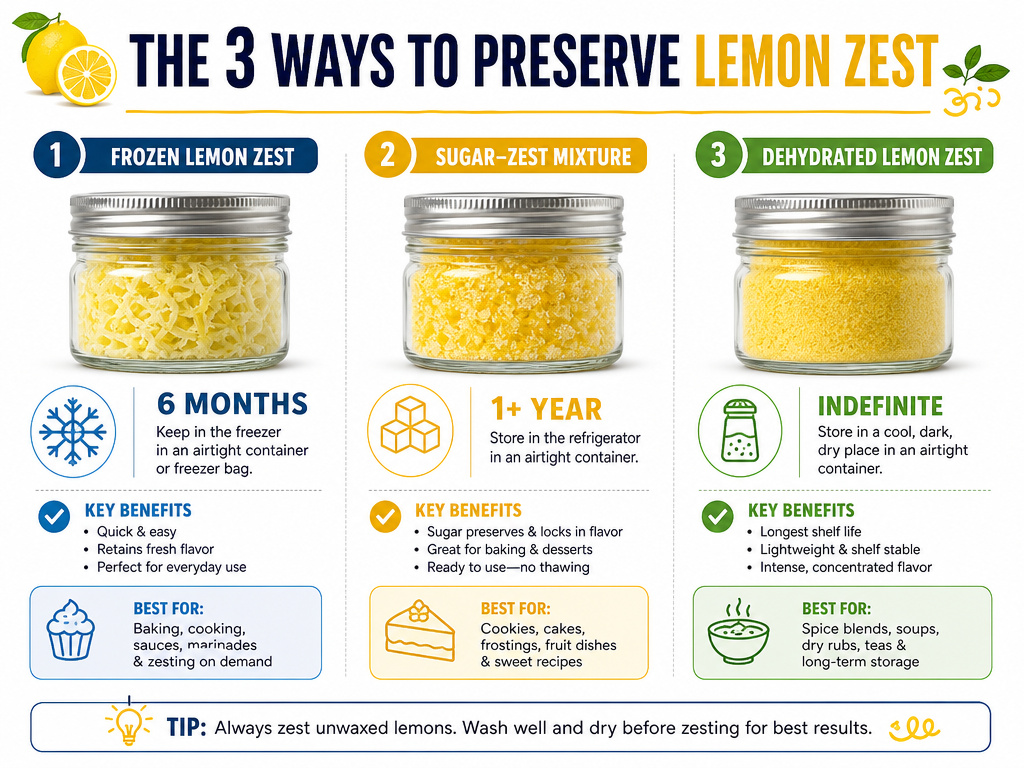 Each preservation method fights a different enemy: freezer burn, clumping, or flavor decay. Your goal dictates the winner.
| Method | Best For | Shelf Life | The Catch |
|---|---|---|---|
| Freezing (Plain) | General cooking, last-minute addition | 6 months (quality) | Loses vibrant color; can clump if not tray-frozen first |
| Freezing (with Sugar) | Baking, desserts, ready-to-use scoopable zest | 1+ year | You must account for the added sugar in your recipes |
| Dehydrating | Pantry storage, spice blends, rubs, teas | 1+ year (indefinite) | Requires a dehydrator or very careful oven use |
For most home cooks, the sugar-freeze method is the default. It balances long-term storage with convenience. The sugar mixture stays soft in the freezer, so you can scoop out a teaspoon without defrosting a whole block. It’s the closest thing to having a fresh lemon on demand.
If you’re deep into preserving food and want a shelf-stable ingredient, dehydration is your project. The powder won’t have the same floral top notes as fresh zest, but it adds a potent citrus backbone to dry rubs, salts, or tea blends. It’s a different ingredient for a different job.
Method 1: Freezing Plain Zest
This is the fastest route to a six-month supply. The keys are preventing a solid block of frozen zest and excluding as much air as possible.
- Zest your lemons onto a clean plate or cutting board.
- Spread the zest in a thin, single layer on a small baking sheet, plate, or even a freezer-safe bag laid flat. Do not pile it.
- Place the tray in the freezer for 1-2 hours, or until the zest is completely frozen solid. This “flash-freezing” step is non-negotiable. It keeps the individual strands separate.
- Transfer the frozen zest to an airtight container or a heavy-duty freezer bag. Squeeze out all the air before sealing. Label it with the date.
Use it straight from the freezer. There’s no need to thaw. The flavor remains, though the bright yellow color will fade to a pale beige after a few months. That’s normal.
Method 2: Freezing Zest with Sugar (The Baker’s Method)
This technique comes from professional bakers who need lemon flavor year-round. The sugar binds to the zest’s oils, preserving them and creating a soft, crumbly texture that never turns into an ice block.
The ratio is 1:1 by weight. For every gram of zest, use a gram of sugar. White granulated sugar is standard.
- Weigh your freshly grated zest.
- Add an equal weight of sugar to the bowl.
- Massage the sugar and zest together with your fingers for 30-60 seconds. You’ll see the zest darken slightly and the mixture become moist, that’s the oils releasing.
- Pack the mixture into a small airtight container. Press it down to remove air pockets.
- Freeze immediately.
Because this mixture is 50% sugar, you must adjust your recipes. If a recipe calls for 1 tablespoon (about 6 grams) of zest, use 2 tablespoons (12 grams) of this sugar-zest blend and reduce the recipe’s added sugar by 1 tablespoon (12 grams). This is the same principle used in commercial products like Perfect Purée of Napa Valley zest.
Method 3: Dehydrating Zest into Powder
This transforms zest from a perishable ingredient into a shelf-stable seasoning. The goal is to remove all moisture at a low enough temperature to avoid burning the delicate oils.
Where this goes sideways: Using a high oven. Home ovens, even on the “warm” setting, often run hotter than 170°F (77°C). At that temperature, the zest’s essential oils vaporize before the moisture is gone, leaving you with a bland, browned powder.
The right tool is a dehydrator set between 125°F and 135°F (52°C–57°C). 1. Spread your zest in a thin, even layer on the dehydrator trays. 2. Dry for 2 to 4 hours, checking periodically. The zest is done when it’s brittle and snaps easily. 3. Let the dried zest cool completely. 4. Grind it into a fine powder using a spice grinder, clean coffee grinder, or mortar and pestle. 5. Store the powder in a small airtight container in a cool, dark pantry.
The powder is intensely flavorful. Mix it with salt to make lemon salt for finishing dishes, or add it directly to dry spice rubs. It won’t work as a direct 1:1 substitute for fresh zest in cakes, but it’s a powerful tool for preserving vegetables in a marinade or brightening a soup.
The Science Behind the Zest: Why These Methods Work
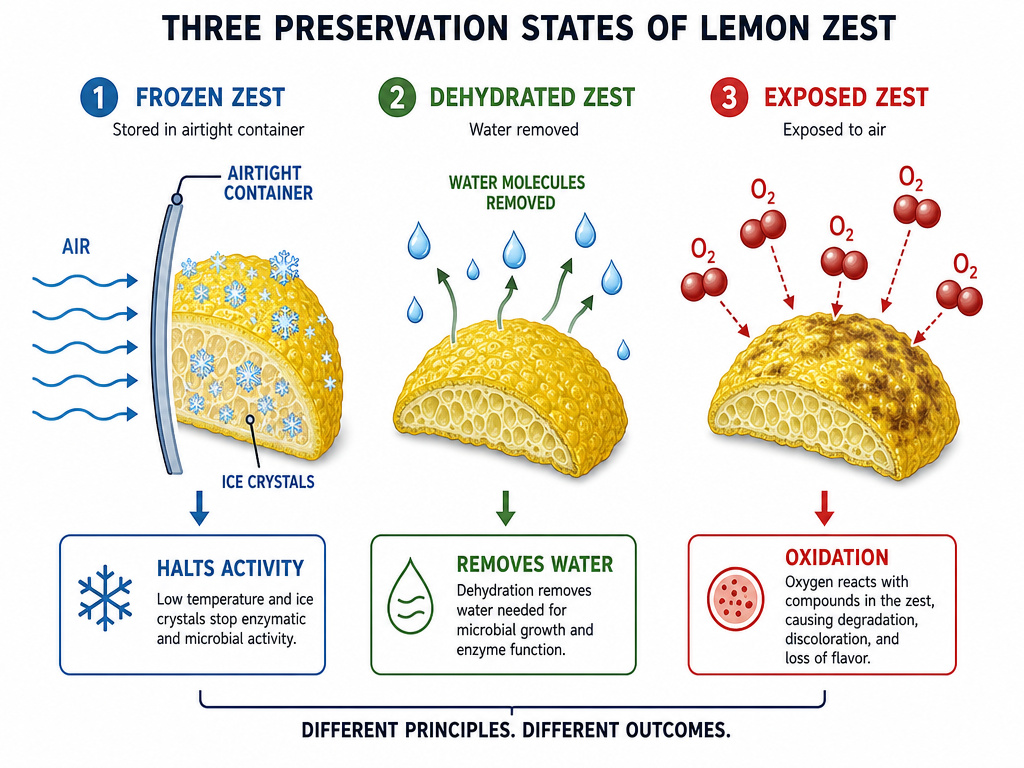 Preservation is about controlling water, air, and temperature. Each method tackles these factors differently.
Freezing works by halting biological activity. At temperatures below 0°F (-18°C), the enzymes and microbes that cause spoilage and flavor degradation are essentially paused. The threat here is freezer burn, the sublimation of ice crystals that dries out the zest and oxidizes the oils. An airtight container is your defense. The sugar-freeze method adds another layer: sugar is hygroscopic, meaning it binds to water molecules, further slowing ice crystal formation and protecting the cell structure of the zest.
Dehydration removes the water entirely. Without water, bacteria and molds can’t grow. The challenge is removing water without destroying the heat-sensitive volatile compounds (the flavor). Industrial studies, like one comparing drying methods for lemon peels in the Journal of Food Process Engineering, found that freeze-drying best preserved phenolics and aromatics, while microwave drying captured the most volatile compounds. At home, low-temperature dehydrating is the closest you can get to replicating those results without a lab.
Easy to miss: Oxygen is the silent flavor killer. Whether frozen or dried, every exposure to air degrades the essential oils. That’s why the “fill your container to the top” or “use a vacuum sealer” advice isn’t fussy, it’s chemistry.
Storing and Using Your Preserved Zest
You’ve done the work. Now make it easy to use.
For frozen zest (plain or sugared): Store it in the door of your freezer isn’t ideal, the temperature fluctuates too much every time you open it. Keep your containers towards the back of the freezer, in the coldest, most stable zone. Write the contents and date on the lid with a marker. “Lemon Zest + Sugar, Nov 2024” is perfect.
For lemon powder: A tiny glass jar in your spice cabinet is fine. Keep it away from the stove or any heat source. Light degrades quality, so a dark cupboard is best.
How to substitute in recipes:
- Frozen plain zest: Use it 1:1 for fresh zest. No thawing needed.
- Sugared zest: Remember the 50% sugar content. Double the volume called for and reduce other sugar.
- Lemon powder: Start with half the amount of zest called for. Taste and adjust. Its flavor is concentrated but lacks the bright top notes.
This preserved zest opens doors. Add frozen zest to compound butter for fish, stir sugared zest into yogurt or oatmeal, or whisk lemon powder into a vinaigrette. It’s a core technique for preserving fruit flavors long after their season has passed.
Frequently Asked Questions
Can I preserve zest from waxed lemons?
Yes, but you should remove the wax first. The wax itself is food-grade, but it can trap dirt and pesticides and may add a slight bitterness. Pour boiling water over the lemons in a colander and scrub with a brush. Dry them thoroughly before zesting.
Does frozen zest taste the same as fresh?
Very nearly, but not identically. The core lemon flavor remains strong for months. The very brightest, most floral top notes are the first to fade, which happens within days even in the fridge. For almost all cooked and baked applications, frozen zest is an excellent substitute.
What’s the best tool for zesting?
For fine, fluffy zest that’s ideal for preserving, a Microplane grater is unmatched. Its ultra-sharp, fine blades shave off the zest without digging into the pith. The fine holes on a box grater are a good second choice. A dedicated citrus zester creates beautiful strands for garnishes but isn’t as efficient for producing volume.
Can I preserve other citrus zest the same way?
Absolutely. All these methods work for orange, lime, grapefruit, and other citrus zest. Adjust yields accordingly: an orange gives about double the zest of a lemon, a lime gives about a third.
Is it safe to preserve zest in oil?
No. Preserving any low-acid vegetable, like garlic or zest, in oil at room temperature creates a risk for botulism, a dangerous form of food poisoning. If you want an oil infusion, make it fresh, use it within a week, and keep it refrigerated. For long-term preservation of garlic, follow a dedicated guide for preserving garlic in oil safely.
Before You Go
Preserving lemon zest turns a fleeting ingredient into a kitchen staple. Freeze it with sugar if you bake. You’ll have soft, ready-to-use zest for over a year. Dehydrate it if you want a pantry powder for rubs and seasonings. Freeze it plain for everything else. Just remember the three guards against flavor loss: keep air out, temperature stable, and moisture controlled.
The next time a recipe calls for a tablespoon of zest, you won’t be scrambling for a fresh lemon. You’ll already have a jar in the freezer, and that changes how you cook.
