
How to Store Dehydrated Fruit | The 3-Year Shelf Life Gap
This post contains affiliate links. As an Amazon Associate, we earn from qualifying purchases.
Store dehydrated fruit in an airtight container, in a cool, dark, dry place after a mandatory “conditioning” period. Aim for 60°F (16°C) or cooler and 55-60% relative humidity for a shelf life of up to one year. Vegetables last about half as long. Skip conditioning, and moisture pockets lead to mold within weeks.
That “up to one year” is the manufacturer’s best-case number. The real shelf life hinges on three variables you control: initial dryness, storage temperature, and a hidden step called conditioning that redistributes residual moisture. Most home dehydrators leave an uneven 20% moisture spread between pieces, which is why commercial operations use it and why your last batch of apricots felt tacky in the middle after two months in the pantry.
What follows: the conditioning ritual, the exact temperature bands that add or subtract months, the container showdown (mason jar vs. Mylar bag), and the one USDA-backed practice that stretches quality beyond the one-year mark without freezing.
Key Takeaways
- Conditioning is non-negotiable. Shake dried fruit in a sealed container for 2–4 days to equalize moisture; skip it and risk mold in the wettest pieces.
- Temperature is the shelf-life throttle. Store at 60°F (16°C) for up to a year; at 80°F (27°C), shelf life drops to six months.
- Vegetables get half the time. Their lower sugar and acidity mean they spoil faster; treat a six-month shelf life as the ceiling at room temperature.
- Darkness beats any container. Light degrades color and flavor faster than air; a pantry closet beats a clear jar on a sunny counter every time.
- Freezing is for the long game. It pauses quality loss for years, but dried fruit’s high sugar content means it may not fully freeze, risking desiccation without a vapor-proof bag.
The Step Most Guides Skip: Conditioning
Your fruit is leathery and cool. Bagging it now is the most common mistake.
The part nobody mentions: Uneven moisture is guaranteed in a home dehydrator. The pieces on the edge dry faster than those in the center. Without conditioning, the wetter pieces become mold incubators next to the dry ones, and you won’t know until you open the jar.
Conditioning is the process of letting dried fruit sit sealed for a few days so moisture migrates from the damp pieces to the dry ones. The goal is an even 20% moisture content throughout the batch, which dramatically lowers the risk of spoilage during long-term storage. The Iowa State conditioning instructions specify packing cooled fruit into non-porous containers—glass or clear plastic—only two-thirds full, sealing tightly, and shaking daily.
Here’s the full sequence: 1. Cool fruit completely on the trays. 2. Pack loosely into a clean, dry glass jar or food-grade plastic container. Fill it only two-thirds full to leave room for air movement. 3. Seal the lid tightly. 4. Shake the container thoroughly every day for 2 to 4 days. 5. After conditioning, check for any signs of condensation on the container walls or soft, clumped pieces. If you see any, return those pieces to the dehydrator for another hour.
If you are drying multiple batches of the same fruit, you can add freshly dried pieces to a conditioning batch within the first five days, extending the conditioning period to accommodate the new addition. This step is most critical for fruit and tomatoes; for dehydrated vegetables, which have a shorter shelf life anyway, it’s less vital but still a good safety habit.
Temperature & Humidity: The Shelf Life Equation
Where you store the container matters more than the container itself. Heat accelerates two things: nutrient loss and a type of non-microbial browning that dulls flavor and makes rehydration less efficient.
The OSU Extension safety tips provide the benchmark numbers. For fruit, the rule is one year at 60°F (16°C) or six months at 80°F (27°C). This isn’t a guess; it’s based on observed quality degradation in stored commodities. After a year at 60°F, nutrient loss “speeds up” and that browning reaction kicks in.
| Storage Temperature | Fruit Shelf Life (Quality) | Vegetable Shelf Life (Quality) |
|---|---|---|
| 60°F / 16°C | Up to 1 year | Up to 6 months |
| 80°F / 27°C | About 6 months | About 3 months |
| 32-45°F / 0-7°C | 1 year+ (quality preserved) | 6 months+ (quality preserved) |
For professional-grade stability, the Global Cold Chain Alliance recommends 32°F to 45°F (0°C to 7°C) with a steady 55-60% relative humidity. This environment minimizes moisture migration inside large containers, which prevents mold and “sugaring”—where fruit sugars crystallize on the surface. Your home pantry won’t hit these exact specs, but the principle is clear: cooler and steadier is always better.
This is why the general food storage principle of “cool, dark, and dry” applies doubly here. A basement shelf or a dedicated pantry closet away from heating vents is ideal. A garage that swings from freezing to 90°F is one of the worst places.
The Container Showdown: Jar, Bag, or Mylar?
The container’s job is to block air, moisture, and light. No single option does all three perfectly, so you pick for your timeline.
Glass Mason Jars are excellent for the 1-year timeline at cool room temperature. They are impermeable, airtight with a proper lid, and reusable. * Best for: Small batches, frequent use, and the conditioning step. You can see the contents. * The catch: They don’t block light. You must store them in a dark cupboard or box. A jar on a sunny windowsill will have faded, bland fruit in months.
Vacuum-Sealed Plastic Bags or Mylar Bags with Oxygen Absorbers are for multi-year storage. They remove oxygen, which slows oxidation and prevents insect larvae (which can be present in dried fruit) from developing. * Best for: Long-term prepping, bulk storage, and protecting against pantry moths. * The catch: Once opened, the contents are exposed. You must repackage leftovers into a smaller storage containers. Not suitable for the conditioning step.
Heavy-Duty Resealable Plastic Bags are a short-term compromise. * Best for: Holding fruit for a few months, or for transferring conditioned fruit to the freezer. They are not a long-term oxygen barrier. * The catch: Plastic is slightly permeable to air over time. Use them within a season.
Where this goes sideways: Using a mason jar without a dark storage location. Light penetrates glass, driving photo-oxidation that bleaches color and creates off-flavors long before mold appears. The fruit looks fine but tastes like cardboard.
Your choice flows from your goal. For eating within the year, use conditioned fruit in mason jars kept in a dark pantry. For building a multi-year food reserve, vacuum-seal or use mylar bags with oxygen absorbers and store them in the same cool, dark place.
Why Vegetables Are a Different Game
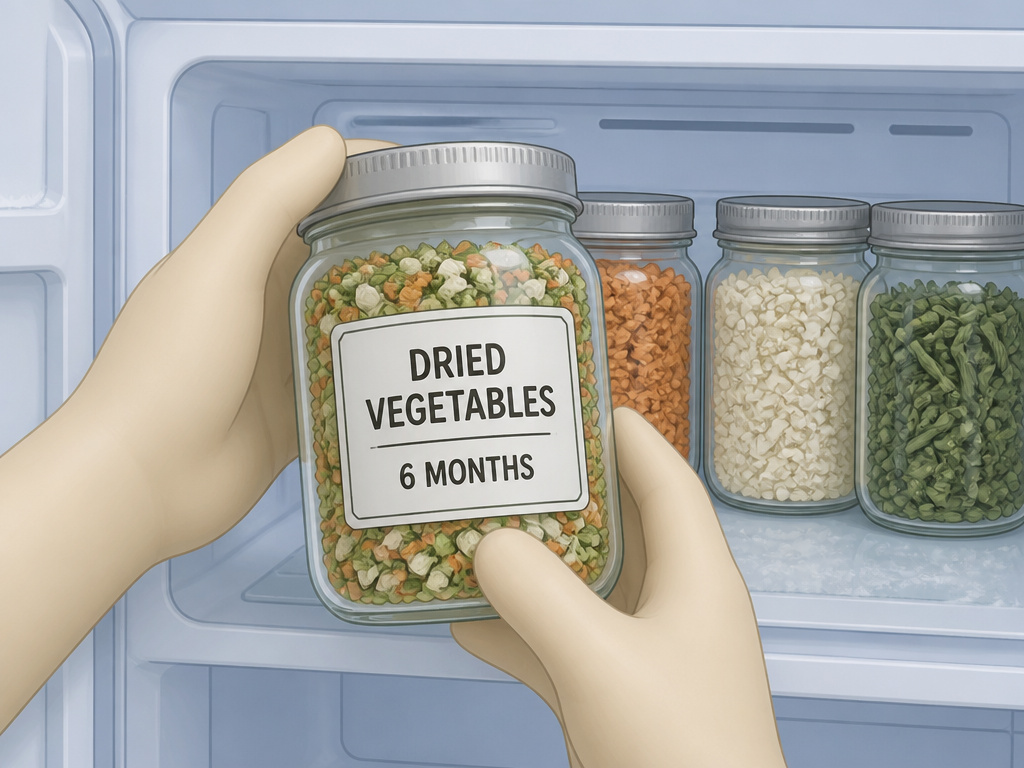 You cannot treat dried apples and dried carrots the same. The University of Idaho drying guide and every manufacturer manual give vegetables roughly half the shelf life of fruits at the same temperature.
The reason is chemical. Fruits are high in sugar and often acidity, which are natural preservatives that slow bacterial and mold growth. Vegetables are low-acid, higher in certain enzymes, and more prone to quality fade and rancidity. A dried green bean is simply more vulnerable.
This means your storage protocol for dehydrated vegetables needs to be stricter: * Freeze them if you can. The Nesco dehydrator manual explicitly recommends the freezer for low-acid foods like vegetables for best storage. * Label with the date. Assume a 6-month ceiling at 60°F. If you won’t use them within that window, freeze them from the start. * Consider them ingredients, not snacks. Plan to use your dried carrots, onions, and peppers in cooked dishes within the season. Their flavor and color degrade faster than fruit’s.
This same principle of tailoring storage to the food’s nature applies to other produce. The techniques for storing ginger or preserving onions are different because the plant tissue and moisture content are different.
Freezing for the Long Haul
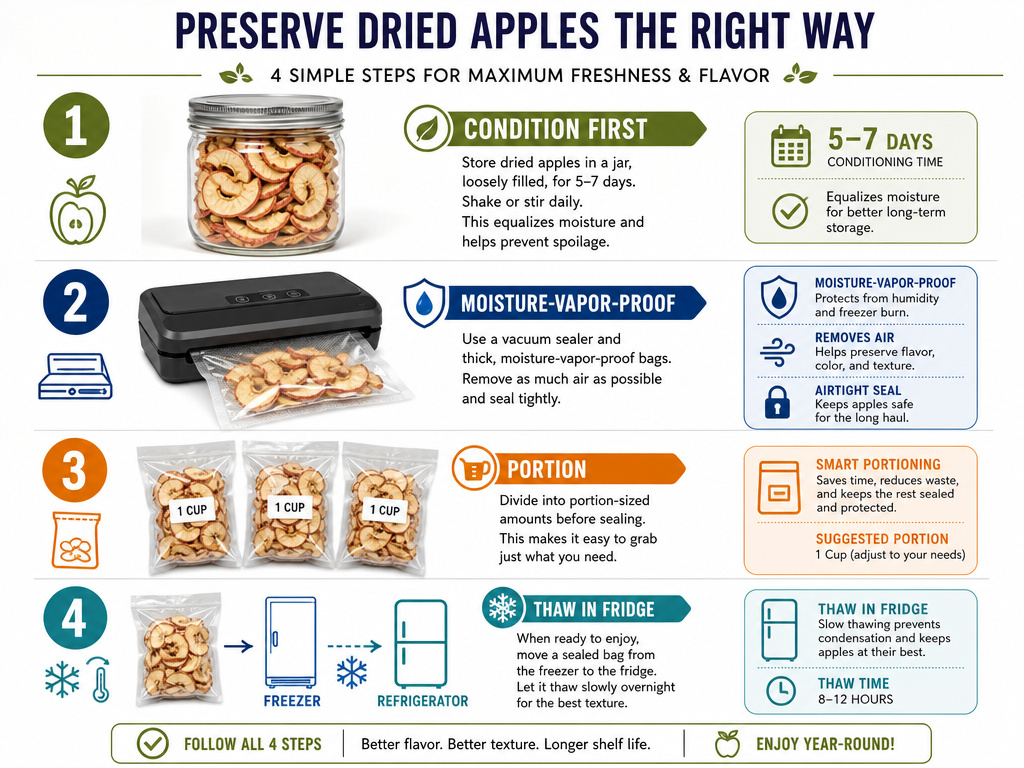 Freezing is the pause button. It stops the clock on quality loss, but it introduces a different physics problem.
The GCCA manual notes that dried fruit has a very low freezing point due to its high sugar concentration. In a typical home freezer (0°F / -18°C), your dried apricots might not actually freeze solid. This seems good—no ice crystals to damage cell structure—but it means the product can still slowly desiccate (get freezer-burn) if the packaging isn’t perfect.
Worth knowing before you start: Freezing dried fruit for longer than two years risks sugaring and desiccation, even in good packaging. It’s a trade-off between paused decay and texture change.
If you choose to freeze: 1. Condition the fruit first. This is critical. Freezing locks in moisture distribution; if you freeze an uneven batch, the wet spots will still spoil. 2. Use moisture-vapor-proof packaging. This is not a standard Ziploc. Use a vacuum-seal bag, a thick mylar bag, or a double layer of heavy-duty freezer bags. 3. Pack in usable portions. Thawing and refreezing introduces condensation. Portion out what you’ll use in a few months. 4. Thaw in the refrigerator. Move the sealed package from the freezer to the fridge for 24 hours before opening. This minimizes condensation on the fruit itself.
Freezing is especially wise for vegetables and for fruits you’ve powdered (like berry powder for smoothies). For whole fruits you plan to eat within a year, the complexity of freezing often isn’t worth the effort if you have a cool, dark pantry spot.
Troubleshooting: When Storage Goes Wrong
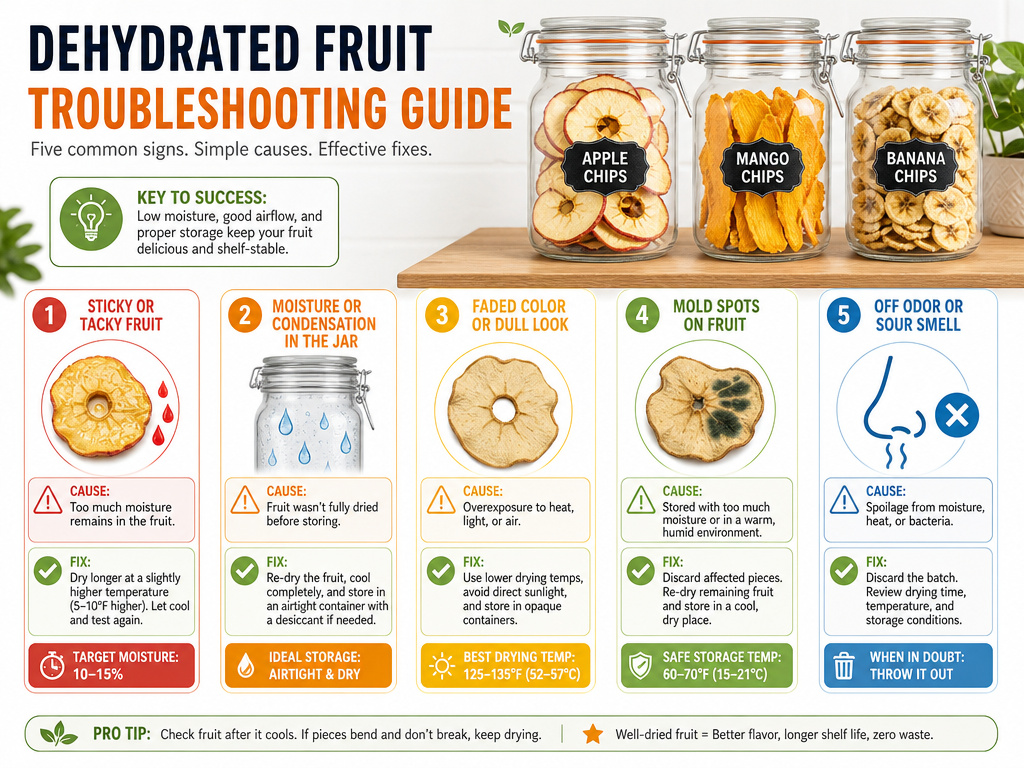 Even with perfect procedure, things can change. Here’s how to diagnose common problems.
| Sign | Likely Cause | Fix & Timeline |
|---|---|---|
| Soft, sticky pieces | Insufficient initial drying or moisture migration from conditioning. | Return sticky pieces to dehydrator for 1-2 hours. Check within 2 weeks of storage. |
| Condensation on jar | Fruit was not fully cooled before sealing, or storage location is too warm/humid. | Open jar, spread fruit on a tray to air dry for an hour, then repackage. Immediate. |
| Loss of color/flavor | Storage too warm or exposed to light. | Irreversible. Use fruit in cooking where flavor loss matters less. |
| Mold | Moisture too high, conditioning skipped, or container not airtight. | Discard affected fruit and any pieces touching it. Check remaining batch. |
| Unusual odor | Absorption of odors from storage environment or rancidity in vegetables. | Discard. Odors indicate chemical breakdown and cannot be removed. |
The rule from the Hamilton Beach manual applies: “Always check the condition of your food prior to consumption. When in doubt, throw it out.” This is not scare talk. Mold on dried fruit can produce mycotoxins, which are not destroyed by cooking.
Frequently Asked Questions
Do I need oxygen absorbers for dehydrated fruit?
For storage up to one year in a cool, dark place in an airtight glass jar, oxygen absorbers are not strictly necessary. Their primary role is to prevent insect larvae development and slow oxidation over multi-year storage. If you are using mylar bags or vacuum sealing for long-term prepping, then yes, use them.
Can I store different dehydrated fruits together?
You can, but with caution. Do not mix strongly flavored fruits (like mango) with delicate ones (like apple) unless you want the flavors to cross-contaminate. Also, ensure all pieces are conditioned and equally dry before mixing. A wet pineapple piece can spoil a whole jar of dry apple chips.
How do I know if my dehydrated fruit is dry enough?
The squeeze test is the home standard. Take a handful of cooled fruit and squeeze it tightly. Open your hand. The pieces should spring apart, not clump together, and you should feel no moisture on your palm. Leathery and pliable, not sticky or brittle.
Why does my dehydrated fruit get hard?
Hardness usually means over-drying. The fruit has lost too much moisture, making it brittle and difficult to chew or rehydrate. You can’t reverse it, but you can use rock-hard fruit in powdered form by grinding it in a blender and using it in baking or smoothies.
Is it safe to store dehydrated fruit in the refrigerator?
Yes, and it’s a good idea if your pantry is consistently above 70°F (21°C). The fridge provides a cool, dark environment with stable temperature and low humidity. Use an airtight container to prevent the fruit from absorbing fridge odors. This is a smart strategy for preserving fruit quality when you lack a cool basement.
The Bottom Line
Storing dehydrated fruit isn’t just about sealing a jar. It’s a short process: dry evenly, condition to equalize, then pick a container matched to your timeline and a location that stays cool and dark. Hit 60°F and you get the full year. Skip conditioning, and you gamble on mold.
For most home users putting up a summer harvest, the path is clear. Condition your fruit in glass jars for a few days, then store those jars in the back of a pantry closet. Label them with the date. For onions, carrots, or other vegetables, halve that timeline or use the freezer. That’s the system that bridges the gap between the dehydrator tray and a shelf-stable pantry staple.
