
Learn How to Vacuum Seal a Mason Jar for Long-Term Storage
This post contains affiliate links. As an Amazon Associate, we earn from qualifying purchases.
To vacuum seal a mason jar, you need a device to remove air and a compatible lid. The three reliable methods are a countertop jar sealer attachment (like FoodSaver), a chamber vacuum sealer, or a manual brake bleeder pump. This creates an airtight seal for dry goods, extending shelf life by preventing oxidation and moisture. It is not a substitute for heat canning.
The seal itself relies on pulling air from under a flat lid that has a rubber gasket. That gasket is what gets sucked down against the jar’s rim. If the rim is flawed or the lid is bent, air leaks back in within minutes.
What follows is a breakdown of each method, the one household trick that seals flour every time, and the non-negotiable safety rule that separates pantry storage from a food safety hazard.
Key Takeaways
- Vacuum sealing is for dry, shelf-stable foods only. It does not preserve wet or fresh foods like canning.
- For powdery goods like flour or cocoa, place a coffee filter on top of the contents before sealing. This prevents particles from blocking the seal.
- Never use the screw band (ring) during the vacuum process with a jar sealer attachment. It traps air and causes seal failure.
- The jar rim must be flawless. A single chip, crack, or food particle will break the vacuum.
- Label every jar with the contents and date. A vacuum seal extends life but doesn’t grant immortality.
The Three Main Methods for Vacuum Sealing Jars
You have three proven paths. Your choice depends on your budget, how often you seal, and what you’re sealing.
A countertop jar sealer attachment pulls air through a hose connected to your main vacuum sealer. A chamber sealer places the entire jar inside a machine that evacuates a large chamber. A brake bleeder pump is a manual, handheld tool that creates vacuum through repeated pumps.
1. Jar Sealer Attachments (FoodSaver-style)
This is the most common home method. You need a primary vacuum sealer machine with an accessory port and a specialized jar sealer head.
The FoodSaver Jar Sealer is the default. It’s designed specifically for Ball and Kerr mason jars. The wide-mouth sealer only works with wide-mouth jars; the regular sealer only works with regular jars. Mix them up and you get no seal.
How it works:
- Place a clean, new or used flat lid (with the rubber gasket intact) on the jar.
- Hand-tighten the screw band, then unscrew it one full turn. This is critical. The lid must be loose enough for air to escape.
- Press the jar sealer head firmly onto the lid.
- Activate your vacuum sealer. Wait for the machine to stop, indicating a full vacuum.
- Remove the sealer head. Immediately tighten the screw band down fully.
Skipping step two is the number one reason for seal failure with this method. The band left on tight creates a closed system. Air has nowhere to go, so the vacuum never forms.
2. Chamber Vacuum Sealers
This is the professional method, but smaller models exist for homes. The entire jar goes inside a sealed chamber.
The process is simpler: 1. Place the jar inside with a flat lid seated. The screw band is not used at all. 2. Close the chamber lid. 3. Start the cycle. The machine removes air from the entire chamber, pulling it from under the lid. 4. When the cycle ends, the chamber equalizes, pressing the lid firmly onto the jar.
Chamber sealers handle liquids without risk of sucking them into your machine. They also work on almost any lidded glass jar, not just standard Mason jars. The limitation is size. Your jar must fit inside the chamber.
3. The Brake Bleeder Pump Hack
This is a low-cost, manual alternative. You need a brake bleeder kit from an auto parts store and a jar sealer head (often sold separately).
The setup connects the pump hose to the sealer head. You then press the head onto a lidded jar and pump the handle until the gauge shows a strong vacuum.
It’s slow and requires elbow grease, but it works. It’s perfect for occasional use or if you don’t own a vacuum sealer. The seal is just as strong as an electric method.
| Method | Best For | Biggest Limitation |
|---|---|---|
| Jar Sealer Attachment | Owners of a standard vacuum sealer | Won’t work if the screw band is left tightened |
| Chamber Vacuum Sealer | Sealing liquids, using odd-shaped jars | Jar must fit inside the fixed chamber size |
| Brake Bleeder Pump | Low-budget, occasional sealing, off-grid use | Physically tiring; requires a separate sealer head |
What You Can (and Cannot) Safely Seal
This is the line that keeps your food safe. Vacuum sealing removes oxygen. It does not kill bacteria, mold spores, or enzymes.
Before you start: Vacuum sealing is only for commercially shelf-stable, dry goods. Never seal fresh meat, dairy, moist vegetables, or cooked meals meant for the pantry. These items require refrigeration or freezing, with or without a vacuum.
Safe to vacuum seal for pantry storage:
- Dried beans, rice, and grains
- Pasta
- Dehydrated fruits and vegetables
- Powdered milk, cocoa, spices
- Whole nuts and seeds
- Flour and sugar (with a barrier)
- Freeze-dried foods
- Hard candies
Not safe for pantry storage via vacuum sealing alone:
- Fresh fruits or vegetables
- Cooked soups or stews
- Raw or cooked meat
- Cheese or butter
- Any food with measurable moisture
The University of Minnesota Extension guide states vacuum sealing cannot achieve the 240–250°F temperatures required for safe canning of low-acid foods. Treat it as superior packaging, not a preservation process.
Step-by-Step: Sealing with a Jar Sealer Attachment
Let’s walk through the most popular method. Gather your jar, a flat lid, a screw band, your vacuum sealer, and the hose attachment.
- Inspect the jar rim. Run your finger around the top. Feel for nicks, cracks, or rough spots. A perfect rim is non-negotiable. A flawed rim breaks the seal every time.
- Fill the jar correctly. Leave headspace. For dry goods, stop below the bottom thread. This gives contents room to settle and keeps food away from the sealing surface.
- Prepare the lid. Use a new lid or one with a soft, pliable gasket. Pre-soak new lids in hot (not boiling) water for a minute to soften the sealing compound.
- Place the lid and band. Set the flat lid on the jar. Screw the metal band on by hand until it’s snug, then back it off one full turn.
- Connect and attach. Plug the hose into your sealer’s accessory port. Press the jar sealer head straight down onto the lid until it sits flush.
- Start the vacuum. Press the vacuum button. You’ll hear the air being pulled out. Wait for the machine to cycle off automatically.
- Complete the seal. Remove the sealer head. Immediately tighten the screw band all the way while the vacuum is holding the lid down. You’re done.
You should hear a faint hiss when you remove the sealer head. The lid will be concave, sucked downward. Try lifting the jar by the lid alone. If the seal is good, it will hold.
The Coffee Filter Trick for Powdery Goods
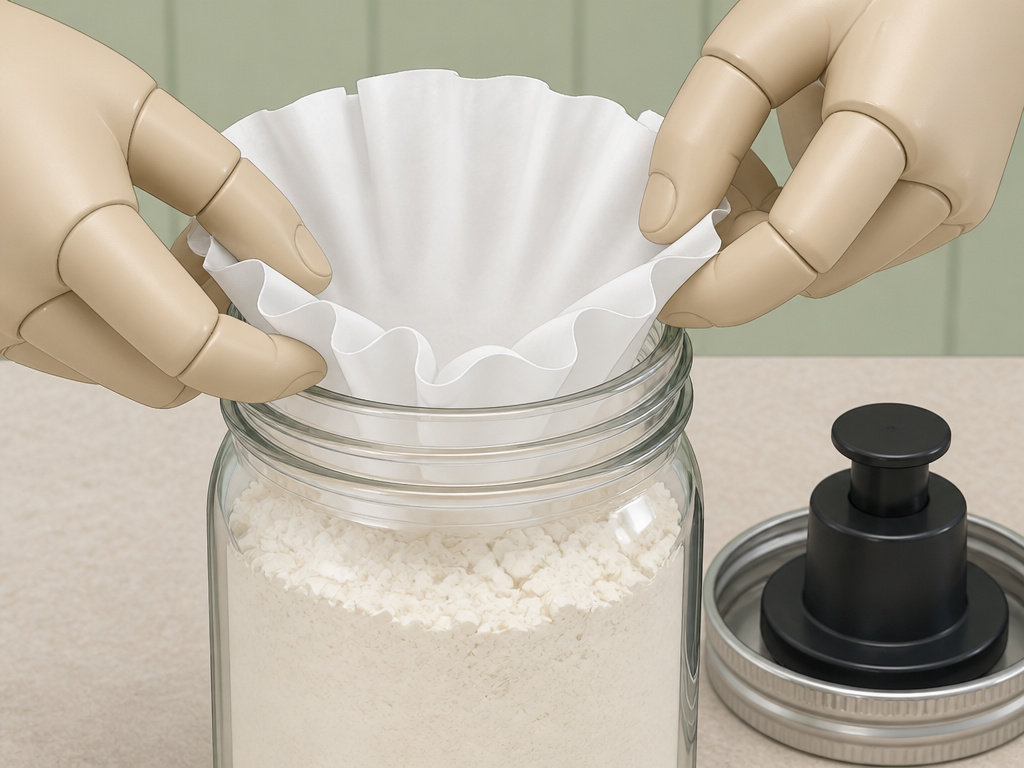 Flour, powdered sugar, and cocoa are the most frustrating items to seal. Fine particles get pulled into the microscopic gap between the jar and lid during the vacuum process.
This grit prevents the rubber gasket from making full contact. The seal appears to hold for an hour, then fails.
The fix is simple. After filling the jar, place a plain coffee filter or a small circle of parchment paper directly on top of the powder. Tuck the edges down slightly. This barrier stops particles from migrating during the air removal.
Where this goes sideways: Sealing brown sugar with an oxygen absorber. The two can create a hard, brick-like mass in the jar. For brown sugar, use only vacuum sealing, or skip it and use a terra cotta sugar saver instead.
Troubleshooting a Failed Seal
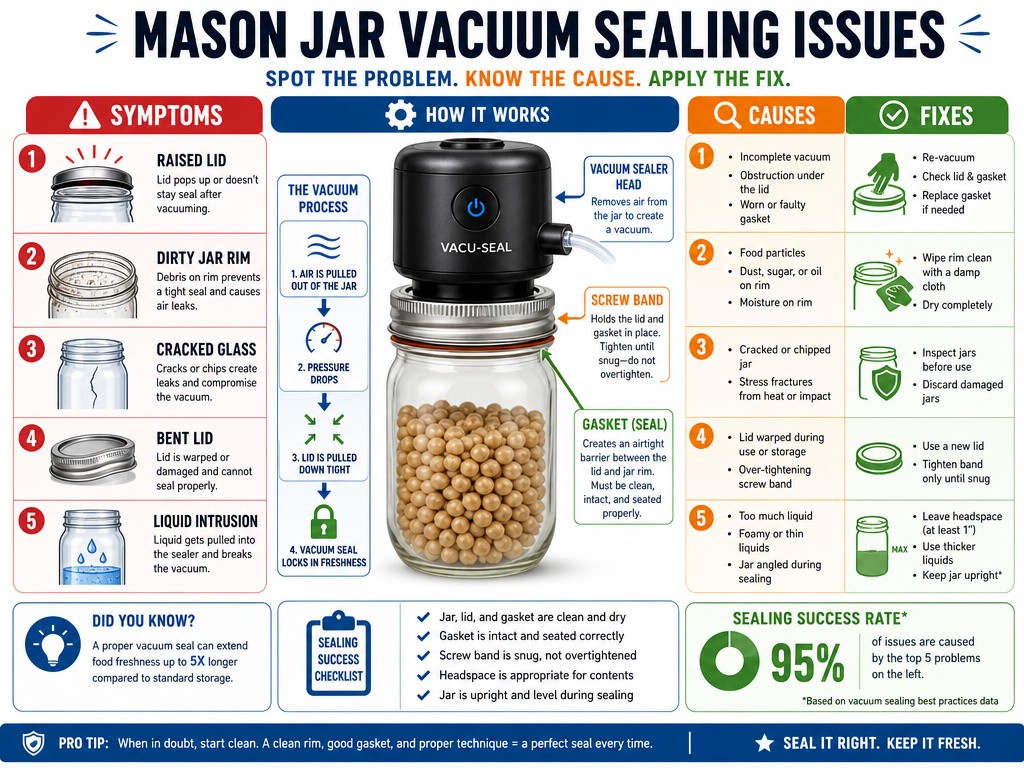 Your jar didn’t seal. Or it sealed but the lid popped up a day later. Here are the usual suspects, in order of likelihood.
| Symptom | Likely Cause | The Fix |
|---|---|---|
| Lid never sucked down | Screw band was left fully tightened | Always back the band off one turn before sealing |
| Seal held then failed later | Food debris or powder on jar rim or lid gasket | Clean rim thoroughly; use a coffee filter barrier |
| Machine runs but no vacuum forms | Crack or chip in the jar rim | Discard the jar; the flaw cannot be repaired |
| Hissing sound after removing sealer | Bent or warped flat lid | Use a new lid; recycled lids can warp over time |
| Liquid sucked into machine | Attempted to seal a liquid with a hose method | Use a chamber sealer or store liquids in the fridge |
Check the simplest thing first. Is your sealer head the right size for your jar? A wide-mouth head on a regular jar makes no contact. The connection must be airtight before the pump even starts.
Also, ensure your vacuum sealer itself is working. Test it on a bag. If it struggles there, the problem is the main unit, not your jar technique.
Choosing Your Equipment: A Quick Comparison
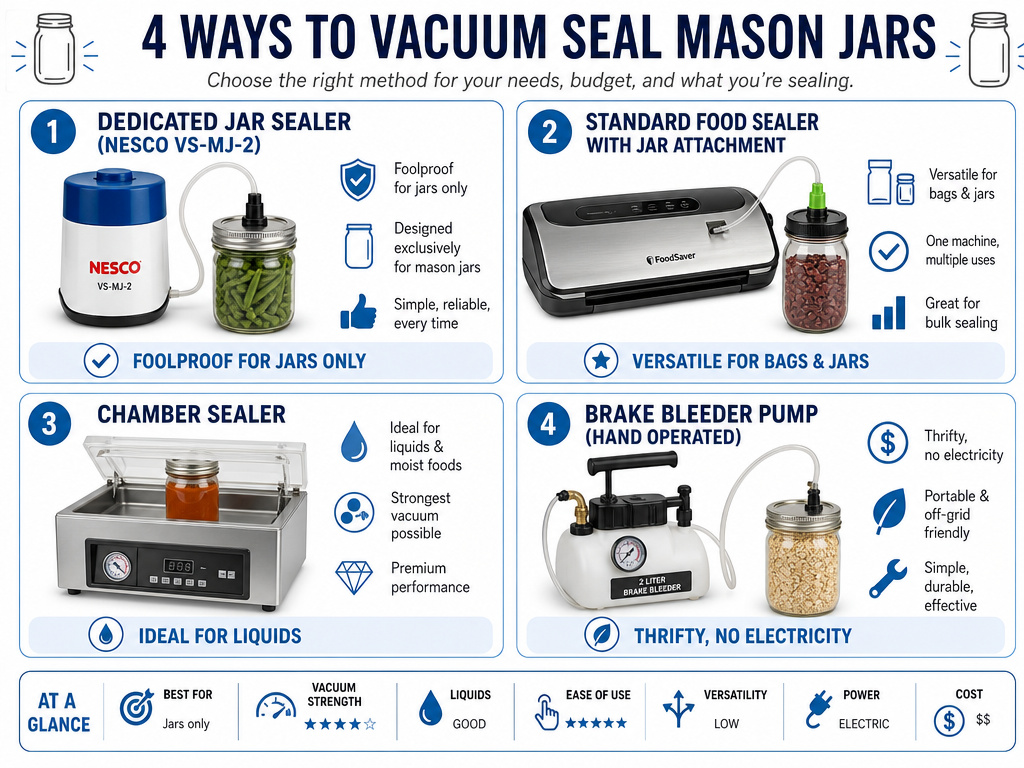 Your results depend on your tools. A dedicated mason jar vacuum sealer like the Nesco VS-MJ-2 is foolproof for jars but does nothing else. A standard food sealer with attachments is more versatile.
For most people starting out, a basic vacuum sealer machine and a jar sealer attachment cover all bases. You can seal bags for the freezer and jars for the pantry. Brands like FoodSaver are ubiquitous, and learning to use a vacuum sealer for both tasks maximizes its value.
If you seal constantly or want to preserve liquids like soup starters, a chamber sealer is worth the investment. Look at home vacuum sealers with larger chambers.
The brake bleeder method is for the thrifty or prepared. It requires no electricity. Its performance, however, depends entirely on your arm strength and the quality of the pump’s seals.
Frequently Asked Questions
Can I reuse canning lids for vacuum sealing?
Yes, you can. The rubber gasket must still be soft and pliable, not cracked or brittle. Used lids often work better than new ones for vacuum sealing because the sealing compound is already molded. Always inspect the gasket first.
How long will food last in a vacuum-sealed jar?
It depends on the food. Low-fat, low-moisture items like white rice or dried beans can last for years. Whole grains with natural oils, like brown rice or whole wheat flour, may only last 1-2 years before the oils could turn rancid. The vacuum dramatically slows oxidation, but it doesn’t stop the clock entirely.
Do I need to use oxygen absorbers too?
It’s one or the other, not both. Vacuum sealing physically removes the air. Oxygen absorbers chemically bind oxygen inside a sealed environment. Using both is redundant and, with some foods like brown sugar, can cause hardening. For jars, vacuum sealing is usually simpler.
Can I vacuum seal liquids in mason jars?
Not with a hose-based jar sealer. The liquid will be sucked straight into your machine’s pump, destroying it. You can vacuum seal liquids using a chamber vacuum sealer, or by freezing the liquid solid in the jar first and then sealing it. For most home kitchens, it’s safer to store liquids in the refrigerator.
Why did my jar seal but the ring is loose?
That’s normal and correct. The screw band is only a safety restraint, not part of the seal. The vacuum holds the flat lid on. The ring should be fingertip-tight, not cranked down. Over-tightening can actually break the vacuum by distorting the lid.
Can I seal a jar that’s not completely full?
Absolutely. The vacuum acts on the air in the headspace. A half-full jar seals just as well as a full one. Just ensure the food level is below the bottom thread to keep the sealing surface clean.
Before You Go
Vacuum sealing mason jars turns your pantry into an organized, long-term storage system. The method is straightforward: clean jar, proper lid, correct headspace, and the right tool for the job.
Remember the coffee filter for powders. Remember to loosen the band before you start the vacuum. And remember that this is for dry goods only—your soups and sauces still belong in the fridge or freezer.
Start with a bag of rice or a batch of dried beans. That first pop of a successful seal is satisfying. It’s a small step toward a kitchen where nothing gets lost in the back of the cupboard.
