
How to Use a Vacuum Sealer: A Complete Step-by-Step Guide
This post contains affiliate links. As an Amazon Associate, we earn from qualifying purchases.
To use a vacuum sealer, place your item in a chamber pouch, leave 2-3 inches of headspace, lay the pouch opening flat across the clean seal bar inside the chamber, close the lid, and initiate the vacuum-seal cycle. The specific vacuum time, seal time, and cooling time must be adjusted in 0.1-second increments based on your pouch thickness to prevent leaks or melted plastic.
That headspace number isn’t a suggestion. It’s the minimum gap the machine needs to grab the bag material without sealing in a wrinkle or, worse, sealing over your food. Cut it shorter and the seal fails within a week in the freezer.
What follows is the full breakdown: the universal seven-step process, the critical timing adjustments nobody mentions until their first bag leaks, the oil-change schedules that keep the pump alive, and the specific mistakes that turn a $500 machine into a countertop ornament.
Key Takeaways
- Leave 2-3 inches of headspace at the top of your pouch. Less than that guarantees a wrinkled, weak seal.
- Adjust sealing time in 0.1-second increments. Thin pouches melt and leak at standard settings; thick pouches won’t seal.
- Change the vacuum pump oil on the manufacturer’s schedule—after 25 initial hours, then every 60 hours for a VacMaster VP320. Ignoring this destroys the pump.
- Never store the machine with the lid locked down. Gaskets compress and won’t rebound, causing chronic vacuum leaks.
- For liquids, ensure the fluid level stays below the seal bar. Let liquid touch the hot bar and it ruins the seal and fouls the chamber.
The 7-Step Core Process for Any Chamber Sealer
Forget brand-specific buttons for a moment. Every chamber vacuum sealer operates on the same mechanical sequence. Mastering these seven steps is the difference between a perfect seal and a drawer full of spoiled food.
- Select the correct chamber pouch. The bag must fit entirely within the stainless steel chamber. The pouch opening cannot be wider than the seal bar. For a VacMaster VP320, that means bags up to 16 inches wide by 20 inches long.
- Load the pouch, minding headspace. Place your item inside, then leave 2-3 inches of empty bag at the top. This is non-negotiable. The machine needs this slack to pull the bag material taut and create a clean seal area.
- Position the pouch in the chamber. Lay the open end of the bag completely flat across the seal bar. Ensure the entire bag opening is inside the chamber and the bag is free of folds or wrinkles where the seal will form. Any crease becomes a capillary for air and moisture.
- Close and latch the lid. Firmly press the lid down for 2-3 seconds until you hear the vacuum pump engage and see the gauge needle start to drop. This ensures the lid gasket is fully seated.
- Initiate the cycle. Press the “Vacuum & Seal” button. The pump will evacuate air from the chamber (and your bag) for a preset duration, then the seal bar will heat for its preset time, and finally a cooling cycle will run.
- Wait for completion. The lid will unlock and open automatically once the cooling cycle finishes. Do not force it open early.
- Inspect the seal. Remove the bag and visually check the sealed edge. It should be smooth, uniform, and slightly embossed. Run your fingers along it; a proper seal feels flat and solid, not bumpy or creased.
The entire pouch, including its opening, must remain inside the vacuum chamber during the cycle. If any part of the bag is pinched under the lid’s seal, the vacuum will fail and the bag will not seal. This is the most common first-time user error.
Skipping step seven is how you find a freezer-burnt, frost-filled bag three months later. A visual inspection takes five seconds and saves the entire package.
How to Adjust Vacuum and Seal Timing
Your sealer’s default settings are a guess. They work for a standard 3-mil pouch with dry goods. The moment you switch to a thicker pouch for sharp bones, a thinner pouch for herbs, or a wetter product, you must recalibrate. This is where the manuals get specific, and where most users give up.
The VacMaster VP230 and VP220 manuals state adjustments should be made in 0.1-second increments. This precision isn’t overkill. It’s the difference between a bond and a burn.
| Setting | What it Controls | Adjust If… | Increment |
|---|---|---|---|
| Vacuum Time | Duration the pump runs to remove air. | Bag is mostly full or item is dense. | 5-10 second blocks. |
| Seal Time | Duration the heated bar melts the pouch layers together. | Pouch feels thicker/thinner than usual. | 0.1 seconds. |
| Cooling Time | Duration the bar cools while pressure holds the seal. | Seal looks brittle or is peeling. | 1-2 seconds. |
Where this goes sideways: Increasing seal time for a thick pouch but not increasing cooling time. The seal bar stays too hot, so the molten plastic sticks to it and tears when the bag is removed. Always set the cooling time at least 1 second longer than the seal time.
For a thick, heavy-duty pouch, increase the seal time by 0.2 or 0.3 seconds. For a delicate, thin pouch, decrease it by the same amount. The goal is a smooth, fused seal line without any melted plastic beads or, on the other end, a peel-able seam.
This fine-tuning is why a chamber vacuum sealer outperforms external suction models. You have direct control over the environment where the seal forms.
The Non-Negotiable Maintenance: Oil and Gaskets
A vacuum sealer is not a set-and-forget appliance. It has a pump with moving parts that require lubrication, and rubber gaskets that fatigue. Ignoring these two items is the fastest route to a costly repair.
Vacuum Pump Oil
Oil-lubricated rotary pumps are the heart of commercial-grade sealers like the VacMaster series. The oil traps moisture, carries away heat, and prevents internal corrosion.
- Schedule: The VacMaster VP320 manual dictates the first oil change after 25 hours of use. Subsequent changes are needed every 60 hours or if the oil becomes discolored. For the VP215, the schedule is even stricter: first change after one week of use, then every 3 months or 250 cycles.
- Consequence: Old, cloudy or “milky” oil loses its lubricity and viscosity. The pump runs hotter, seals wear faster, and eventually the motor seizes. A seized pump often costs more to replace than a new machine.
- Check: Use the machine’s site glass. Oil level should be between the 1/2 and 3/4 mark. Only use the manufacturer’s specified vacuum pump oil.
Lid and Seal Bar Gaskets
The rubber gaskets around the lid and the seal bar create the airtight chamber.
- Storage: Never leave the lid locked in the closed position. The FoodSaver MS2000 manual explicitly warns this compresses the gaskets, which may not rebound, leading to vacuum loss. Always use the “Store” or “Open” position.
- Cleaning: Wipe gaskets with a damp cloth after any session involving liquids or crumbs. Dried debris creates micro-gaps.
- Failure Sign: If the pump runs for its full cycle but the vacuum gauge never drops below a certain point, or the bag remains puffy, you likely have a gasket leak.
Common mistake: Topping off pump oil without ever draining the old, contaminated oil. This just dilutes the problem. Always drain completely, then refill with fresh oil to the correct level in the site glass.
This maintenance is trivial compared to replacing a pump. It’s the equivalent of changing your car’s oil—skip it, and the engine fails.
Sealing Liquids and Wet Foods Without Disaster
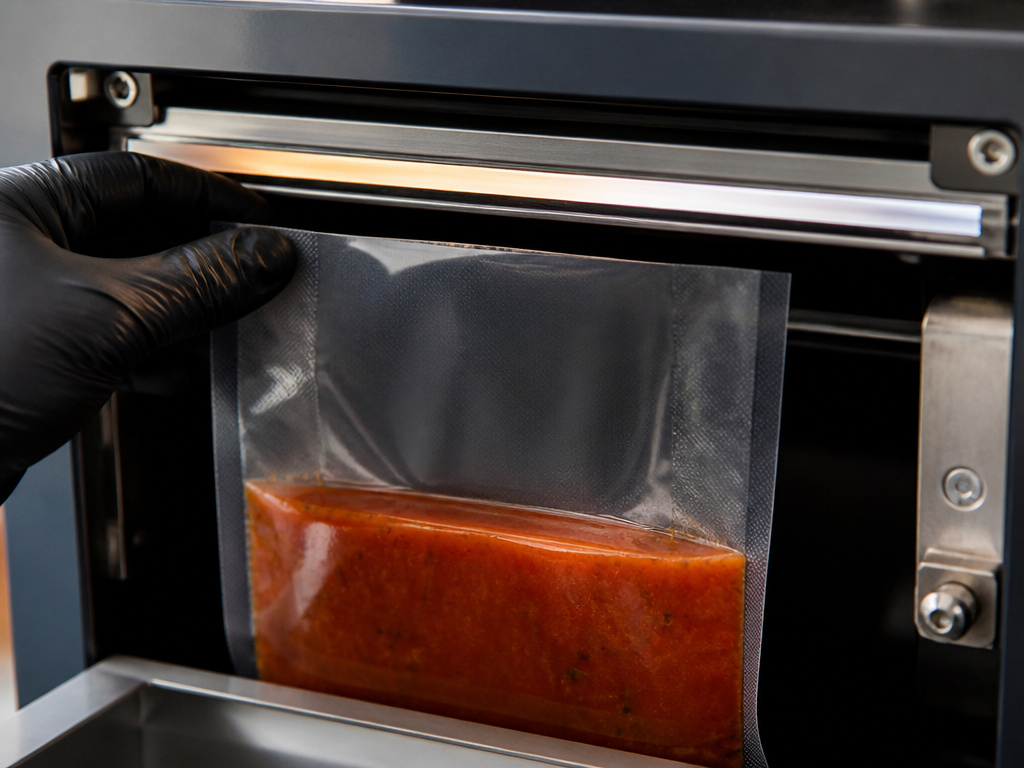 Chamber sealers excel with liquids because they remove air from the chamber, not by sucking it through the bag’s opening. But physics still applies. Liquid will boil at room temperature under a strong enough vacuum, and it will flow toward any low-pressure area.
The VacMaster VP320 manual has a single, vital rule: ensure the liquid level is below the height of the seal bar. If liquid from the bag touches the hot seal bar during the cycle, it will contaminate the sealing surface, causing a failed seal and a sticky, hard-to-clean mess.
Here’s the safe method: 1. Freeze the liquid solid first (ideal for soups, stocks). 2. Or, use a rigid container inside the bag to keep the pouch upright and the liquid contained below the seal line. 3. Or, use the “Pulse” or “Stop” function (if your model has it) to manually stop the vacuum cycle just before liquid starts to creep up the bag, then immediately seal.
For models like the FoodSaver MS2000, designed for bag-in-handheld use, the best vacuum sealers for wet foods are those with a “Pulse” button and a moisture trap. Even then, the manual advises leaving a full 3 inches of headspace for liquids.
The YouTube transcript of a user sealing “red hot links” shows the practical approach: work quickly, expect some moisture, and have the sealer on a spill-friendly surface.
Troubleshooting: Why Did My Seal Fail?
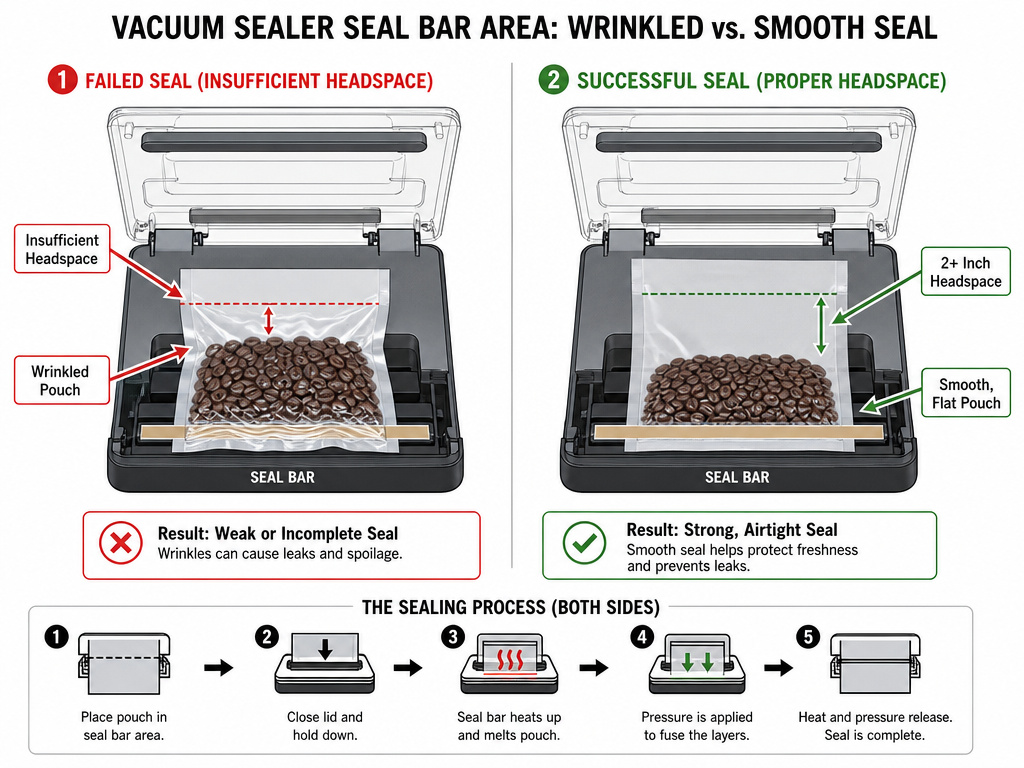 When a bag reinflates or shows freezer burn after a week, the cause is usually one of these five issues. The timeline of the failure tells you what went wrong.
| Problem | Immediate Cause | Likely Root Cause | Fix |
|---|---|---|---|
| Bag not vacuumed, no seal. | Lid didn’t latch; cycle didn’t start. | Pouch overfilled, blocking lid closure; power issue. | Check pouch placement; ensure lid is fully seated. |
| Bag vacuumed but seal is wrinkled/peeling. | Poor contact at seal bar. | Insufficient headspace (<2 inches); pouch wrinkled at bar. | Increase headspace; smooth pouch flat before closing lid. |
| Bag partially vacuumed, weak seal. | Vacuum cycle too short; minor gasket leak. | Vacuum time setting too low for bag volume; dirty lid gasket. | Increase vacuum time by 10 seconds; clean gasket. |
| Seal looks melted/stringy. | Seal bar too hot for too long. | Seal time setting too high for pouch thickness. | Decrease seal time by 0.1-second increments. |
| Bag seals but air returns within hours. | Micro-perforation in bag; seal not fully fused. | Sharp item punctured bag; seal time too short. | Use a heavier pouch; cushion sharp edges; increase seal time slightly. |
If you’ve checked all these and the machine still fails, consult your manual’s troubleshooting guide. For a Nesco vacuum sealer or an Anova vacuum sealer, the principles are the same, though the oil maintenance may not apply to their dry-pump designs.
Frequently Asked Questions
Can you vacuum seal mason jars?
Yes, with a sealer that has a hose port and a jar-sealer attachment. You vacuum seal a mason jar for storing dry goods like coffee, flour, or spices. The sealer removes air directly from the jar, and a one-way valve in the lid seals it. It’s not for liquids.
Does vacuum sealing prevent freezer burn?
Absolutely, and it’s the primary reason to do it. Vacuum sealing prevents freezer burn by removing the air that contains moisture. That moisture is what sublimates into ice crystals on the surface of your food, causing dehydration and oxidation. A perfect vacuum seal creates an anaerobic environment where freezer burn cannot occur.
What are the best bags to use?
Use bags designed for your specific sealer type. Chamber sealers require textured chamber pouches, which have a micro-pattern that allows air to escape from all sides. Using smooth bags made for external suction sealers will result in failed seals. For reviews on specific products, see our guide on the best vacuum seal bags.
How long do vacuum-sealed foods last?
In the freezer, vacuum-sealed meats last 2-3 years versus 6-9 months with conventional wrapping. In the fridge, cooked foods last 1-2 weeks versus 3-4 days. Always start with fresh, high-quality food for the best results.
My sealer smells like burning. What’s wrong?
Burning smell typically means food debris or melted plastic is on the heating element (seal bar). Unplug the machine, let it cool completely, and carefully clean the seal bar with a damp cloth. If the smell persists, the element may be failing and require service.
Before You Go
Using a vacuum sealer correctly hinges on three things: giving the machine enough bag material to work with (that’s your headspace), speaking its language in tenths-of-a-second timing adjustments, and keeping its vital parts—the oil and the gaskets—clean and supple. It’s a tool that rewards precision and punishes neglect. Start with the universal seven-step process, dial in your timing for your most-used pouches, and stick to the oil-change schedule. That routine turns a intimidating appliance into your most reliable weapon against food waste and freezer burn. For a broader look at your options, our roundup of the best vacuum sealer machines can help you choose the right model for your kitchen.
