
A Complete Guide on How to Clean a Thermos and Keep It Fresh
This post contains affiliate links. As an Amazon Associate, we earn from qualifying purchases.
To clean a thermos, you need a daily wash with warm, soapy water and a bottle brush, followed by a weekly deep clean with a baking soda soak or a vinegar-and-baking-soda reaction. Never fully submerge the flask, never use bleach, and always disassemble the lid to clean under gaskets where residue hides. Skipping the deep clean lets coffee and dairy proteins build up, and the smell becomes permanent within a month.
That residue under the gasket is where most cleaning attempts fail. You can scrub the interior until it shines, but if you miss the narrow channel where the silicone seal sits, old milk or sweet tea ferments. The smell comes back two hours after you refill it.
What follows is the split between daily upkeep and chemical deep cleaning, the exact warnings from Thermos manuals that most guides gloss over, and the one tool that makes the weekly job take three minutes instead of thirty.
Key Takeaways
- Disassemble completely every time. Residue lives under silicone gaskets and in straw assemblies; a surface wipe misses it.
- Soak with the lid OFF. When using baking soda or vinegar solutions, attaching the stopper traps carbon dioxide gas and can stress the vacuum seal.
- Bleach destroys stainless steel. Chlorine ions pit the passive oxide layer on the steel, creating microscopic holes where bacteria colonize.
- Preheat for performance. For maximum temperature retention, fill your thermos with hot tap water for 5–10 minutes before adding your coffee or soup.
- Empty it within 24 hours. Dairy-based or acidic contents left longer can spoil and build pressure, risking a forceful stopper ejection.
The Daily Clean: A 5-Minute Routine
This isn’t about a deep scrub. It’s about preventing the conditions that demand one. The official Thermos UK guide lays out a cold-to-warm water sequence that works.
Disassemble the entire lid. Pull out the silicone gasket, remove any straw pieces, and unscrew any rotating caps. Rinse the exterior under cold water first, this lifts dried-on splatters without smearing them. Then, wash the interior with warm, soapy water and a long-handled bottle brush. Scrub the silicone parts separately with a pipe cleaner to get into the grooves. Rinse everything with cold water and air-dry fully before reassembly.
Common mistake: Only rinsing instead of washing after use. Coffee oils and milk proteins coat the walls within three uses, creating a film that later stains and holds odors.
Store the thermos with the lid off. Trapping moisture inside a sealed container is how you get a mildew smell that a baking soda soak can’t fix.
The Deep Clean: Banishing Stains and Odors
When your thermos develops a tint or a persistent smell, the daily routine isn’t enough. You need a chemical reaction to break down the bonded residues. Thermos manuals prescribe two primary methods, each for a different type of buildup.
The Baking Soda Soak for Stains
For general discoloration from coffee, tea, or turmeric, the Thermos GTB flask manual specifies this method. Fill the flask with hot water and add one teaspoon of bicarbonate soda. Do not attach the stopper or lid. Let it soak overnight. The alkaline solution gently lifts organic stains without abrasion.
Rinse thoroughly in the morning. If a shadow remains, use your bottle brush with a little soap. This method works because baking soda (sodium bicarbonate) hydrolyzes in hot water, creating a mild alkaline solution that saponifies fats and dissolves tannins.
The Vinegar & Baking Soda Reaction for Odors
For sour, milky, or fermented smells, the Thermos UK guide recommends a more aggressive approach. Fill the flask about one-quarter full with white vinegar. Add 1–2 tablespoons of baking soda, it will fizz violently. Once the reaction subsides, top up the flask with warm water and let it soak for a few hours or overnight.
The combination creates carbon dioxide gas and a sodium acetate solution. The effervescence helps dislodge particles, while the acetic acid breaks down protein-based smells that baking soda alone can’t touch. Again, leave the lid off during the soak to allow gas to escape.
| Cleaning Method | Best For | Key Instruction |
|---|---|---|
| Baking Soda Soak | Brown coffee/tea stains, general film | Soak overnight, lid OFF |
| Vinegar & Baking Soda | Sour milk, fermented odors, protein residue | Initial fizzing reaction, lid OFF |
| Denture Tablet Soak | Severe, set-in stains and odors | Use 2 tablets with hot water, lid OFF |
When to Use Denture Tablets
The Thermos US FAQ mentions denture tablets as a potent option for stubborn cases. The effervescence and enzymatic cleaners in tablets like Polident are designed to break down organic biofilm. Drop two tablets into your thermos, fill with hot water, and soak overnight. This is your last step before considering replacement.
What Not to Do: The Rules That Void Your Warranty
The care manuals are strict for physical reasons. Violating these doesn’t just make your thermos dirty, it can break it.
Before you start: The vacuum insulation is a sealed air gap between two steel walls. Compromising this seal ruins the flask’s core function. The following actions risk that seal.
Do not fully immerse the flask. Submerging the entire body can allow water to seep into the sealed vacuum space through the rim weld or the base plug. Once inside, that water cannot be removed and will drastically reduce insulation performance. Washing is for the interior and exterior surfaces only.
Never use bleach or chlorine cleaners. Chlorine ions attack the passive oxide layer that makes stainless steel “stainless.” This creates micropits, tiny holes where bacteria can hide and multiply, leading to persistent odors and potential material weakness.
Avoid abrasive scrubbers. Steel wool or harsh scouring pads scratch the stainless steel interior. These scratches become nucleation sites for stains, making future cleaning harder and potentially trapping bacteria.
Skip the dishwasher for most models. While products like the Thermos FUNtainer food jar are listed as top-rack dishwasher safe, every manual recommends hand washing. The reason is the combination of harsh detergent and sustained high heat, which can dull finishes and degrade plastic components over time. For classic stainless steel flasks like the Thermos GTB series, the manual explicitly says “Do not put in an automatic dishwasher.”
Disassembly & Part-by-Part Cleaning
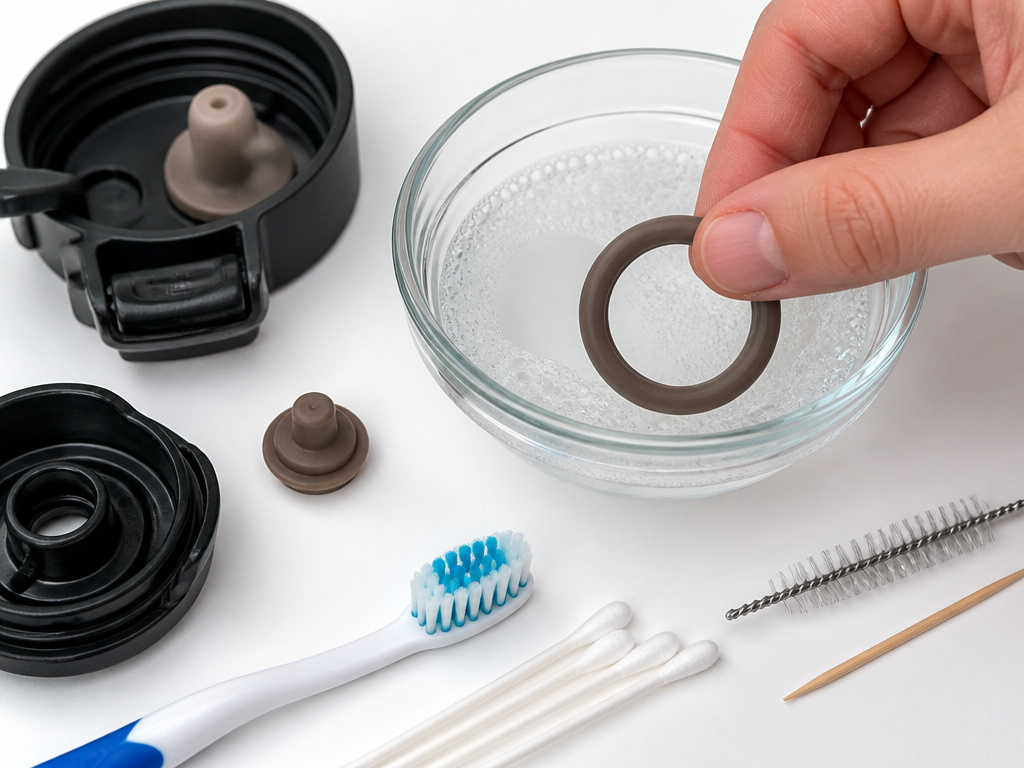
If your thermos still smells after a deep clean, you missed a part. Residue hides in plain sight.
- Silicone Gasket/Ring: Pop it out of the lid groove. Feel the inner edge with your thumb, it’s often coated in a slippery film. Soak it in warm, soapy water and scrub with a toothbrush.
- Straw or Sip Assembly: If your model has one, use a narrow straw brush. Run it through multiple times until the brush comes out clean.
- Threads and Vents: The screw threads on the lid and the small pressure-release vents can trap granules. A toothpick or a soft-bristled brush cleans these.
- Drinking Spout or Button: For flip-top or push-button lids, work the mechanism open and clean inside with a cotton swab dipped in vinegar.
Leaving these parts unwashed guarantees the odor will return. It’s like cleaning a blender jar but not the blade assembly.
How to Clean Specific Thermos Models
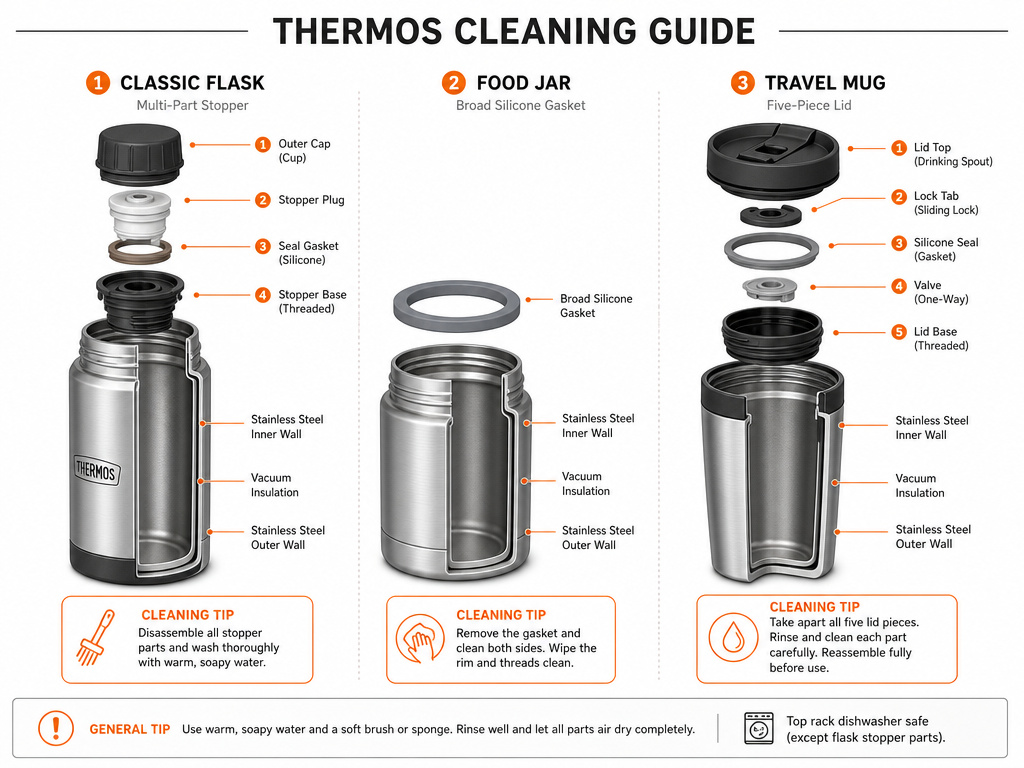
Not all thermoses are identical. The cleaning logic is the same, but the parts differ.
- Classic Stainless Steel Flask (e.g., Thermos GTB): Focus on the stopper assembly. It often unscrews into multiple pieces. The dishwasher safe claim does not apply here, hand wash only.
- Food Jar (e.g., Thermos FUNtainer): The wide mouth is easier to brush but the lid has more parts. The silicone sealing gasket is broad and flat. It is top-rack dishwasher safe, but hand washing preserves the exterior decals.
- Travel Mug with Lid: These have the most complex lids, with slide-open closures, locking buttons, and drinking holes. Full disassembly is critical. A Thermos Stainless King mug might have five separate lid components.
The principle is universal: if it touches liquid or vapor, it needs to be cleaned.
Frequently Asked Questions
Can you use rice to clean a thermos?
No. The “shake with rice and soapy water” method is ineffective for thermoses. It might scrub a narrow bottle neck but won’t reach the stains on the curved shoulders of a flask. It also does nothing for the odor under the gasket. Use a bottle brush and proper soaking solutions instead.
Why does my thermos smell like metal?
Metallic smell usually means the protective oxide layer on the stainless steel has been disturbed, often by prolonged exposure to acidic contents (like lemon water or tomato soup) or a chlorine-based cleaner. Soak the flask with a baking soda solution to help re-passivate the surface. If the smell persists, the steel may be pitted.
Is it safe to use boiling water to clean a thermos?
Yes, for the interior. Thermos manuals specify “hot water” for their soaking methods. Boiling water is fine for the stainless steel inner wall and aids in dissolving residues. However, avoid pouring boiling water over external plastic parts or lids with complex mechanisms, as it can warp them.
How often should I deep clean my thermos?
Perform a deep clean weekly if you use it daily for coffee or tea. If you use it for dairy-based soups or smoothies, deep clean it after every use. The proteins in dairy spoil rapidly and bind to the steel.
Can a stained thermos make you sick?
Stained interior itself isn’t a direct health risk if you clean it properly. The danger comes from biological growth in residues left from spoiled food or drinks. This can introduce harmful bacteria. Proper cleaning and the rule of never leaving contents for more than 24 hours eliminate this risk.
The Bottom Line
Cleaning a thermos is a fight against residue in hidden places. Win it with a bottle brush, baking soda, and the discipline to take the lid apart every time. Skip the dishwasher, ban the bleach, and never let a soup thermos sit unwashed overnight. Your nose will know by morning.
A clean thermos works better, too. The preheating a thermos step is most effective on a stain-free surface. And when you understand how a thermos works, the vacuum seal that keeps temperature stable, you see why avoiding immersion and harsh chemicals matters. It’s not just about appearance; it’s about preserving the engineering you paid for.
