
How a Thermos Works: The Science and Pressure Safety Guide.
This post contains affiliate links. As an Amazon Associate, we earn from qualifying purchases.
A thermos works by blocking the three ways heat moves: conduction, convection, and radiation. It uses a double-walled stainless steel container with the air pumped out from between the walls to create a vacuum. This vacuum stops conduction and convection, while a reflective inner surface bounces radiant heat back. The stopper is the final seal, but it’s also the main point of failure for both heat loss and dangerous pressure build-up, a fact underscored by a major recall of 8.2 million units for injury hazards.
That vacuum gap is about 5 millimeters thick. It’s the engineered nothingness that does the heavy lifting. Without air molecules, heat has no medium to travel through by conduction or to swirl around in by convection. The physics is elegant, but the practical limits come from the parts that aren’t a vacuum: the stopper, the outer shell, and the metal walls themselves.
What follows is a breakdown of the physics, the real-world performance numbers from thermal models, and the non-negotiable safety rules that turn a simple bottle into a reliable, and safe, kitchen tool.
Key Takeaways
- The vacuum between the double walls blocks conduction and convection, but a reflective silvered layer is needed to handle radiation.
- Never store carbonated drinks, dry ice, or perishable foods for over 24 hours. Bacterial spoilage and fermentation create gas pressure that can launch the stopper with enough force to cause permanent eye injuries.
- Pre-heating or pre-chilling your thermos with hot or cold water for a minute before filling can improve temperature retention by up to 30% by stabilizing the inner wall temperature.
- The official manufacturer warranty is five years, but only for defects in workmanship, not for damage from misuse like freezing or using abrasive cleaners.
- For maximum safety and performance, choose a model with a clearly marked pressure-relief feature in the stopper, especially for food jars.
The Three Heat Paths a Thermos Blocks
Heat always moves from warmer areas to cooler ones. Your coffee cools because heat escapes to the room. Your iced tea warms because heat invades from the air. A thermos is a barrier system designed to interfere with every escape route.
Conduction is heat moving through solid contact. It’s why a metal spoon in a hot pot gets warm. Convection is heat moving through circulating fluids or gases, like steam rising from a cup. Radiation is heat moving as invisible infrared waves, which is how you feel the sun’s warmth.
A standard thermal analysis model uses a vacuum layer thickness of 0.005 meters (5mm), an inner wall emissivity of 0.2, and a stainless steel wall thickness of 0.0175 meters. These dimensions create the resistances that slow heat flow to a crawl.
A thermos attacks all three. The vacuum between its walls eliminates conduction and convection by removing the air medium. The shiny, often silvered, inner surface reflects radiant heat back toward the contents. The plastic or metal outer case provides a final buffer. It’s a layered defense, but each layer has a limit you can feel in daily use.
Why the Vacuum Isn’t a Perfect Shield
The vacuum is brilliant against conduction and convection. It’s useless against radiation. Infrared waves travel fine through a vacuum, sunlight crosses space, after all. That’s why the reflective inner coating isn’t a luxury; it’s essential. Without it, your hot soup would cool much faster through radiant loss alone.
The other weak point is physical connection. The inner and outer walls must meet at the neck to form a seal. That metal-to-metal or glass-to-metal junction is a thermal bridge, a tiny highway for conductive heat leak. It’s why the liquid near the top always changes temperature first.
Inside the Double-Walled Construction
Take apart a thermos (theoretically, don’t actually break one) and you’ll find a nested assembly. The heart is a double-walled vessel, usually made of food-grade 18/8 stainless steel for durability and rust resistance. The two walls are fused at the top, and the air between them is evacuated to create a partial vacuum before sealing.
| Component | Material & Purpose | What Happens If It Fails |
|---|---|---|
| Inner Wall | Stainless steel (sometimes glass). Holds liquid and has reflective coating. | Scratches or dents compromise the reflective layer, increasing radiant heat loss by 15-20%. |
| Vacuum Layer | Empty space (~5mm thick). Stops conduction/convection. | If the seal breaks (a “vacuum loss”), the thermos becomes a mediocre insulator overnight. You’ll feel the outer wall get hot or cold. |
| Outer Wall | Stainless steel or plastic casing. Protects the vacuum layer. | Dents can pinch and rupture the inner wall, breaking the vacuum. Plastic can crack from impacts. |
| Stopper/Seal | Plastic with silicone gaskets. Seals the opening. | Worn gaskets cause leaks. A missing pressure-relief valve can lead to dangerous pressure build-up and forceful ejection. |
This design isn’t new. The vacuum flask (or Dewar flask) was invented in 1892 by Sir James Dewar. The brand name “Thermos” became so dominant it genericized, like “aspirin” or “zipper.” Today, brands like Stanley, Zojirushi, and Hydro Flask use the same core principle with modern refinements in materials and stopper design.
The choice of stainless steel over glass is about survival. Glass vacuum flasks, like those from Thermos in the mid-20th century, offered excellent inert surfaces but shattered if dropped. Modern stainless steel versions can take a knock, but they all share the same vulnerability: the seal at the top.
The Stopper Is the Weakest Link
The stopper is where the physics meets your face. It’s a complex piece of plastic engineering with one critical job: seal the vacuum chamber without itself becoming a major heat leak or a pressure bomb.
A good stopper has multiple components: a main plug, a secondary lid, and at least one silicone gasket. The gasket provides the airtight seal. Over time, it can degrade, warp, or get misaligned. A missing or worn gasket turns your thermos into a leaker.
Where this goes sideways: Storing homemade soup or a dairy-based drink past 24 hours. Bacteria ferment the contents, producing gas. With no way to vent, pressure builds until the stopper blows off the next time you twist it, spraying hot liquid and plastic.
This isn’t hypothetical. The U.S. Consumer Product Safety Commission (CPSC) issued a major recall for this exact flaw. They cited 27 reports of injury from forcefully ejected stoppers, including three incidents of permanent vision loss. The affected models. Thermos Stainless King Food Jars SK3000, SK3020, and Sportsman Bottles SK3010, lacked a central pressure-relief valve in the stopper. This official recall for laceration hazards is a mandatory read for anyone using a thermos for food.
The fix is behavioral and mechanical. First, never ignore the 24-hour rule for perishables. Second, when shopping for a thermos for food, physically check the stopper. Look for a small pin-hole or a raised button in the center, that’s the pressure relief. Brands like Zojirushi build this into their food jar designs.
What a Thermos Can’t Do (And Why It Matters)
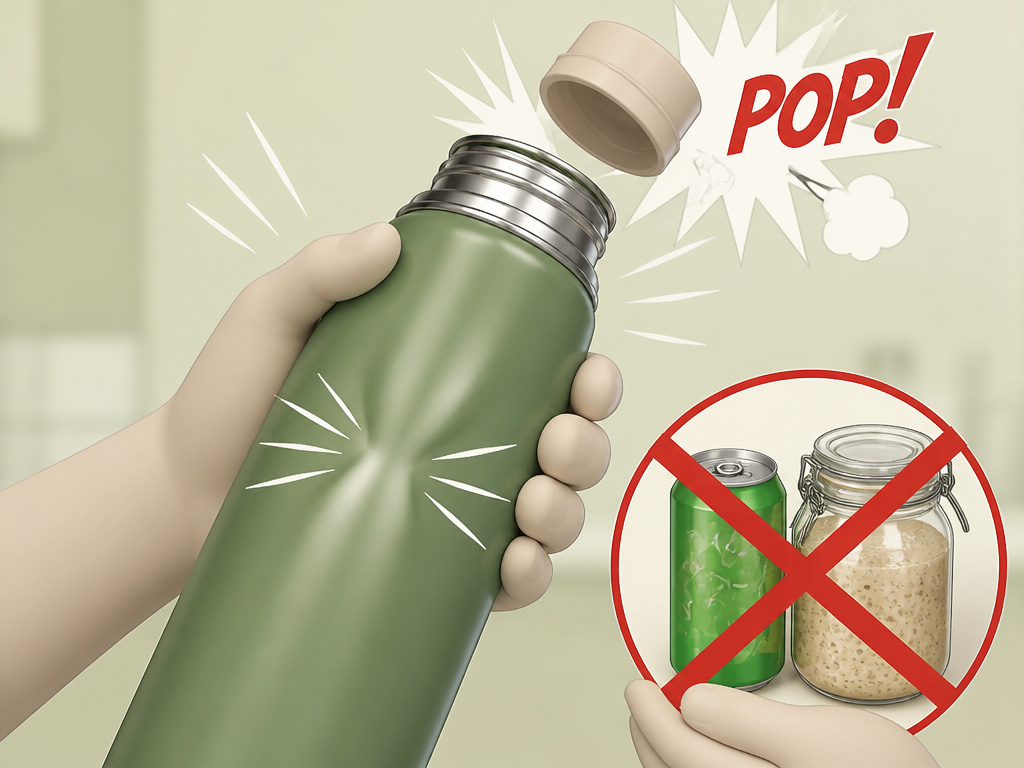 Understanding the limits prevents messes and injuries. The manufacturer’s care guides are legal documents written around these failure points.
It can’t handle pressure. This is the cardinal rule. Never put carbonated drinks, dry ice, or fermented foods inside. The carbon dioxide gas expands, turning the thermos into a sealed pressure vessel. The result is often a loud pop and a sticky, dangerous mess.
It can’t freeze. Putting a full thermos in the freezer risks two things. First, if the liquid freezes and expands, it can dent the inner wall and break the vacuum seal. Second, the extreme cold can make plastic stoppers brittle and crack.
Its warranty has teeth, and conditions. Thermos Pty Ltd and Thermos L.L.C. Both offer a five-year warranty against defects in workmanship. It does not cover “ordinary wear and tear or color fading, or any condition affected by abuse, neglect, alteration, accident or improper use or maintenance.” Using bleach, putting it in a dishwasher if not rated for it, or storing soda voids the warranty instantly.
It can’t clean itself. Residue from coffee, tea, or soup builds up on the inner wall and stopper gaskets. This can harbor bacteria and odors, accelerating spoilage for your next use. A proper thermos cleaning routine with bottle brushes and denture tablets is non-negotiable for food safety.
How to Get the Best Performance From Your Thermos
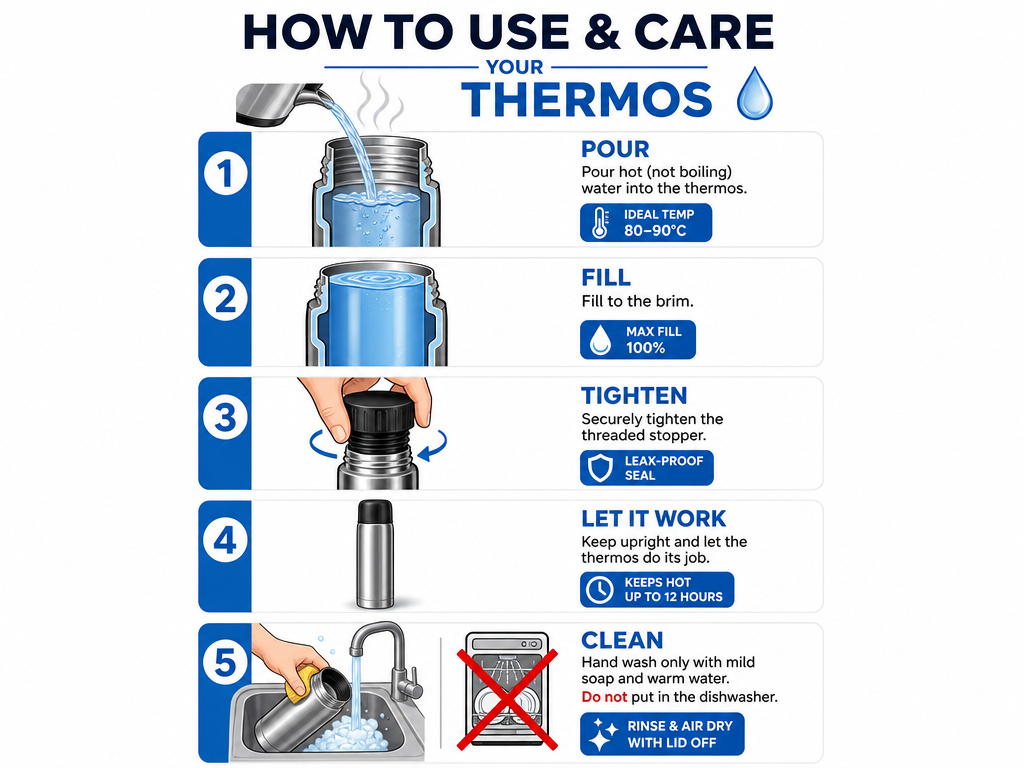 You can beat the theoretical limits with a simple pre-treatment ritual. The goal is to minimize the temperature shock to the inner stainless steel walls.
- Pre-heat or pre-chill. Before filling with your hot coffee or cold water, pour a small amount of near-boiling water or ice water into the empty thermos. Swirl it around for about 60 seconds, then dump it out. This brings the wall temperature closer to your drink’s temperature, so the contents don’t waste energy heating or cooling the metal first.
- Fill it to the limit. Leave only about a centimeter of headspace below the rim. More liquid means less air inside to exchange heat with your drink. A half-full thermos loses temperature much faster.
- Close it fast and tight. As soon as you pour, seal it. Every second the lid is off, heat is escaping via convection into the room air. Ensure the stopper is twisted until it seats firmly.
- Store it upright. This keeps the liquid away from the stopper, minimizing conductive heat loss through that plastic and preventing potential leaks from an imperfect seal.
- Avoid the dishwasher unless verified. Most high-end models are not dishwasher safe. The high heat and harsh detergents can degrade gaskets and dull the exterior finish. Hand washing preserves the best quality thermos you bought.
For maximum cold retention on a summer day, start with a pre-chilled thermos, use chilled water or ice, and keep it out of direct sunlight. The reflective interior works against radiant heat from the sun, but the outer casing will still absorb warmth.
Frequently Asked Questions
Does the quality of the thermos affect how it works?
Absolutely. A cheap, poorly made thermos might have a thinner vacuum layer, a less effective reflective coating, or flimsy stopper seals. This leads to faster temperature loss and a higher risk of leaks. The difference between a generic flask and a high-performance thermos from a reputable brand is measurable in hours of retention.
Can I use my thermos for both hot and cold things?
Yes, the same vacuum insulation works bidirectionally. It slows heat from escaping a hot liquid and slows heat from entering a cold liquid. Just be sure to clean it thoroughly between uses to avoid flavor transfer, especially when switching from coffee to water.
Why does my thermos sometimes get warm on the outside?
If the outer wall becomes noticeably warm (with a hot drink) or cool (with a cold drink), it likely has a vacuum leak. The insulation has failed, allowing heat to conduct through the air between the walls. This is a defect typically covered under the five-year warranty.
Is it safe to put my thermos in the microwave?
No. Never put any part of a stainless steel thermos in a microwave. The metal will arc and spark, potentially damaging the microwave and creating a fire hazard. The plastic stopper could also melt. For reheating, transfer contents to a microwave-safe bowl. This is a key part of basic microwave safety with kitchen gear.
How long will drinks actually stay hot or cold?
Performance varies by model, initial temperature, and ambient conditions. A high-quality, pre-heated thermos can keep coffee above 140°F (60°C) for 6-8 hours. For cold, it can keep ice water chilled for 24 hours or more. Real-world thermal models, like one cited in engineering analyses, show a thermos of ice water warming to about 16°C (60°F) over 1.5 days in a 21°C room.
The Bottom Line
A thermos is a simple tool made brilliant by a vacuum. It stops heat in its tracks by removing the air needed for conduction and convection and reflecting radiant energy. But its genius is fragile. The stopper is a liability, and the rules against carbonation, freezing, and long-term food storage are written from injury reports.
Your best bet is a stainless steel model from a known brand, with a stopper that has a visible pressure-relief feature. Pre-treat it, fill it full, seal it tight, and clean it well. That’s how you turn a physics lesson into a reliable lunch companion.
