
The Correct Way to Use a Thermos for Keeping Hot Food Safe
This post contains affiliate links. As an Amazon Associate, we earn from qualifying purchases.
To use a thermos for hot food, pre-heat the empty stainless steel container with boiling or very hot tap water for 5 to 10 minutes, then fill it with food that has been heated to a piping hot temperature (near boiling). Seal the lid tightly immediately, and never leave contents inside for more than 24 hours, as spoilage can create dangerous pressure.
That pre-heat step is the difference between a lukewarm lunch and a meal that’s still steaming at noon. Most people skip it or cut it short, and that’s why the food goes cold by 10 a.m. The process isn’t magic, it’s physics, and it hinges on three specific actions you take before the food even goes in.
What follows: the exact timing from Thermos’s own service manuals, the one component that fails first and causes leaks, the real reason you shouldn’t store tomato soup overnight, and how to test if your jar’s insulation is already shot.
Key Takeaways
- Pre-heat with boiling water for a full 5–10 minutes. Hot tap water isn’t enough if your goal is 5+ hours of heat.
- The silicone gasket under the lid is the single point of failure for leaks and heat loss. Check it every week.
- Never exceed the 24-hour storage limit, especially with dairy or tomato-based foods. Bacterial spoilage builds gas pressure that can blow the stopper off violently.
- Hand wash only. Dishwasher heat warps plastic lids and degrades gaskets faster.
- A thermos that feels warm on the outside after a 5-minute boiling water test has lost its vacuum seal. It won’t recover.
The Non-Negotiable Pre-Heat Step (And Why It Works)
You’re not just warming the jar. You’re charging a thermal battery.
A stainless steel food jar is a heat sink. Pour hot soup into a room-temperature jar, and the metal instantly absorbs a massive amount of that energy, dropping your food’s temperature by 20 or 30 degrees in the first minute. Pre-heating with boiling water brings the entire inner steel mass up to near 100°C first. When you swap the water for hot food, there’s no thermal shock, the jar is already on your food’s team, working to keep energy in, not steal it.
For maximum thermal efficiency (for stainless steel container only), pre-heat/chill for 5 to 10 minutes before each use with hot tap water for hot food and cold tap water for chilled food, then empty prior to filling. . Thermos Pty Ltd., Use, Care & Warranty manuals (Forms 300-201802, 701-10802, 400-201802)
The manufacturer’s “5 to 10 minutes” is a minimum for hot tap water. If your tap doesn’t run near-scalding, or if you need heat retention for a full workday, use water boiled in a kettle. The goal is to see steam rising from the jar when you pour it out.
Skip this, and your thermal efficiency drops by half. The food might stay warm for two hours instead of five. That’s the most common reason kids complain their pasta is cold at lunch.
| Pre-Heating Method | Best For | Expected Heat Hold |
|---|---|---|
| Very hot tap water (5-10 min) | Short trips (<3 hrs), mild climates | 3-4 hours |
| Freshly boiled water (5-10 min) | Work/school days (>5 hrs), cold climates | 5-7 hours |
| Quick rinse with hot water | Beverages only, not food | <2 hours |
How Hot Is “Hot Enough” for the Food Itself?
The jar can only maintain the temperature you give it. It cannot re-heat.
This seems obvious, but it’s where weekend meal-prep fails. You cannot microwave last night’s stew for 90 seconds, declare it “warm,” and expect a thermos to keep it safe. Pathogenic bacteria thrive between 4°C and 60°C. To stay out of that “danger zone” for hours, the food must start from a temperature that kills those bacteria.
- Soups, stews, sauces: Bring to a rolling boil on the stove. See active bubbles for at least 30 seconds.
- Pasta, rice, grains: Submerge in boiling water or sauce until piping hot throughout.
- Leftovers: Re-heat in a pan or microwave until steaming hot all the way through, 165°F (74°C) is the safety target.
Fill the pre-heated jar to within half an inch of the rim. Overfilling prevents the lid from sealing against the gasket, creating a direct path for heat to escape. It also guarantees a messy leak.
Common mistake: Under-heating leftovers. The center of a microwaved casserole can be 20 degrees colder than the edges. Stir thoroughly and check the temperature.
Pour the food in quickly and screw the lid on immediately. Every second the jar is open, heat vapor rises out and is replaced by cooler room air. The sequence is a single motion: dump water, fill food, seal lid.
The Anatomy of a Leak (And How to Stop It)
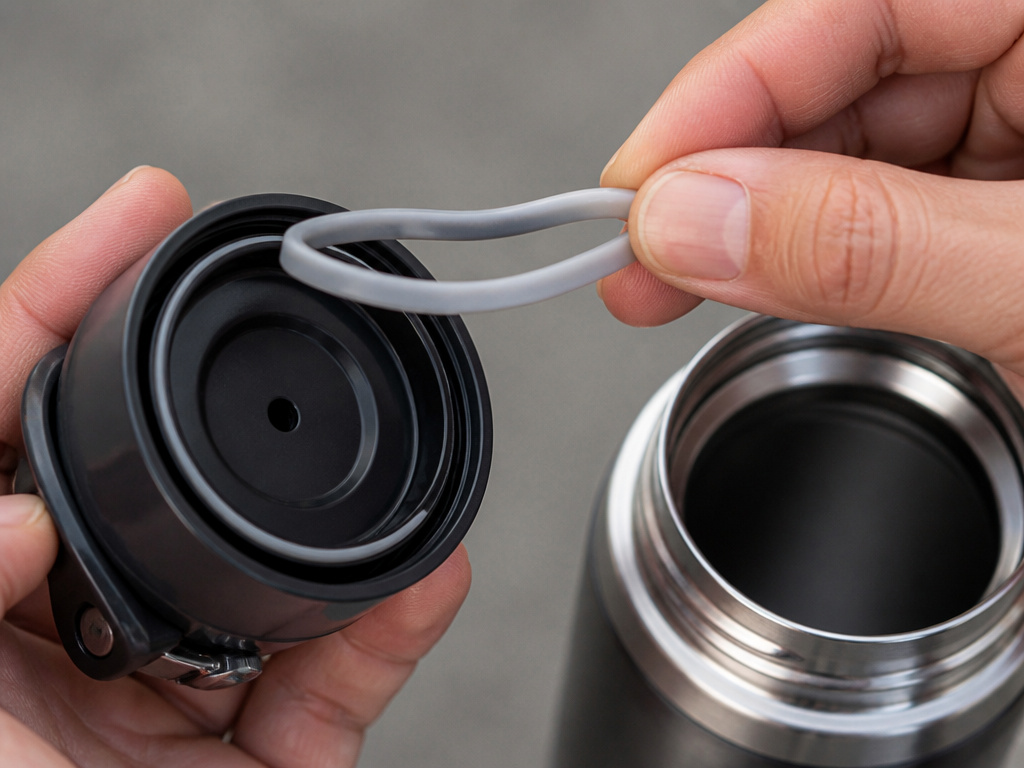 Heat escapes through two paths: the vacuum wall and the lid seal. If the outside feels cool, the vacuum is working. If food spills out, the lid failed.
The primary seal is a silicone O-ring or flat gasket seated in a groove under the lid. It compresses against the jar’s rim to create an airtight, watertight lock. This component gets brittle, misshapen, or dirty.
Check the gasket every time you wash the jar.
- Remove it from its groove.
- Stretch it slightly between your fingers. It should be flexible, not stiff or cracked.
- Look for food particles trapped underneath.
- Rinse and dry it completely before snapping it back into place.
A missing or deformed gasket will leak every time. It also breaks the vacuum integrity, allowing heat to conduct through the trapped air. Replacement gaskets are cheap and specific to your model, order them from the manufacturer, not a generic parts bin.
The secondary seal is the screw threads themselves. Cross-threading the lid, or stopping when you feel resistance instead of giving it one final firm twist, leaves a micro-gap. Hand-tight is enough; wrench-force can crack the plastic lid or warp the gasket.
Where this goes sideways: Transporting a jar on its side. Even a perfect seal can weep under pressure if the liquid is pressing directly against it. Keep it upright in your bag. The Thermos L.L.C. Care guide is explicit: “DO NOT carry or transport product other than in an upright position.”
The 24-Hour Rule Isn’t Just a Suggestion
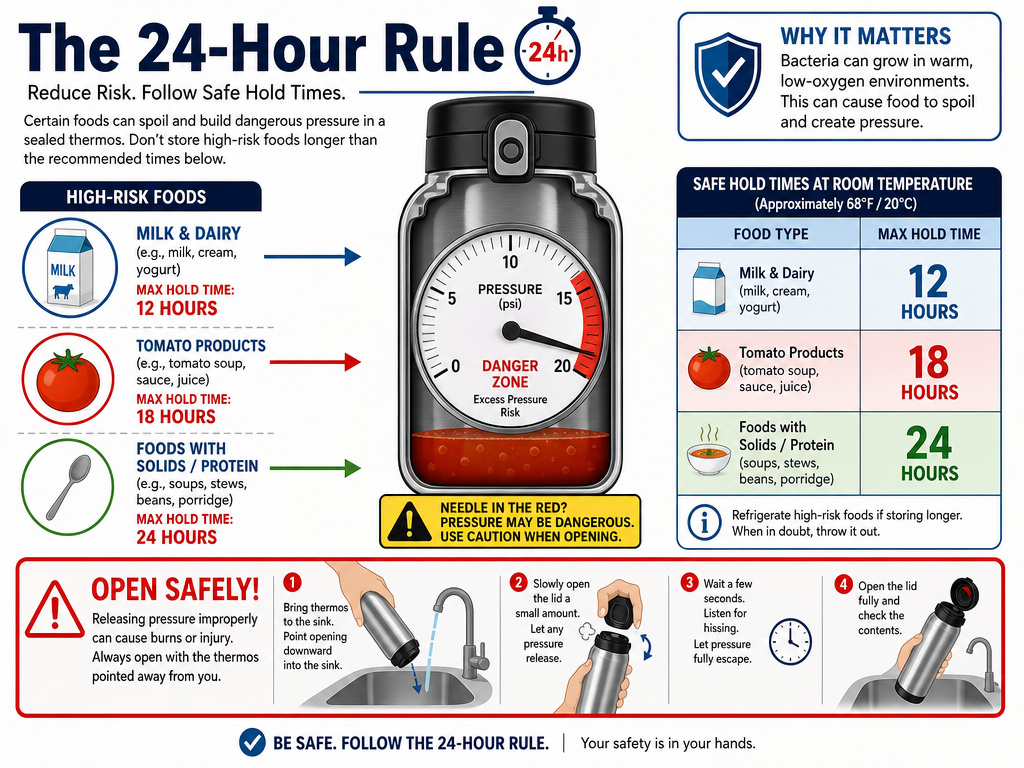 A thermos is not a refrigerator. It’s a slow-cooling chamber.
The official guidance from every Thermos manual is identical: “Contents should not be left in container for longer than 24 hours.” This isn’t about temperature; it’s about microbiology. The jar’s insulated environment, while cooling, can still be warm enough to accelerate bacterial growth in perishable foods.
The risk multiplies with certain ingredients. Dairy, homemade soups, and tomato-based sauces spoil faster. Partially consumed food introduces new bacteria from your spoon. Each time you open and re-close the jar, you lock in warmer air.
| Food Type | Maximum Safe Hold Time | Specific Risk |
|---|---|---|
| Clear broths, plain pasta | Up to 24 hours | Low acidity, less protein |
| Cream-based soups, cheese sauces | Under 8 hours | Dairy spoilage, rapid bacteria growth |
| Tomato soup, chili with meat | Under 6 hours | High acidity + protein creates gas pressure |
| Partially eaten leftovers | 4 hours or discard | Introduced contaminants |
The consequence of ignoring this isn’t just a sour smell. Spoilage generates gas. In a sealed container, that pressure has nowhere to go.
Proceed with caution when using the product with quick spoiling or partially consumed contents, as pressure may build up in the container and possibly cause forceful ejection of the stopper or contents… Before attempting to open container, ENSURE THE OPENING IS POINTED AWAY FROM THE USER. . Thermos Pty Ltd., Caution sections
If a jar has been sealed for over a day, open it pointed into a sink. Better yet, don’t open it at all, dispose of it according to your local waste rules. Never force a stuck lid.
Cleaning for Longevity, Not Just Hygiene
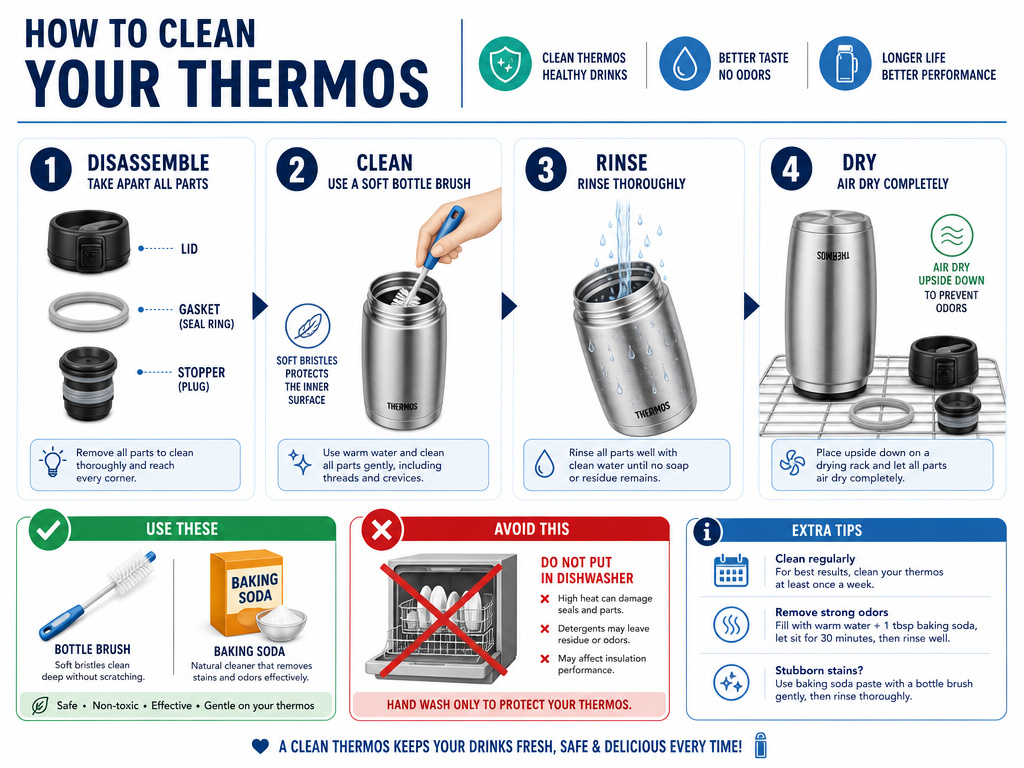 Dishwashers destroy thermoses. The guarantee is in the fine print.
While some models are labeled “top-rack dishwasher safe,” every manual strongly recommends hand washing. The reason is twofold. First, the intense, prolonged heat of a dishwasher cycle (often over 65°C) can warp plastic lids and degrade the silicone gasket’s elasticity. Second, dishwasher detergents are abrasive. They dull the stainless steel’s exterior finish and can leave a chemical film inside.
The right cleaning sequence:
- Disassemble completely. Remove the lid, gasket, stopper, and any straws.
- Wash all parts with warm, soapy water and a soft bottle brush. Scrub under the gasket groove.
- Rinse thoroughly. Soap residue tastes terrible.
- Air-dry upside down on a rack. Never store the jar with the lid sealed on, trapped moisture grows mold.
For stubborn stains or odors (coffee, tomato, curry), a baking soda soak works. Fill the jar with hot water, add a teaspoon of baking soda, and let it sit overnight. Do not attach the lid during this soak. The chemical reaction needs to vent. For extreme cases, two denture tablets dissolved in hot water will lift almost any stain.
Bleach is forbidden. Chlorine corrodes stainless steel and will ruin the jar.
How to Test If Your Thermos Is Actually Broken
Insulation failure is gradual, not sudden. You’ll notice the hold time getting shorter over months.
The vacuum seal between the double stainless steel walls is the core technology. If it’s compromised, by a dent, a manufacturing flaw, or metal fatigue, the jar is just a metal cup. You can test this in five minutes.
The Boiling Water Test:
- Fill the clean, empty jar with boiling water.
- Screw the lid on tightly.
- Let it sit undisturbed for 5 minutes.
- Carefully feel the outside wall and bottom.
A functioning vacuum-insulated jar will feel room temperature or barely warm. If the exterior is hot to the touch, the vacuum is lost. The heat is conducting directly through the wall. This damage is not repairable. The jar will never perform to its original standard.
Thermos products carry a 5-year warranty against defects in materials and workmanship. If your jar fails this test within that period, contact Thermos L.L.C. Warranty service. They will typically repair or replace it within 30 days of receiving it.
Choosing the Right Tool for the Job
Not every insulated container is a Thermos, and not every Thermos is ideal for food.
A narrow-mouth bottle is for drinks. A wide-mouth jar is for meals. The difference is about loading and cleaning. Spoons fit in wide mouths. You can get a brush to the bottom. For soups, stews, and pasta, a wide mouth thermos is the only practical choice.
Brand matters because of the warranty and quality of the vacuum seal. The Thermos® Brand Stainless Steel Food Jar is the benchmark, with consistent performance and available replacement parts. Competitors like Zojirushi or Stanley make excellent jars, but their gaskets and lids are proprietary, lose one, and you’re hunting for a specific spare.
For a child’s lunch, consider a Thermos FUNtainer, it’s BPA-free, slightly smaller, and often has fun designs. For an adult needing all-day heat, the Thermos Stainless King holds more and has a rugged build.
The default pick: For most people packing lunches, the standard 16-ounce Thermos Stainless Steel Food Jar. It’s the right size, reliable, and every accessory is easy to find.
Frequently Asked Questions
Can you put a thermos in the microwave?
No. Never. This is prohibited in every care guide. Metal in a microwave is a fire hazard. The vacuum seal can also trap steam and explode. If you need to reheat food, transfer it to a microwave-safe bowl.
Why does my thermos smell bad?
Odors mean trapped organic material, usually under the gasket or in a scratch on the stainless steel. A baking soda or denture tablet soak will remove it. Ensure the jar is completely dry before storage to prevent mildew.
How long will hot food actually stay hot?
With proper pre-heating and a quality jar, food can stay above 60°C for 5 to 7 hours. Thin liquids cool faster than dense stews. The ambient temperature matters, a jar in a cold car will lose heat quicker than one in an insulated lunch bag.
Is it safe to put dairy in a thermos?
Yes, but with a strict timeline. Dairy-based soups or sauces should be consumed within 4-6 hours of being packed hot. Do not store dairy in a thermos overnight under any circumstances.
Can a thermos keep food cold as well?
Absolutely. The insulation works both ways. Pre-chill the jar with ice water for 10 minutes, then fill it with cold food or drinks. It will keep items cold for up to 12 hours, making it perfect for salads or yogurt.
Before You Go
Using a thermos correctly boils down to three things: start with a hot container, fill it with even hotter food, and respect the 24-hour biological clock. The pre-heat is non-negotiable. The gasket is your first line of defense. And when in doubt, throw it out, the risk of foodborne illness or a pressure explosion isn’t worth a container of soup.
Get the sequence right, and a hot lunch away from home becomes a simple, reliable pleasure. Get it wrong, and you’re just carrying a heavy, cold disappointment.
