
Guide on How to Dry Age Meat in Refrigerator Successfully
This post contains affiliate links. As an Amazon Associate, we earn from qualifying purchases.
Dry aging meat in a refrigerator requires matching three things: a cold, stable temperature (0–4°C / 32–39°F), controlled air circulation using a wire rack, and a protective wrap like cheesecloth to manage moisture loss in a low-humidity home environment. For food safety in a standard fridge, limit the process to 3–4 days for enhanced browning and tenderness; true flavor-concentrating dry aging beyond 21 days demands commercial-grade humidity and airflow control.
That temperature and humidity gap isn’t academic. It’s the line between a successful home technique and a spoiled, wasteful experiment. Commercial units hold meat at 75–85% relative humidity and precise temperatures for weeks. Your kitchen fridge runs at about 30–50% humidity and its temperature spikes every time you open the door.
What follows is the full breakdown: the science that makes it work, the exact 3–4 day method for home cooks, the commercial specs that explain why longer times are risky, and how to spot the point where your meat stops improving and starts oxidizing.
Key Takeaways
- Wrap meat in cheesecloth and place it on a wire rack over a pan. The cloth slows dehydration in a dry fridge; the rack ensures air circulates on all sides.
- Adhere to the 3–4 day limit for home refrigerators. Longer periods require the 75–85% humidity of a commercial aging chamber, which your fridge cannot provide.
- Use only thick, well-marbled cuts like rib-eye, strip, or porterhouse. Lean cuts like tenderloin or sirloin dry out too quickly and become tough.
- The back of the bottom shelf is the coldest spot. Use it. Frequent door openings cause temperature swings that accelerate bacterial growth over enzymatic tenderization.
- Trim off the dried, leathery exterior (the pellicle) before cooking. That crust protected the interior meat but is too tough and funky to eat.
The Science in Your Fridge (And Why Humidity is Everything)
Dry aging works through two simultaneous processes: evaporation and enzymatic breakdown. Moisture leaves the meat’s surface, concentrating its flavor. Inside, natural enzymes (calpain and cathepsin) slowly break down muscle proteins and connective tissue, which tenderizes the meat and creates savory, umami-rich amino acids.
A home refrigerator typically operates at 30–50% relative humidity. The Meat & Livestock Australia guidelines for commercial dry aging specify a humidity range of 75–85%. This difference dictates everything about timing and method at home.
Your fridge is a desert compared to a professional aging cabinet. Without intervention, a steak left uncovered for a week in that dry air would turn into a stiff, tasteless jerky. The cheesecloth wrap recommended by America’s Test Kitchen is a clever hack, it slows the moisture loss just enough to let the enzymatic tenderization happen without completely desiccating the surface.
The 3-4 Day Rule vs 21+ Days (Why the Gap Exists)
You’ll see two numbers: culinary sources say 3-4 days, academic and industry papers discuss 21, 28, or 55 days. Both are correct for their context.
| Context | Typical Duration | Key Condition | Primary Goal |
|---|---|---|---|
| Home Refrigerator | 3–4 days | Low humidity (~30-50%) | Enhanced browning, slight tenderness |
| Commercial Chamber | 21–55+ days | Controlled humidity (75-85%) | Profound flavor concentration, significant tenderization |
The 3-4 day window is the safe zone for a standard kitchen. It maximizes the “surface drying” effect, which gives you a better sear, without pushing into the territory where the lack of controlled humidity causes excessive weight loss or safety concerns.
The academic timeline comes from studies like the METU thesis on home refrigerator aging, which used a specially modified fridge compartment to maintain 80% humidity and 0°C. In that controlled environment, researchers aged rib steaks for 7, 14, 21, and 28 days. Their finding? After 21 days, a sharp rise in oxidation markers occurred. That’s the threshold where fat begins to break down in ways that can create off-flavors without professional oversight.
What You’ll Need: The 4 Essential Tools
This isn’t a fancy setup. You likely have three items already. The fourth is non-negotiable.
- A Wire Rack. This elevates the meat, allowing air to circulate underneath. A roasting rack or cooling rack works perfectly. Without it, the bottom side sits in its own moisture and won’t form the proper protective pellicle.
- Cheesecloth. This is your humidity buffer. Wrap the meat loosely, one layer is enough. It protects the surface from drying too fast while still permitting airflow. Do not use plastic wrap, foil, or a sealed bag; you’ll trap moisture and promote bacterial spoilage.
- A Rimmed Baking Sheet. Place the rack on this. It catches any drips and makes the whole setup easy to move in and out of the fridge. Line it with paper towels for easier cleanup.
- A Reliable Refrigerator Thermometer. You need to know your fridge’s coldest zone is truly at or below 4°C (39°F). Don’t guess. The $10 investment prevents a $50 steak from spoiling.
For long-term meat storage beyond aging, a dedicated meat freezer provides stable, deep-cold conditions that a refrigerator cannot match.
Step-by-Step Guide to Dry Aging in a Home Fridge
Follow this sequence exactly. The timing between steps matters.
Step 1: Pat the Meat Bone-Dry.
Remove the steak from its packaging and blot it aggressively with paper towels. Any surface moisture is a breeding ground for unwanted bacteria and prevents the pellicle from forming correctly. The surface should feel tacky, not wet.
Step 2: Loosely Wrap in Cheesecloth.
Drape a single layer of cheesecloth over the meat and tuck the ends underneath loosely. You are not making a tight package. The goal is a breathable cover. If the cloth is too tight, it will stick to the meat as it dries and tear the pellicle when you remove it.
Step 3: Set Up the Rack and Pan.
Place your wire rack inside the rimmed baking sheet. Position the wrapped meat on the rack, ensuring no part overhangs and touches the pan. This is where proper wire racks earn their keep, they provide full airflow.
Step 4: Find the Coldest Spot and Wait.
Put the pan on the back of the bottom shelf of your fridge. This area has the most stable, coldest temperature. Close the door and do not open it unnecessarily for the next three days. Every time you open it, warm, moist air rushes in, causing a temperature spike.
Step 5: Trim and Cook.
After 3-4 days, remove the meat. The cheesecloth will be stuck to a dark, firm, leathery crust, the pellicle. Peel the cloth off. Use a sharp knife to trim off this crust completely; it’s inedible. What remains is your concentrated, tenderized steak. Cook it immediately using high, dry heat (grill, broil, cast-iron sear) to capitalize on the improved browning.
Where this goes sideways: Skipping the trim. The pellicle is tough, chewy, and can have bitter notes from concentrated surface compounds. If you don’t cut it away, you’ll ruin the texture of the entire steak.
Choosing and Preparing the Right Cut of Meat

Not all meat is fit for dry aging. The process amplifies what’s already there, good and bad.
Best Cuts:
- Rib-eye: The high fat content (marbling) bastes the meat from within as it ages, preventing it from becoming too dry. This is the top choice.
- New York Strip (Top Loin): Excellent marbling and a robust beefy flavor that concentrates beautifully.
- Porterhouse/T-Bone: You get two textures in one, the tender filet and the flavorful strip.
Avoid These Cuts:
- Lean Cuts like Tenderloin/Filet Mignon: With little internal fat, they desiccate quickly and become tough, not tender.
- Thin Steaks (under 1.5 inches): The ratio of crust to interior meat is too high. You’ll trim away most of it.
- Pre-Tenderized or Blade-Punched Meat: The added surface area invites spoilage bacteria.
The principle of concentrating flavor through controlled drying connects to other preservation methods. For instance, salt curing uses a different agent, salt, to draw out moisture and create an environment hostile to spoilage microbes.
Troubleshooting: Signs of Success vs. Spoilage
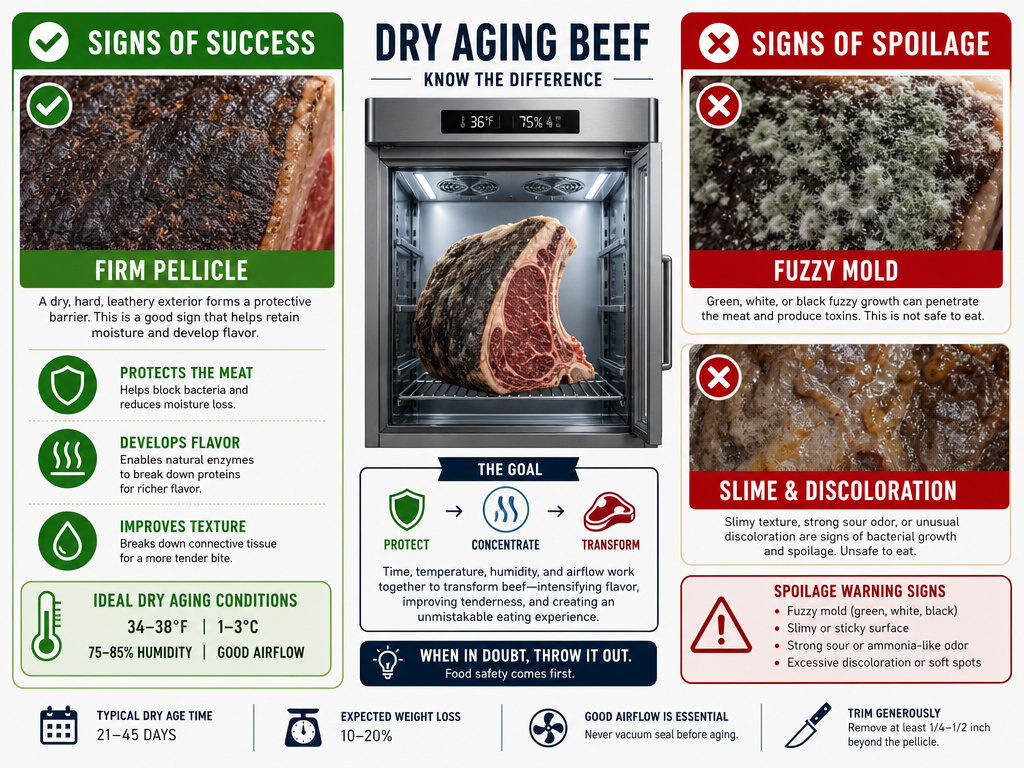
You must use your senses. Sight and smell don’t lie.
| What You See/Smell | Likely Cause | Is It Safe? | Action |
|---|---|---|---|
| Dark, firm, leathery crust | Successful pellicle formation. | Yes. | Trim it off and cook. |
| Faint, pleasant, nutty/cheesy aroma | Beneficial mold/enzyme activity (common in long-term aging). | Usually, in commercial settings. | At home, any strong smell is a warning. Trim aggressively and smell the interior meat. |
| Slimy, sticky surface | Bacterial growth. | No. | Discard the meat immediately. |
| Green, black, or fuzzy mold patches | Contamination from spores. | No. | Discard the meat. Do not attempt to trim. |
| Strong, sour, or putrid odor | Spoilage bacteria or yeast. | No. | Discard the meat immediately. |
The safety rules for dry aging are absolute. If you have any doubt, throw it out. This is not the same as judging meat with freezer burn, which is often a quality issue, not a safety one.
What About Dry Aging Game Meat?
Venison, elk, and other lean game meats can benefit from a short dry age, but the rules change. Their low fat content means the risk of rancidity is lower, but the window for tenderness is narrower.
The ICE guide to dry-aging meat notes that game can often be aged longer without developing off-flavits precisely because it’s so lean. Start with 3 days for a thick backstrap. The goal is primarily tenderization and surface drying for a better crust, not the complex flavor development you get from fatty beef.
Frequently Asked Questions
Can I dry age meat without cheesecloth?
Yes, but only if you can precisely control humidity. Chef Shawn Matijevich of ICE recommends placing unwrapped meat on a rack for up to three days. This works because the technique relies on your fridge’s natural dryness. The cheesecloth method is simply a safer, more forgiving buffer for most home environments.
Why can’t I dry age for a month at home?
Your refrigerator lacks the humidity control (75-85%) and dedicated, sterile environment of a commercial aging cabinet. At low home humidity, meat loses moisture too quickly, resulting in excessive trim loss and a hard, inedible exterior. Furthermore, a standard fridge contains other foods, introducing cross-contamination risks over long periods.
Does dry aging work for chicken or pork?
It can, but with extreme caution and much shorter times. Poultry and pork have different bacterial profiles (like salmonella) and fat composition. A whole, air-chilled chicken can be left uncovered on a rack for 24-48 hours in the fridge to dry the skin for roasting. Do not attempt multi-day dry aging with pork or chicken at home.
How much weight does the meat lose?
In a 3-4 day home dry age, expect about 3-8% weight loss, mostly from surface evaporation. In commercial 28-day aging, losses from evaporation and trimming can reach 15-24%, which is why dry-aged steak commands a higher price.
Can I vacuum-seal meat to dry age it?
No. Vacuum-sealing creates a wet-aging environment, not dry aging. The meat ages in its own juices, which tenderizes it but does not concentrate flavor through evaporation. A vacuum sealer is fantastic for long-term freezer storage to prevent freezer burn, but it serves the opposite purpose here.
The Bottom Line
Dry aging at home is a powerful technique for improving a good steak, but it is not a shortcut to replicating a 28-day, professionally aged product. The 3-4 day method with cheesecloth and a wire rack reliably delivers better browning and a slight tenderness boost, worth the effort for a special meal.
Respect the limits of your equipment. Your kitchen refrigerator is a tool for short-term raw meat storage, not a climate-controlled aging cabinet. For the deep, funky, profoundly tender results of long-term aging, seek out a reputable butcher. They’ve invested in the environment, the humidity controls, the sterile air circulation, the dedicated space, that makes the extended timeline safe and spectacular. Your job is to master the first few days.
