
How to Keep Your Food Warm Until Lunch Without a Thermos
This post contains affiliate links. As an Amazon Associate, we earn from qualifying purchases.
To keep your food warm until lunch without a thermos, you must hold it above 140°F using a pre-heated, insulated container and supplemental heat packs. Bacteria double every 20 minutes between 40°F and 140°F, so the goal is to keep food out of this danger zone for the entire storage period, which typically requires more than just wrapping it in a towel.
The 140°F threshold isn’t arbitrary. It’s the USDA’s hot holding safety line. Dropping below it starts the clock on bacterial growth, and in summer heat above 90°F, that clock runs twice as fast.
What follows is a breakdown of the three things that actually work: the right container, the correct pre-heating ritual, and the layered insulation method that buys you the most time. We’ll also cover the foods that simply aren’t worth the risk.
Key Takeaways
- The safety target is 140°F. Below that, food enters the “temperature danger zone” where bacteria multiply rapidly.
- Pre-heat any insulated container with boiling water for 2-3 minutes before adding hot food; skipping this step can cut safe holding time in half.
- Use two heat sources: a pre-heated container plus a supplemental hot pack or a wrapped brick heated in the oven.
- Avoid brown paper bags entirely for hot food; they offer zero insulation and accelerate cooling.
- In summer temperatures (90°F+), discard any perishable food left unrefrigerated for more than one hour, not two.
The 140°F Target and the Temperature Danger Zone
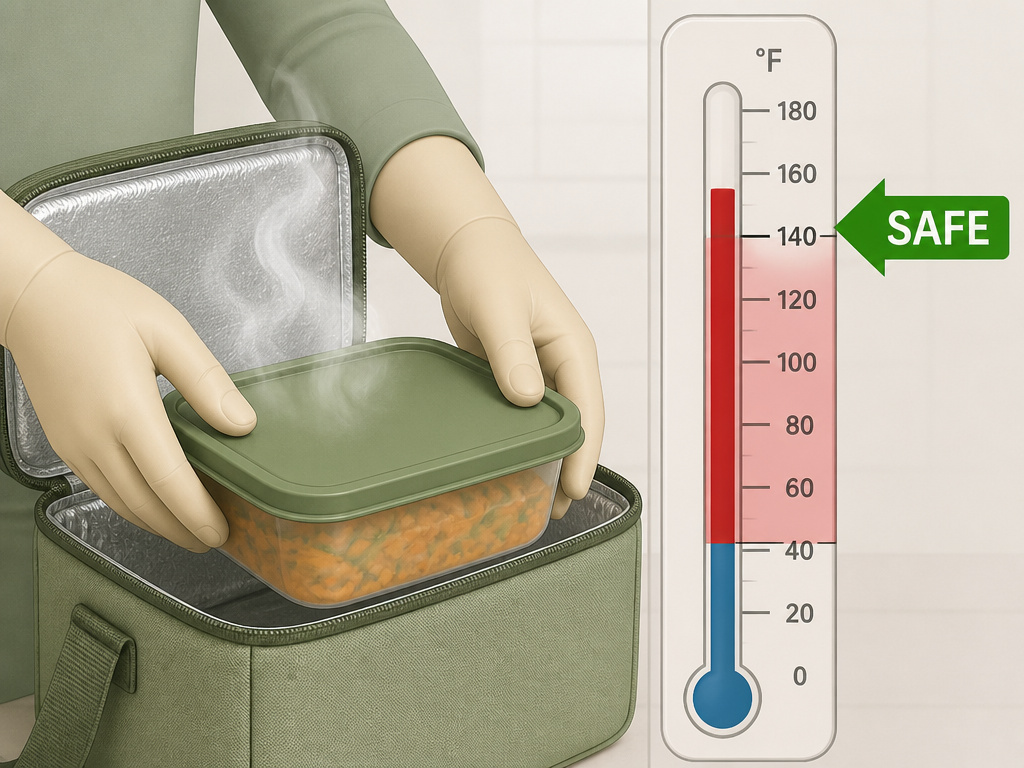
This isn’t about preference. It’s about pathogen growth rates. The Temperature Danger Zone is defined by food safety authorities as 40°F to 140°F. Within this range, bacteria like Salmonella and E. Coli can double in number every 20 minutes. Your goal isn’t just “warm.” It’s “too hot for bacteria to grow.”
Food must be kept at or above 140°F to remain safely out of the temperature danger zone. Below this threshold, the countdown to potential spoilage and foodborne illness begins, with the risk accelerating in warmer ambient conditions.
The USDA Food Safety and Inspection Service sets the rule: discard perishable food after two hours at room temperature. In summer heat of 90°F or above, discard it after one hour. That shortened timeline shows how ambient temperature directly pressures your insulation strategy. A container that works in a 70°F office may fail in a car parked in the sun.
The Clemson bag lunch safety factsheet states hot foods “need to stay hot” and should be kept at or above 140°F. This is the non-negotiable line. Your insulation method is a race against the clock to keep food on the safe side of that line until lunch.
Your Three Best Insulation Options (No Thermos Needed)
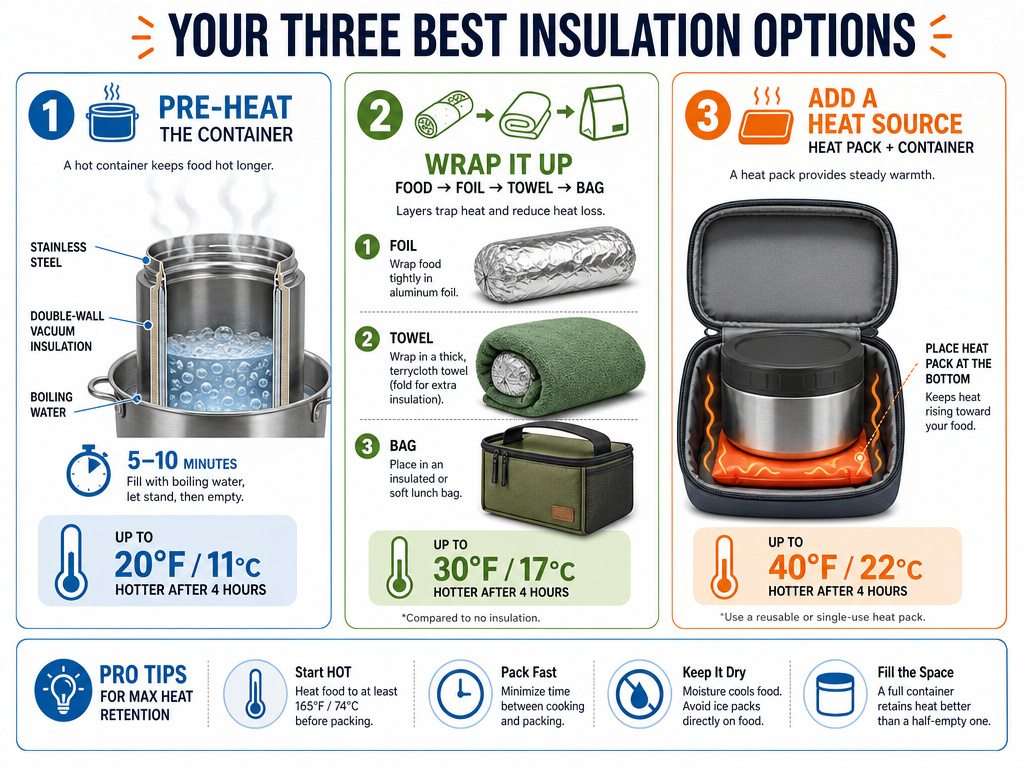
A thermos is a specialized insulated container. You can replicate its function with other gear. The principle is always the same: create a barrier that slows the transfer of heat from your food to the cooler environment. These three options, used correctly, can maintain safe temperatures for 3-4 hours.
| Option | Best For | Critical Step Often Missed |
|---|---|---|
| Insulated Food Container | Soups, stews, casseroles, pasta | Pre-heating with boiling water for 2-3 minutes |
| Layered Wrap Method | Individual items like burritos, baked potatoes | Wrapping first in foil, then a thick cloth towel |
| Supplemental Heat Pack | Extending the hold time of any container | Activating the pack 15 minutes before packing |
Insulated food containers are your first choice. Look for stainless-steel or glass-lined ones like those from Stanley or Zojirushi; they retain heat better than thin plastic. The pre-heating step is non-negotiable. Fill the container with boiling water, seal it, and let it sit for 2-3 minutes. Dump the water, immediately add piping hot food (at least 165°F straight from the stove), and seal it tight. This process brings the container’s internal mass up to temperature so it doesn’t steal heat from your meal.
The layered wrap method uses materials you already own. Wrap your hot item tightly in aluminum foil. This provides a conductive barrier. Then, wrap that bundle in a thick, dry cloth towel—a flour-sack towel isn’t enough; use a terrycloth hand towel or small bath towel. The towel creates an air gap, which is the actual insulator. Place this bundle inside a standard insulated lunch bag for a third layer of protection.
For the longest hold, add a supplemental heat pack. These are the opposite of ice packs. You boil them or microwave them to activate. Place one at the bottom of your insulated lunch box, then your pre-heated food container, then another heat pack on top if possible. This external heat source helps counteract heat loss through the walls of your container.
Common mistake: Using a single layer of insulation, like just a towel or just a lunch box. Heat escapes from all surfaces. Effective insulation requires multiple, sealed layers to trap air and slow conduction.
The Pre-Heating Ritual: Why It’s Not Optional
Skipping pre-heating is the single fastest way to fail. A room-temperature insulated container is a heat sink. When you add 165°F food, the container’s cold walls and interior immediately start absorbing that energy, pulling the core temperature of your food down toward the danger zone much faster.
The correct sequence takes five minutes and uses boiling water:
1. Boil water. Use a kettle or pot. You need enough to fill your chosen container.
2. Fill and wait. Pour the boiling water into the empty, dry container. Close the lid. Let it stand for a full 2-3 minutes. This allows the thermal mass of the container walls to absorb heat.
3. Empty and load. Carefully dump the water out. Immediately add your steaming hot food. The goal is to minimize the time the empty, hot container is open to cooler air.
4. Seal immediately. Put the lid on and ensure it’s locked or clipped shut.
This process is consistently recommended by extension services, including the University of Maine lunch safety guide, which specifies filling the container with boiled water, letting it stand, then emptying it before adding hot food. It turns your container from a competitor into an ally.
What Not to Pack (And What Works Better)
Some foods are poor candidates for hot holding without a dedicated heat source. They either cool too quickly or their quality nosedives.
Avoid these for long, unheated holds:
- Foods with high moisture content but low mass, like a single serving of plain rice or a thin broth. They have little thermal mass to retain heat.
- Fried foods expecting to stay crisp. They will steam inside any sealed container and become soggy.
- Dairy-based cream sauces. They are particularly sensitive to temperature fluctuation and can spoil more readily.
Excellent choices include:
- Dense, moist casseroles or stews. Chili, baked pasta, or curry have high thermal mass and hold heat evenly.
- Whole, baked proteins. A baked potato, a meatloaf slice, or a chicken breast retain core heat well.
- Thermal mass boosters. Pack a separate container of boiling water or a hot brick wrapped in foil to place alongside your food container inside your thermal bag. It acts as a buffer.
If hot holding seems too risky for your situation, the safest pivot is to choose non-perishable, shelf-stable lunch items. The University of Delaware safe lunch PDF advises avoiding foods that require hot holding or reheating if no microwave is available, suggesting alternatives like peanut butter sandwiches, whole fruits, and crackers.
The Brown Paper Bag Problem
Brown paper bags are functionally useless for keeping food warm. They offer no insulating air gap and are designed to be breathable, which actively promotes heat loss through convection. Using one for a hot lunch guarantees your food will plummet through the danger zone quickly.
Where this goes sideways: Relying on a brown paper bag for insulation. It provides none. In summer heat, a sandwich with mayo in a paper bag left in a car can become unsafe in under an hour, not two.
Extension services are unanimous on this. The University of Maine guide states “brown paper bags are not well insulated,” and the Washington State University PDF recommends using an insulated bag or, if using a paper bag, storing it in a refrigerator immediately. For hot food, a paper bag is not an option. Your baseline must be a proper insulated food container inside an insulated lunch bag.
A Step-by-Step Plan for a 4-Hour Hold
This method combines all the effective principles. It’s for a scenario where you pack at 8 AM and eat at 12 PM.
- Cook and Heat Thoroughly. Bring your food to at least 165°F. Portion it directly from the stove.
- Pre-Heat Your Container. While food cooks, fill your insulated container with boiling water. Seal it for 3 minutes.
- Prepare the Ecosystem. Place an activated hot pack at the bottom of your best lunch box. Have a thick towel ready.
- Load and Seal. Dump the water from your container, immediately add the hot food, and seal it tightly.
- Create the Final Bundle. Wrap the sealed container in the towel. Place this bundle on top of the hot pack in the lunch box. If you have a second hot pack, place it on top.
- Minimize Openings. Keep the lunch box closed until you are ready to eat. Every peek releases a surge of trapped warm air.
If you can’t verify the temperature at lunchtime, use the time rule. If it’s been under 4 hours and the container is still noticeably warm to the touch, it’s likely safe. If it’s lukewarm or cold, or if it’s a summer day, err on the side of caution and don’t eat it. The safe holding time is a maximum, not a guarantee.
Frequently Asked Questions
Can I use aluminum foil by itself to keep food warm?
No. Aluminum foil is an excellent conductor, not an insulator. It will actually speed up heat loss if used alone by efficiently transferring heat from the food to the cooler air. It must be paired with an insulating layer like a towel or an air gap to be effective.
How long will a baked potato stay warm wrapped in foil and a towel?
Large baked potato, straight from the oven and double-wrapped in foil then a thick towel, can retain a safe core temperature for about 2 hours. For a longer hold, place the wrapped potato inside a pre-warmed insulated container, which can extend that to 3-4 hours.
Is it safe to reheat food at work and then keep it warm until lunch?
Yes, but you must reheat it to at least 165°F first, measured with a food thermometer. Then, immediately transfer it to a pre-heated insulated container. The danger is reheating to only a “warm” temperature, which leaves it in the middle of the danger zone, and then holding it there.
What’s the best type of container for keeping food hot?
Stainless-steel or glass-lined insulated container with a tight-sealing, screw-top lid is best. Plastic containers, even if labeled insulated, generally have thinner walls and lose heat faster. The Stanley Classic Food Jar is a benchmark for durability and heat retention.
Can I use a heated lunch box instead of all these methods?
Absolutely. A cordless heated lunch box is the most reliable solution. It actively maintains temperature by plugging into a wall outlet or car adapter, eliminating the guesswork and time limits of passive insulation. It’s the one method that guarantees your food stays above 140°F indefinitely.
Before You Go
The core idea is simple: treat heat like a commodity you’re trying to bank. You start with a large deposit (165°F food), you reduce withdrawals (pre-heat your container), and you insulate the vault (use multiple layers). The 140°F mark is your account’s minimum balance—dip below it, and you’re in the red. For most people, the winning combo is a quality pre-heated insulated container inside a good lunch bag. Skip the paper sacks, master the pre-heat, and you’ll have a safe, hot lunch without ever needing a traditional thermos.
