
Prevent Ice Cream Freezer Burn with These Simple Techniques
This post contains affiliate links. As an Amazon Associate, we earn from qualifying purchases.
To prevent ice cream from getting freezer burn, you need a three-part barrier: an airtight lid, a surface wrap pressed directly onto the ice cream, and storage in the coldest part of a freezer set to -18°C or lower. The goal is to block air contact, which drives moisture loss and oxidation, the twin causes of gritty crystals and stale flavor.
That air contact is the entire fight. When a container isn’t perfectly sealed, dry freezer air pulls moisture from the ice cream’s surface. Those escaped water molecules refreeze into the gritty crystals you feel. Simultaneously, oxygen seeps in and reacts with fats, turning creamy vanilla into something that tastes like cardboard. Your home freezer’s temperature fluctuations, every time you open the door, speed both processes up.
What follows is not just a list of tips. It’s the mechanics of why each step matters, backed by the same data the ice cream industry uses. We’ll cover the exact temperature that defines “heat-shock,” the measurable growth of ice crystals over time, and the simple, physical barriers that actually stop it.
Key Takeaways
- Freezer burn is caused by air contact, which leads to moisture loss (forming ice crystals) and oxidation (causing stale flavors).
- The industry standard for safe ice cream storage is -28.9°C; home freezers at -18°C allow ice crystals to grow 2.5x larger over a year.
- Pressing plastic wrap or parchment paper directly onto the ice cream’s surface before sealing the lid creates a critical air gap barrier.
- Store ice cream in the back of the freezer, away from the door, to minimize temperature swings from opening and closing.
- Ice cream with freezer burn is safe to eat, but the texture will be gritty and the flavor dulled or “off.”
Why Your Ice Cream Gets Gritty: It’s Not Just Cold
Forget the idea that colder is always better. The problem isn’t the cold itself; it’s the dry air inside the freezer and the temperature stability you can’t control. Your home freezer likely runs at about -18°C (0°F). The ice cream industry’s benchmark for quality control, however, is -28.9°C. According to the International Dairy Foods Association, any product stored above that has already suffered heat-shock damage and shouldn’t be sold.
A 2011 study tracked premium ice cream stored at different temperatures. After 52 weeks at -18°C, the average ice crystal size grew from 40.3 micrometers to 100.1 micrometers. At -50°C, crystals only grew to about 57 micrometers. That’s the difference between a smooth spoonful and a sandy one.
The air in your freezer is extremely dry, it has almost no humidity. When this dry air meets the exposed surface of your ice cream, it acts like a sponge. It pulls water molecules straight out of the emulsion. Those molecules then refreeze on the surface or just below it, forming new, large ice crystals. This is moisture loss, and it’s why the texture goes from creamy to crumbly.
At the same time, oxygen in the air reacts with the fats in the cream. This is oxidation, the same process that turns butter rancid. It mutes bright flavors and introduces stale, cardboard-like notes. The Texas A&M AgriLife Extension PDF resource confirms that this oxygen exposure is what modifies flavor and color.
So every time you open the freezer door, you’re letting in slightly warmer, moist air. It condenses on the cold containers, then refreezes. This cycle, called temperature fluctuation, repeatedly melts and refreezes the ice cream’s surface, accelerating crystal growth and oxidation. This is why where you store the pint matters as much as how you seal it.
The 3-Step Barrier Method (And Why It Works)
Stopping freezer burn is a defensive game. You’re building walls against air. One layer isn’t enough because home freezers are leaky, turbulent environments. You need a multi-stage defense.
Step 1: The Primary Seal – The Lid.
The carton’s plastic lid is your first line of defense, but it’s often flawed. Many lids have a slight warp or gap. Your job is to make it as airtight as possible. Wipe the rim of the container and the inner groove of the lid clean. Any sticky residue prevents a full seal. Press the lid down firmly until you hear or feel a click on all sides. If the original lid is damaged or lost, transfer the ice cream to a freezer-safe container with a locking lid, like those from Pyrex or Rubbermaid.
Step 2: The Surface Blockade – Press & Seal.
This is the step most people skip, and it’s the most important. The air pocket between the lid and the ice cream’s surface is where the damage happens. Eliminate it. * Tear off a sheet of plastic wrap or parchment paper large enough to cover the surface. * Open the container and press the material directly onto the ice cream. Smooth it out so it adheres to every curve and corner. * The goal is zero air gaps. The wrap should look like a second skin. * Then put the lid back on. The wrap acts as a gasket, blocking air from contacting the product.
Step 3: Strategic Placement – Back & Bottom.
The door and the top shelf are the warmest zones in a freezer, subject to the most temperature swings. Put your fortified ice cream container in the back of the freezer, on the bottom shelf if possible. Surround it with other frozen items, they act as thermal mass, buffering against temperature changes when the door opens. This is a core principle of effective freezer storage.
Common mistake: Just snapping the lid shut. The air gap inside is why you get a quarter-inch of frosty, crystallized ice cream on top, even if the seal seems tight. That gap guarantees freezer burn within a month.
What happens if you skip the surface wrap? The air in that gap slowly robs moisture. Within two weeks, you’ll see a thin layer of frost. By four weeks, the texture underneath that frost turns crumbly. The flavor fades. You’ve lost the top third of the pint.
The Science of Cold: What Your Freezer Setting Actually Does
Your freezer’s temperature setting isn’t just about freezing things solid. It controls the speed of molecular movement and the size of ice crystals. Warmer freezers mean bigger, grittier crystals.
| Storage Temperature | Ice Crystal Size After 1 Year | Air Cell Size After 1 Year | Practical Reality |
|---|---|---|---|
| -18°C (0°F) – Home Freezer | Grows from 40μm to 100μm | Grows from 37μm to 88μm | Sandy texture, muted flavor. The baseline for what you’re trying to beat. |
| -28.9°C – Industry Standard | Significant reduction in growth rate. | Slowed air cell expansion. | The benchmark for retail quality. Home units rarely hit this. |
| -50°C or Colder | Grows from 40μm to only ~57μm | Grows from 37μm to only ~46μm | Near-perfect preservation. Used in premium food science and industrial storage. |
The “air cell size” in the table matters because it’s a measure of structure collapse. Ice cream is a foam, tiny air cells whipped into the cream. As these cells coalesce and grow, the texture loses its lightness and becomes dense and icy. The PMC ice cream quality study found that colder storage dramatically slows this collapse.
Your home appliance likely can’t reach -50°C. But you can get closer to optimal by using a freezer thermometer. Place it in the middle of the compartment and adjust the dial until it reads -18°C or, ideally, a few degrees colder. A consistent -20°C makes a measurable difference over months of storage. This is a more effective long-term strategy than any gadget.
Choosing Your Weapons: Containers, Wraps, and Bags
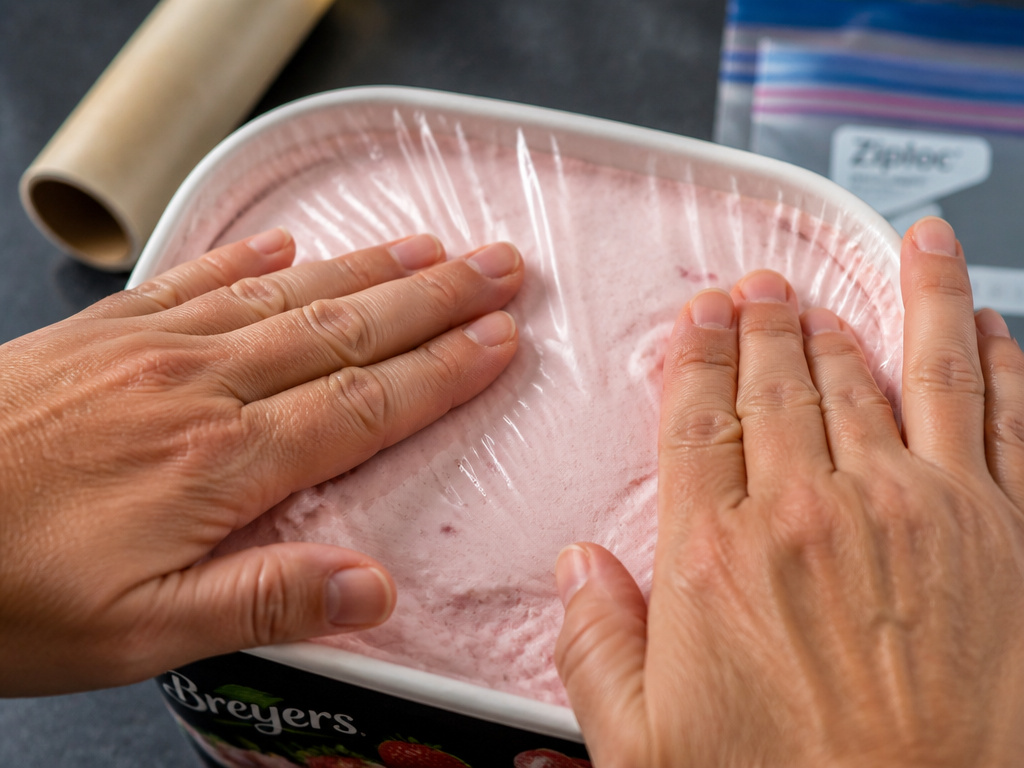
Not all storage tools are equal. The right material and shape add to your defensive wall.
Containers vs. Original Cartons:
The cardboard pint is terrible. It’s porous and provides almost zero insulation. For long-term storage (anything over a week), move the ice cream to a hard-sided plastic container. Look for containers marked as freezer-safe containers. Glass containers like Pyrex work too, but ensure they are explicitly rated for freezer use to avoid cracking.
The Wrap Showdown: Plastic vs. Parchment.
- Plastic Wrap (Polyethylene): Wins on adhesion. It clings tightly to the ice cream surface, creating the best seal. Use a brand like Glad Press’n Seal for maximum effectiveness.
- Parchment Paper: Wins if you’re avoiding plastic. It blocks air but doesn’t cling. You must press it down firmly and ensure the lid holds it in place. It’s a good barrier, but not as foolproof.
Freezer Bags as a Last Resort:
If you’re storing a partial tub or a homemade batch, a high-quality freezer bag is an option. Press out all the air before sealing, then use the water displacement method: lower the bag into a bowl of water, letting the water pressure push air out the top before you finish sealing. Then, place the sealed bag inside a second container for protection and structure.
How to Spot Freezer Burn (And What to Do Next)

You can follow every step and still lose a pint to an old freezer or a faulty seal. Knowing how to tell if freezer burned saves you from tasting disappointment.
Visual Signs:
- Frost: A layer of white, snow-like crystals on the surface.
- Discoloration: Dull, faded patches where the vibrant color has leached out.
- Shrinkage: The ice cream has pulled away from the sides of the container, a clear sign of moisture loss.
Texture & Taste:
- The surface will feel crunchy or gritty instead of creamy.
- When scooped, it may be crumbly and lack its original smooth body.
- The flavor will be dull, stale, or have a faint “off” taste reminiscent of cardboard.
Is it safe? Yes. Freezer burn is a quality issue, not a safety one. No harmful bacteria grow at freezer temperatures. You can scoop off the affected top layer and eat the better-preserved ice cream underneath. For heavily damaged pints, repurpose it: blend into a milkshake, mix into cookie dough, or melt for a sauce. The strong flavors of a shake or baked good will mask the muted notes.
Frequently Asked Questions
Can you fix freezer-burned ice cream?
No. The physical changes, enlarged ice crystals and oxidized fats, are permanent. You cannot revert it to its original creamy state. You can remove the worst parts or use it in applications where texture is less critical, like blending.
Does homemade ice cream get freezer burn faster?
Often, yes. Commercial ice creams contain stabilizers (guar gum, carrageenan) that bind water and slow crystal growth. Many homemade recipes lack these, making them more susceptible to moisture loss. Be extra vigilant with surface wraps and airtight containers for homemade batches.
How long does it take for ice cream to get freezer burn?
In a typical home freezer with just a lid seal, surface changes can begin in as little as two weeks. Significant texture degradation is common within four to six weeks. Using the surface-wrap method can extend this to several months.
Is a deep freezer better for preventing freezer burn?
Yes. A standalone chest or upright freezer maintains a more stable, colder temperature because it’s opened less frequently. It’s easier to keep it at -20°C or below, which significantly slows the causes of freezer burn.
Does the flavor of ice cream affect how fast it burns?
Fat content is the main variable. Premium, high-fat ice creams (like gelato or super-premium brands) have a denser structure that can slightly resist air cell expansion. However, all flavors are vulnerable to oxidation and moisture loss. Nut or candy mix-ins offer no protection.
The Bottom Line
Preventing ice cream freezer burn isn’t about a magic trick. It’s about consistent, physical barriers against air. Snap the lid tight, press wrap onto the surface, and stash the pint in the back of a cold freezer. That trio beats any single “hack.”
The data is clear: colder and more stable is better, but your home freezer has limits. Your best weapon is eliminating the air gap. Do that, and you’ll stop finding those frosty, gritty pints in the back. You’ll just find ice cream.
