
Freezer Safe Containers Guide: How to Prevent Cracks & Burn
This post contains affiliate links. As an Amazon Associate, we earn from qualifying purchases.
Freezer-safe containers are those made from materials that remain durable and non-brittle at -18°C (-0.4°F) or below, have an airtight seal, and provide a moisture-vapor-resistant barrier to prevent freezer burn. The critical specs are material (tempered glass, polypropylene, high-density polyethylene), a secure locking lid, and adequate headspace for expansion.
That -18°C number isn’t arbitrary. It’s the USDA’s long-term storage target, and the threshold where cheap plastics turn brittle and shatter. Your container’s job isn’t just to hold food; it’s to survive a deep freeze without cracking and to block air from desiccating what’s inside.
What follows: the material specs that actually matter (not marketing labels), the official test standard that defines “freezer-safe,” and the headspace math that stops glass from exploding. You’ll know what to look for on the bottom of any container by the last section.
Key Takeaways
- Look for the snowflake symbol or “PP” / “HDPE” on the bottom. Polypropylene (PP) and High-Density Polyethylene (HDPE) are the only common plastics rated for long-term freezing without becoming brittle.
- Tempered glass needs 3/4 inch of headspace. Even freezer-safe glass cracks if filled to the brim with liquid; expansion has nowhere to go.
- Acidic foods degrade standard plastic within months. Tomato sauce, citrus, or vinegar-based items can break down plastic polymers, causing off-flavors and potential leaching, use glass for these.
- The seal matters more than the container. A mediocre container with a perfect silicone gasket will outperform a great container with a warped lid every time.
- Disposable foil pans are for single-use only. The metal thins and can oxidize after a freeze-thaw cycle, risking tears and contamination on reuse.
The Material-Specific Rules (Beyond “Freezer-Safe” Labels)
A “freezer-safe” stamp on the bottom is a start, but it’s not the whole spec sheet. The material determines how the container behaves at -18°C, how it handles thermal shock going from freezer to microwave, and what kind of food you can safely store in it long-term.
Rigid Plastic: PP and HDPE or Bust
Most kitchen plastics are polypropylene (PP), high-density polyethylene (HDPE), or sometimes polyethylene terephthalate (PET). For freezing, you want PP or HDPE. These materials retain their flexibility and impact resistance in deep cold. You’ll find them in brands like Rubbermaid and Sistema.
Common mistake: Assuming any plastic food container is fine. PET and polycarbonate can become brittle and crack when frozen, especially if dropped.
The polymer structure is why. PP has a higher glass transition temperature, the point where plastic goes from hard to brittle, well below freezing. HDPE is naturally more flexible. Check the resin identification code (the chasing arrows symbol) on the bottom. A 5 (PP) or 2 (HDPE) is your green light.
Tempered Glass: The Non-Porous Workhorse
Tempered glass is the default for anyone avoiding plastic or storing acidic foods. It’s inert, doesn’t absorb odors or stains, and can often go from freezer to oven. The “tempered” part is critical: it’s heat-treated to withstand thermal shock.
Where this goes sideways: Using non-tempered glass jars or bakeware. The thermal stress of freezing causes uncontrolled cracking, often along a seam you didn’t know was there.
For soups and sauces, glass containers are superior. Brands like Pyrex and the Rubbermaid Brilliance Glass line are built for this. Their limitation is weight and the headspace rule, which we’ll get to.
Silicone and Flexible Bags: For Odd Shapes and Portions
Silicone containers and reusable freezer bags excel where rigid shapes fail. They conform to irregular items like half a roast or a stack of burritos, and you can squeeze out excess air before sealing. Quality silicone remains flexible down to -40°C.
The trade-off is that they’re not completely airtight over very long periods (6+ months) and can be pierced. They’re perfect for meal prep containers you’ll eat within a quarter.
| Material | Best For | Do Not Use For |
|---|---|---|
| Polypropylene (PP) | General leftovers, baked goods, dry items | Acidic foods (tomato sauce, citrus) long-term |
| Tempered Glass | Liquids, sauces, acidic foods, oven-reheating | No-headspace fills, dropping from height |
| Silicone Bags | Irregular shapes, portion control, air removal | Long-term (6+ month) storage of oily foods |
| Disposable Foil | One-time gifting or cooking/freezing | Reuse—metal fatigues and can tear on second use |
The Freezer-Safe Test Standard
There’s an actual laboratory test that defines “freezer-safe.” Commercial labs like Measurlabs run it to certify containers. Knowing the protocol tells you exactly what a container must survive to earn that label.
The test, per standards like those cited by Measurlabs, involves storing the article at -18°C for 24 hours. Afterward, inspectors look for: – Visual changes: discoloration, deformation, cracking, or chipping. – Functional failure: lids that no longer seal, latches that won’t close. – Off-odors: indicating material breakdown or leaching.
If it passes, it gets the rating. This is why you can’t assume your leftover takeout container is fine, it’s never been tested.
Containers are stored at -18°C for 24 hours and then observed for off-odor, discoloration, deformation, cracking, chipping, and functionality. This is the baseline commercial test for freezer-safe certification.
Why Home Freezers Are Harder
Your freezer might be colder than -18°C. An Electrolux manual recommends settings between -15°C and -24°C. The colder end of that range is more stressful. A container that just passes at -18°C might crack at -24°C. This is where buying containers from reputable brands that over-engineer for the standard pays off.
The test also doesn’t account for repeated thermal cycling. Moving a container from freezer to microwave to dishwasher and back stresses the material at different rates. Glass expands and contracts; plastic warps. This is the real-world test your containers face, and it’s why best containers invest in thicker walls and reinforced lids.
Headspace, Seals, and Why Your Soup Exploded
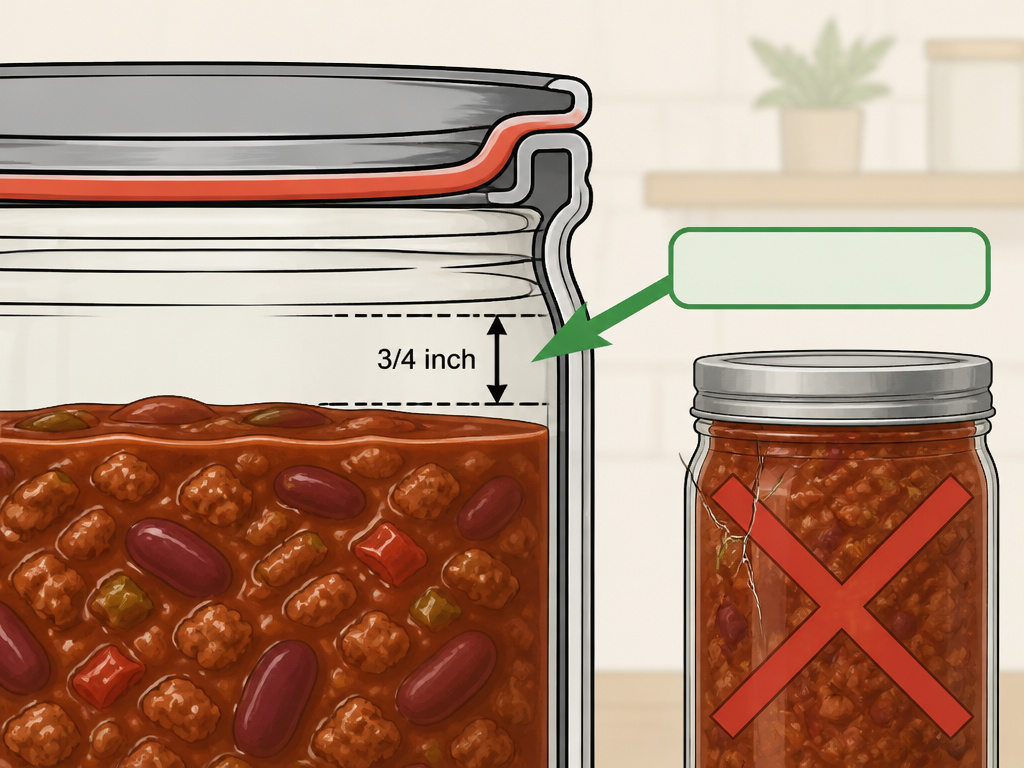
You picked a tempered glass container labeled freezer-safe, filled it with chili to the brim, and found a cracked mess in the morning. The material was right, but the physics were wrong.
The Headspace Non-Negotiable
Liquids expand when they freeze. Water increases in volume by about 9%. A container with no room for that expansion creates immense outward pressure. The safety of glass containers hinges on leaving a 3/4-inch gap between the food surface and the lid. For semi-solids like stew, leave at least 1/2 inch.
Plastic has more give, so you can get away with 1/2 inch for liquids. But the principle is the same: the food needs room to grow.
The Seal is the Actual Barrier
The container body holds the food; the seal protects it. A perfect seal does two things: it locks out air (preventing freezer burn) and locks in moisture. Look for lids with a continuous, flexible silicone gasket that creates a visible indentation on the container rim.
Easy to miss: A warped lid. If the lid doesn’t sit perfectly flat, the seal is broken. This happens when plastic lids are washed on the bottom rack of a dishwasher. The heat warps them permanently.
For bags, the seal is the zipper or the vacuum port. High-quality reusable freezer bags use a double-track zip and a thick silicone sealing area. Cheap single-track zippers leak air slowly over months.
| Problem | Cause | Fix |
|---|---|---|
| Ice crystals on food | Poor seal, excess air in container | Press plastic wrap directly onto food surface before lidding, or vacuum seal. |
| Container lid popped open | Insufficient headspace | Thaw, repackage with proper gap, refreeze. |
| Strange taste after freezing | Acidic food in reactive plastic | Switch to glass or non-plastic containers for acidic items. |
| Cracked glass container | No headspace, or non-tempered glass | Always leave 3/4 inch for liquids; verify “tempered” or “freezer-safe” on label. |
What Not to Freeze In (And Why)
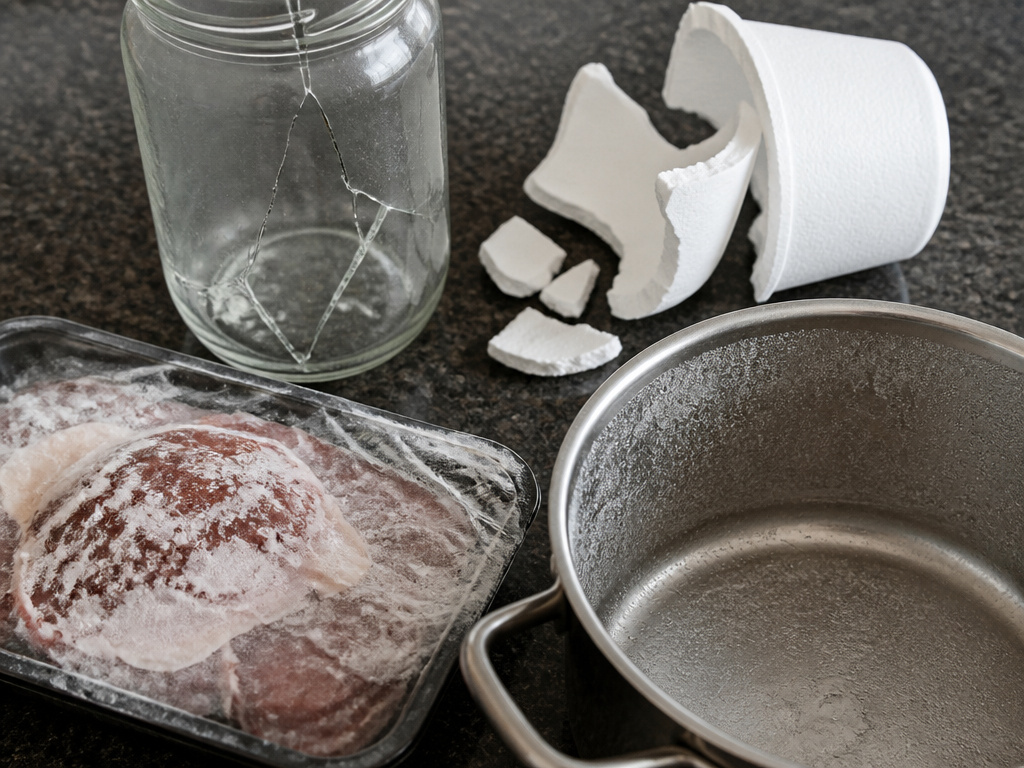
Some materials fail predictably. Knowing the failure mode saves your food and your sanity.
Thin, Non-Tempered Glass
This includes drinking glasses, mason jars not labeled for freezing, and pretty glass bakeware from the discount store. The thermal shock of freezing creates microfractures. You might not see the crack until you take it out and it warms slightly, then fails. The risks of freezing glass are real and messy.
Certain Plastics: PVC, Polystyrene, and Old, Scratched Containers
PVC (resin code 3) and polystyrene (code 6, often used for disposable cups) become very brittle at low temperatures. An old container covered in microwave scars is also compromised. The scratches are stress points where cracks can start. If it’s hazy, stained, or the lid is warped, retire it.
Original Meat Packaging
The USDA notes that while it’s safe to freeze meat in its store tray, the plastic wrap is highly permeable to air. Quality nosedives after a few weeks. For any freeze longer than a fortnight, overwrap it with freezer paper or vacuum seal.
Metal Containers (Unless Designed For It)
Stainless steel is fine, but it conducts temperature wildly. It can cause uneven freezing and create a hotspot that stresses your freezer’s compressor. Also, you can’t see what’s inside. Save metal for the pantry.
The Step-by-Step Freezing Protocol
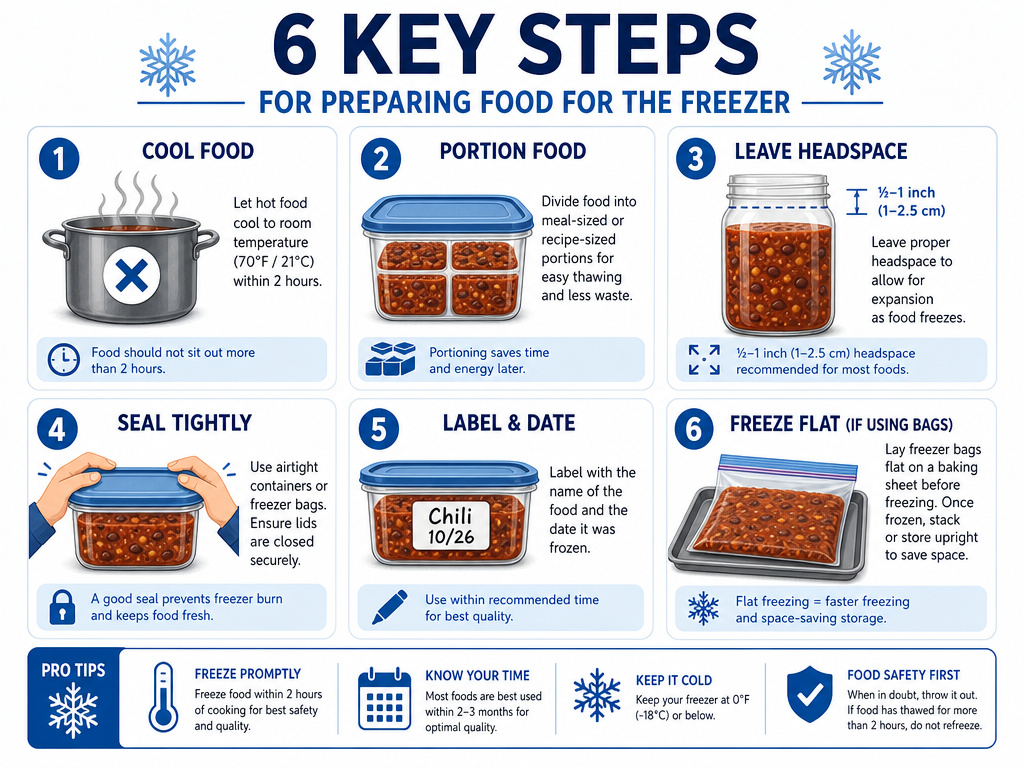
Getting the container right is half the battle. How you fill and prepare it determines whether you win.
- Cool the Food Completely. Hot food raises the freezer’s internal temperature, partially thawing other items and creating condensation inside the container. That condensation turns to ice crystals on your food. Let soups and sauces cool on the counter, then refrigerate until cold.
- Portion for Your Future Self. Freeze in meal-sized portions. Thawing and refreezing ruins texture and safety. Use containers for freezing that match your household’s appetite.
- Apply the Headspace Rule. For liquids in glass: 3/4 inch. For liquids in plastic: 1/2 inch. For solids: just enough room to get the lid on without crushing the food.
- Seal, Then Double-Check. Close the lid firmly. Run your finger around the seal. If you feel an even, slight compression, it’s good. If one side is loose, the lid is warped, use a different container.
- Label with Content and Date. Use freezer tape and a permanent marker. “Chili, 10/26” is all you need. This forces a first-in, first-out system and ends the mystery-container guessing game.
- Freeze Flat First (For Bags). If using bags, lay them flat on a baking sheet to freeze. This creates a thin, stackable brick that thaws faster and uses space efficiently.
Skip the “quick freeze” shelf if your freezer has one unless you’re freezing something very delicate like berries. For cooked meals, the few degrees difference won’t matter, and it often crowds airflow.
Frequently Asked Questions
Can you put any glass container in the freezer?
No. Only glass explicitly labeled as “tempered,” “freezer-safe,” or “thermal shock resistant” should go in the freezer. Non-tempered glass, like many drinking glasses and decorative jars, can crack or shatter due to the stress of expansion during freezing.
How do you know if a plastic container is freezer-safe?
Check the bottom for the resin identification code (a number inside chasing arrows). Look for 5 (PP, polypropylene) or 2 (HDPE, high-density polyethylene). Also, look for a snowflake symbol or the words “freezer safe.” If it’s unmarked or shows a 1 (PET) or 6 (PS), don’t risk it.
Do freezer-safe containers prevent freezer burn?
They significantly reduce it, but only if sealed correctly. Freezer burn is caused by air contact. Airtight, moisture-vapor-resistant containers are the best defense. For ultimate protection, press plastic wrap directly onto the food’s surface before putting the lid on, or use a vacuum sealer.
Can you freeze food in disposable aluminum pans?
Yes, but for one cycle only. The metal becomes weaker after freezing and thawing, and can develop tiny tears or react with acidic foods (like tomato sauce) upon reheating. They are perfect for giving a frozen meal away, but not for storing your own food long-term.
Is it safe to freeze acidic foods in plastic containers?
For short-term storage (under a month), it’s generally okay. For long-term storage, it’s not recommended. Acids can break down the plastic polymers over time, potentially causing off-flavors and leaching. Use glass freezer containers for tomato sauce, citrus, or vinegar-based foods.
Before You Go
Freezer-safe isn’t a mystery. It’s a set of material specs: PP or HDPE plastic, tempered glass, or food-grade silicone. It’s a seal you can feel snap shut. It’s that three-quarter inch of empty space at the top of the chili.
The container you choose is the last step in preserving your effort. A good one makes your freezer a reliable pantry. A bad one turns meal prep into a disappointing waste. Now you know how to spot the difference.
Your next meal from the freezer should taste like you just made it. That’s the only metric that matters.
