
Using a Nesco Vacuum Sealer: A Complete Step-by-Step Guide
This post contains affiliate links. As an Amazon Associate, we earn from qualifying purchases.
To use a Nesco vacuum sealer, match the bag size to your food, position the open end just inside the vacuum chamber on the alignment Taps, and select the correct vacuum and seal settings for your contents. The dry setting uses a longer heat time for dry goods; the moist setting is shorter for damp items. Skip the manual seal button for 15 seconds after the machine runs.
The manual seal delay trips up more first-time users than any other feature. Press it too soon and nothing happens, you’ll think the machine is broken. Wait the full 15 seconds and the heating element resets, ready for a clean seal.
What follows: the three settings that actually matter, the one-step clean-up that prevents a clogged pump, and the model-specific power specs that decide how many bags you can seal in a row.
Key Takeaways
- The dry setting uses a longer heat time for items like crackers or flour; the moist setting is shorter for meats or marinated vegetables.
- Always leave a 3–4 inch tail of bag material past the sealing element, cutting it flush guarantees a failed seal on the next bag.
- Clean the vacuum chamber after every use with a dry paper towel. A grain of rice or drop of juice pulled into the pump will jam it within a month.
- The manual seal button locks out for 15 seconds after any sealing cycle. Pressing it during the lockout does nothing, wait for the indicator light.
- Nesco’s VS-12 Deluxe needs a 1-minute cool-down after every one or two bags; the VS-C1 Classic needs 2 minutes. Running them hot melts the bag instead of sealing it.
Which Nesco Model Do You Have?
Nesco makes half a dozen sealers, and the power rating and cool-down timer change between them. Using a VS-C1 like a VS-12 burns out the sealing element.
The Nesco VS-12 Deluxe pulls 130 watts and needs a 1-minute cool-down after sealing one or two bags continuously. The VS-C1 Classic uses 80 watts and requires a full 2-minute cool-down after each sealing operation.
That difference is the whole game. A higher-watt machine has more thermal headroom, so it can seal more bags back-to-back before the heating strip overheats. Overheat it and the next seal will be weak or won’t form at all.
| Model | Power | Cool-Down Period | Best For |
|---|---|---|---|
| VS-12 Deluxe | 130W | 1 minute after 1–2 bags | Frequent, high-volume sealing |
| VS-C1 Classic | 80W | 2 minutes after each seal | Occasional, small-batch sealing |
| VS-74S Compact | 100W | Not specified; assume 1 min | Limited counter space |
| VS-101S Deluxe | 120W | Not specified; assume 1 min | Balanced power and size |
| VS-15S Deluxe | 120W | Not specified; assume 1 min | Larger bags and portions |
| VS-02 Food Storage | 130W | Not specified; assume 1 min | General home use |
If you don’t know your model, check the label on the bottom. The wattage is printed there. Treat any model under 100 watts like the VS-C1, give it two minutes between seals. Treat anything 100 watts and above like the VS-12, one minute is enough.
Bottom line: Your model’s wattage decides your sealing pace. High-watt machines tolerate haste; low-watt ones demand patience.
The 3 Settings That Actually Matter
Nesco panels have more buttons than a remote control. You only need three.
Vacuum Strength (Normal/Gentle)
Use Normal for solid, dry items, frozen vegetables, dry pasta, crackers. Use Gentle for soft or delicate foods, bread, berries, fragile pastries. Gentle runs a shorter vacuum cycle so the bag doesn’t crush the contents. If your bread comes out looking flat, you used Normal.
Seal Time (Dry/Moist/Double)
This is the duration the heating element stays on to melt the bag layers together. * Dry: Longer heat time. Use for completely dry goods like flour, sugar, rice, or dehydrated fruits. * Moist: Shorter heat time. Use for anything with surface moisture, raw meat, fish, washed vegetables, marinated items. * Double: Two consecutive seals. Use for heavy bags, liquids, or long-term freezer storage. It’s a redundancy, not a stronger bond.
Common mistake: Using Dry on moist food. The longer heat boils the surface moisture into steam, which can burst through the seal before it cools and sets. You get a puffed-up bag with a weak spot.
Manual Seal
This button runs the heat cycle without any vacuum. You use it for sealing bags you’ve already filled and closed by hand, or for making bags from a roll. Here’s the catch, the manual seal button won’t work if you press it within 15 seconds of the unit being active. The control board locks it out to protect the heating element. Wait for the ready light.
The 7-Step Bump-Feed Replacement (and the One Step Nobody Skips)
 This is the core process for any Nesco sealer with a roll cutter. Miss one step and the bag leaks.
- Unroll the bag material so it extends at least 3 inches past the heating element. That extra length is your handle for the next bag.
- Close the lid and press Manual Seal. Let it run the cycle. This creates the bottom seal of your new bag.
- Use the integrated cutter to slice the bag to your desired length. Cut on the line.
- Fill your bag, but leave at least 3 inches of empty space at the top. Overfilling is the number one reason seals fail.
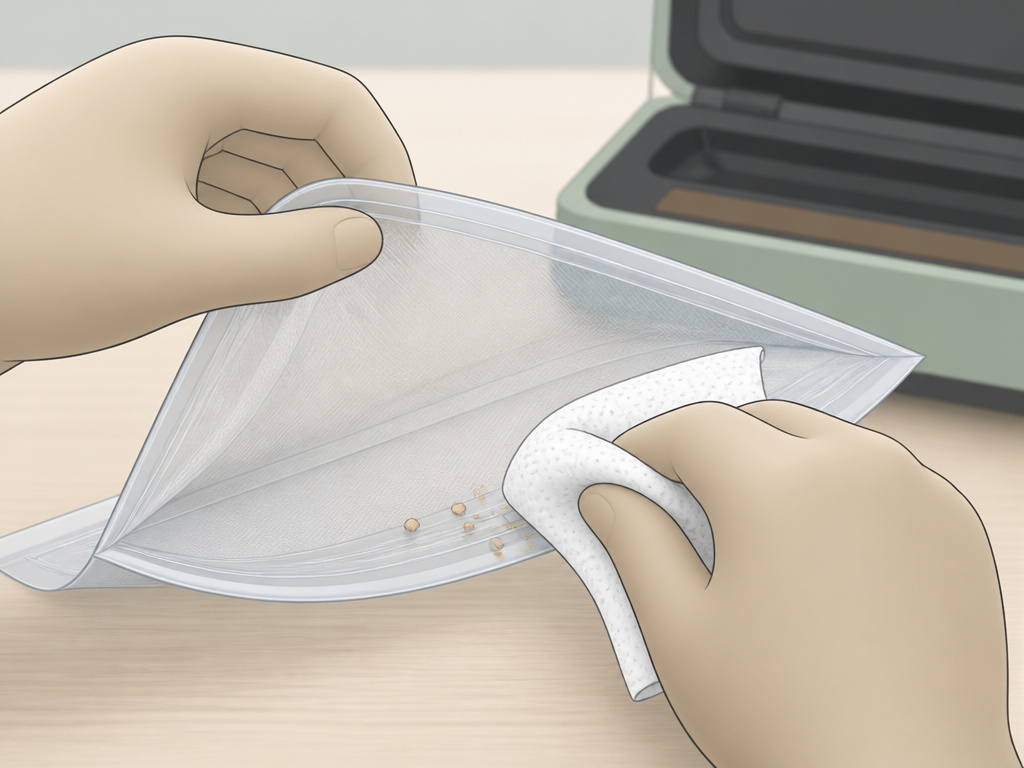
- Wipe the inside of the bag’s open end with a paper towel. Any moisture or crumbs there will break the seal.
- Place the open end of the bag into the vacuum chamber. Nestle it onto the alignment Taps molded into the chamber. The bag should sit just inside the chamber, not hanging out.
- Press Vacuum and Seal. Hold the lid down lightly if the bag is large or stiff. The cycle runs for about 15 seconds.
The step everyone skips? Step 5, wiping the bag’s inner seam. Your fingers leave oil. Meat drips juice. Flour dusts the plastic. That contamination prevents the two layers of plastic from melting together cleanly. The seal looks fine but leaks air within a day.
Where This Goes Sideways: Liquid, Crumbs, and Wrinkles
 The pump on a Nesco is not sealed from the chamber. Small amounts of liquid, crumbs, or food particles get pulled in during the vacuum sealing process.
A grain of uncooked rice or a drop of meat juice inside the pump chamber will jam the mechanism within a month. The motor strains, the vacuum weakens, and the next seal fails because the bag wasn’t fully evacuated.
You prevent it by cleaning the chamber after every use. A dry paper towel is enough. For a deeper clean, unplug the unit and use a cotton swab dipped in isopropyl alcohol on the sealing bar and the chamber grooves.
The other failure point is a wrinkled bag. If the open end of the bag has a fold or ripple where the seal will form, the heat can’t reach both layers evenly. You get a gap. Straighten the bag mouth flat against the Taps before you start the cycle.
Dry vs. Moist vs. Double Seal: When to Use Which
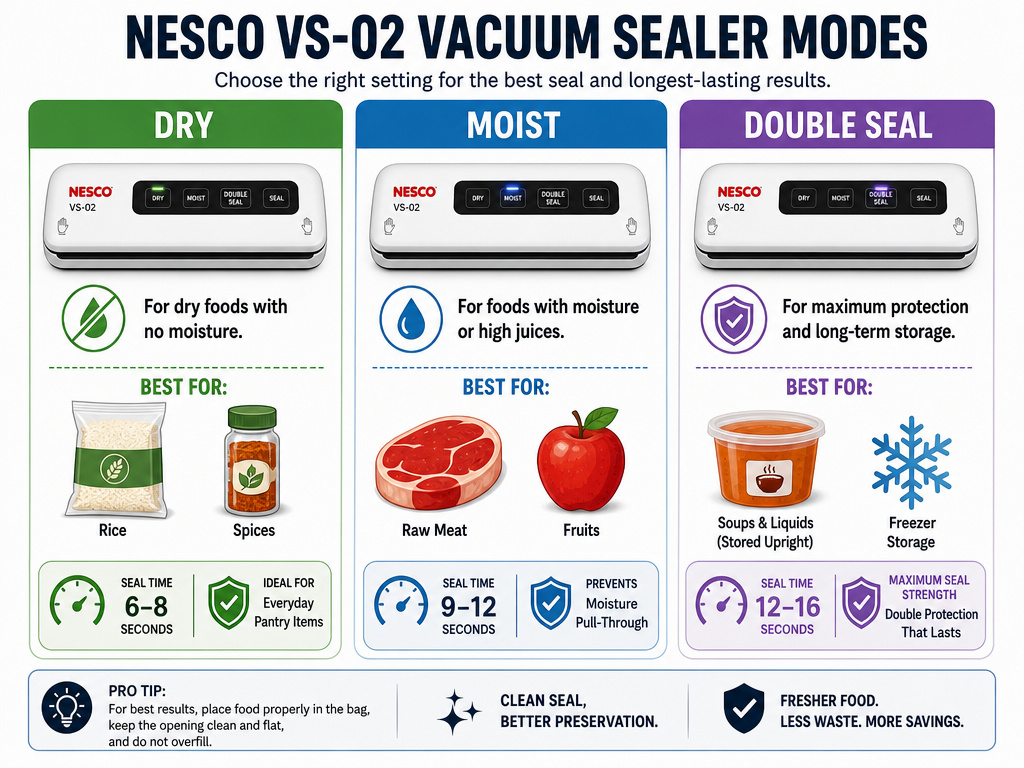 The seal time setting is not a strength dial. It’s a timing dial matched to the water content of your food.
Use Dry for:
- Flour, sugar, salt
- Dried beans, rice, pasta
- Dehydrated fruits or vegetables
- Crackers, biscuits, breadcrumbs
- Spices
Use Moist for:
- Raw meat, poultry, fish
- Washed fruits and vegetables
- Cooked, saucy foods (let them cool first)
- Cheese
- Marinated anything
Use Double Seal for:
- Bags containing liquids or semi-liquids (soups, stews)
- Long-term freezer storage (over 6 months)
- Heavy, dense items that might stress the seal line
- Any time you absolutely cannot afford a leak
Double seal runs the heat cycle twice, with a brief pause in between. It doesn’t make a “stronger” seal on dry goods, it just gives you a second chance if the first one had a flaw.
How Does a Nesco Compare to Other Sealers?
Nesco sits in the middle of the home vacuum sealer market. It’s more capable than a basic FoodSaver but lacks the heavy-duty parts of a chamber vacuum sealer.
Against a chamber vacuum sealer, a Nesco is louder, slower, and can’t handle liquids well. Chamber machines submerge the entire bag in a vacuum, so liquids don’t get sucked toward the seal. They’re also three times the price.
Against a cheaper external sealer like the basic FoodSaver models, a Nesco often has more consistent sealing pressure and better bag alignment guides. The integrated cutter on models like the VS-12 is a genuine time-saver over scissors.
If you seal more than a few bags a week, the step up to a Nesco VS-12 Deluxe from a budget model is worth it. The motor and heating element are rated for more continuous use. For occasional sealing, the VS-C1 Classic does the job.
Frequently Asked Questions
Can you vacuum seal liquids in a Nesco?
You can, but not directly. Pour the liquid into a bag, freeze it solid, then vacuum seal the frozen block. Attempting to vacuum seal liquid will pull it into the pump and ruin the machine. For semi-liquid foods like stews, use the double-seal function and leave extra bag space.
Why did my Nesco stop sealing?
The usual culprit is a dirty sealing bar. Food residue or melted plastic builds up on the heating element and insulates it. Unplug the machine, let it cool, and scrape the bar clean with a plastic scraper or a fingernail. Do not use metal, you’ll scratch the non-stick coating.
How long do Nesco vacuum seals last?
Proper seal on a quality bag lasts years in the freezer, months in the fridge, and weeks at room temperature for dry goods. The seal itself doesn’t degrade; freezer burn happens because of microscopic pores in the bag material, not a failed seal. For longest shelf life, use double-seal and name-brand bags.
Can I use other brand bags with my Nesco?
Yes, as long as they are the right size and have a textured surface on one side. The texture allows air channels for the vacuum to work. Smooth bags will not evacuate properly. Generic bags are fine for dry goods; for long-term freezer storage, stick with name-brand nylon and polyethylene laminates.
What does the canister port do?
The canister port lets you connect a hose to vacuum-seal rigid containers like Mason jars or special canisters. Nesco sells the hose and containers separately. Without them, the port is inactive. It’s a useful add-on for sealing dry goods like coffee beans or flour in jars.
Before You Go
Your Nesco vacuum sealer is a simple machine with one job: remove air and melt plastic. Its complexity comes from matching its three settings to your food’s moisture, cleaning the chamber every single time, and respecting the cool-down timer printed in your model’s manual.
For most households sealing a few bags of leftovers or bulk buys each week, the Nesco VS-12 Deluxe is the default pick. Its higher wattage handles back-to-back bags without complaint, and the integrated cutter means you’re not hunting for scissors. If you only pull it out once a month, the VS-C1 Classic does the same job for less, just give it the full two minutes between seals.
Either way, wipe the bag’s inner seam before you seal. That’s the step that decides whether your food stays fresh or turns in a week.
