
The Right Way to Seal a Mylar Bag for Maximum Shelf Life
This post contains affiliate links. As an Amazon Associate, we earn from qualifying purchases.
To seal a Mylar bag, you need heat, pressure, and an oxygen absorber placed inside within 10 minutes. Match your tool—impulse sealer, hair straightener, or clothing iron—to the bag’s thickness: 375°F for 2 seconds on 5 mil, 400°F for 3 seconds on 7 mil. The seal fails if the bag isn’t clean, flat, and free of folds.
That 10-minute window isn’t a suggestion. It’s the activation timer on the oxygen absorber packet you just dropped in. The clock starts the second you open its protective pouch, and after 20 minutes of air exposure, its capacity drops by a third. Your long-term storage plan hinges on a race between your hands and chemistry.
What follows is the drill for four common tools, the exact temperatures that work, the two mistakes that break the seal every time, and what to do when your vacuum sealer won’t grab the thick foil.
Key Takeaways
- Seal within 10 minutes of adding an oxygen absorber. Exposure beyond 20 minutes cuts its absorption capacity by at least 30%.
- Match heat and time to bag thickness. A 5-mil bag seals at 375°F for 2 seconds; a 7-mil bag needs 400°F for 3-4 seconds.
- A chamber vacuum sealer like the JVR VAC100 is the only type that works on 7-mil bags. Standard FoodSaver-style sealers fail because they can’t heat the thick laminate.
- The seal must be on a perfectly flat, clean surface. Any crumbs, folds, or moisture in the sealing area create a micro-gap for air.
- Test every seal by gently pulling the bag apart. A good seal stretches the material slightly; a bad one separates with no resistance.
Tools and Materials You Actually Need
You can have the best bag and the right food, but the seal depends on three things sitting on your counter before you start. Missing one means a failed batch.
First, the bag itself. Mylar bags for food are a laminate, usually polyester fused to aluminum foil and a food-safe polyethylene inner layer. The thickness, measured in mils (thousandths of an inch), dictates your heat setting. For long-term storage of dry goods like rice or beans, a 5-mil bag is the standard. A 7-mil bag is for heavy-duty or industrial use.
Second, the oxygen absorber. This is a small packet of iron powder that chemically binds oxygen. Its capacity is measured in cubic centimeters (cc). Use a 300cc absorber for a gallon bag, a 2000cc for a 5-gallon bucket liner. The packet should feel soft and powdery when fresh. If it’s hard or rattles, it’s already spent.
Where this goes sideways: Letting oxygen absorbers sit out while you fiddle with other bags. They start working immediately in open air. Have a mason jar ready to seal any unused packets within two minutes.
Third, your heat source. This isn’t a place to improvise with a lighter or a soldering iron. You need consistent, adjustable heat and a flat pressure surface. The four viable options are an impulse sealer, a hair straightener, a clothing iron, or a chamber vacuum sealer. Your choice depends on budget, bag thickness, and volume.
The 3-Step Process for Any Sealing Method
The tool changes, but the physics don’t. A proper seal melts the inner polyethylene layer of the bag so it fuses to itself. Do these three things in order, every time.
- Fill, Label, and Add the Absorber. Stand the bag in a bucket or box for stability. Fill it, leaving 3-4 inches of empty space at the top. Label the bag with contents and date using a permanent marker. Drop in the oxygen absorber. Do not vacuum the air out beforehand. The absorber needs oxygen to work, and it will pull the bag tight on its own over the next 6-12 hours.
- Prepare the Seal Area. This is the step everyone rushes. Lay the bag flat on a heat-resistant surface like a wooden board covered with a towel. Wipe the top inch inside and out with a dry cloth. Any dust, grain, or oil will prevent fusion. Fold the bag’s open end over once to create a clean, straight edge to feed into your sealer.
- Apply Heat and Pressure. This is where you follow the settings for your specific tool and bag thickness. The seal should be a smooth, slightly glossy strip about 5mm wide. Immediately after sealing, gently tug the bag open near the seal. It should stretch the Mylar material, not peel apart.
For a 5-mil Mylar bag, the seal forms at 375°F (190°C) with firm pressure applied for 2 seconds. The inner polyethylene layer melts and rebonds, creating an airtight barrier that withstands the chemical pull of the oxygen absorber without delaminating.
Skipping the tug test means you trust the machine’s light or sound. Those indicators can lie if the heating element has a cold spot. A visual inspection alone misses weak bonds.
Head-to-Head: Impulse Sealer vs. Hair Straightener vs. Iron vs. Chamber Vac
Not every tool works for every job. Using a clothing iron on a 7-mil bag will leave a weak seal. Using a standard vacuum sealer on any Mylar bag will fail completely. This table breaks down where each tool wins and where it breaks.
| Tool | Best For | Seal Width & Strength | The Catch |
|---|---|---|---|
| Impulse Sealer | High volume, consistent 3.5-5 mil bags | ~5mm wide; very strong, uniform | Struggles with 7+ mil bags; can burn through thin bags if timer is off. |
| Hair Straightener | Occasional use, 3.5-7 mil bags, portability | Variable width; strong if done slowly | Requires a steady hand; ceramic plates don’t transfer heat as well as metal. |
| Clothing Iron | Emergency use, 3.5-5 mil bags | Wide but uneven; moderate strength | Hard to control pressure; steam function must be off; can wrinkle the seal. |
| Chamber Vac Sealer | Professional results, 5-7+ mil bags | Wide and very strong; vacuum-seals in one step | Expensive (e.g., JVR VAC100); large footprint; overkill for a few quart bags. |
The impulse sealer is the default for a reason. Its failure rate in commercial packaging is under 0.5%. The hair straightener is a surprisingly capable backup—most heat to 375-425°F, which is the ideal range. The clothing iron is a last resort. You must use the highest dry setting and press straight down, not slide.
The chamber vacuum sealer, like the JVR VAC100, is in its own class. It places the entire bag inside a chamber, removes the air, then heat-seals. This is the only method that reliably handles 7-mil and thicker “retort pouches.” Your standard FoodSaver does not get hot enough and cannot draw a vacuum through the thick, non-porous Mylar.
Why Your Seal Failed (And How to Fix It)
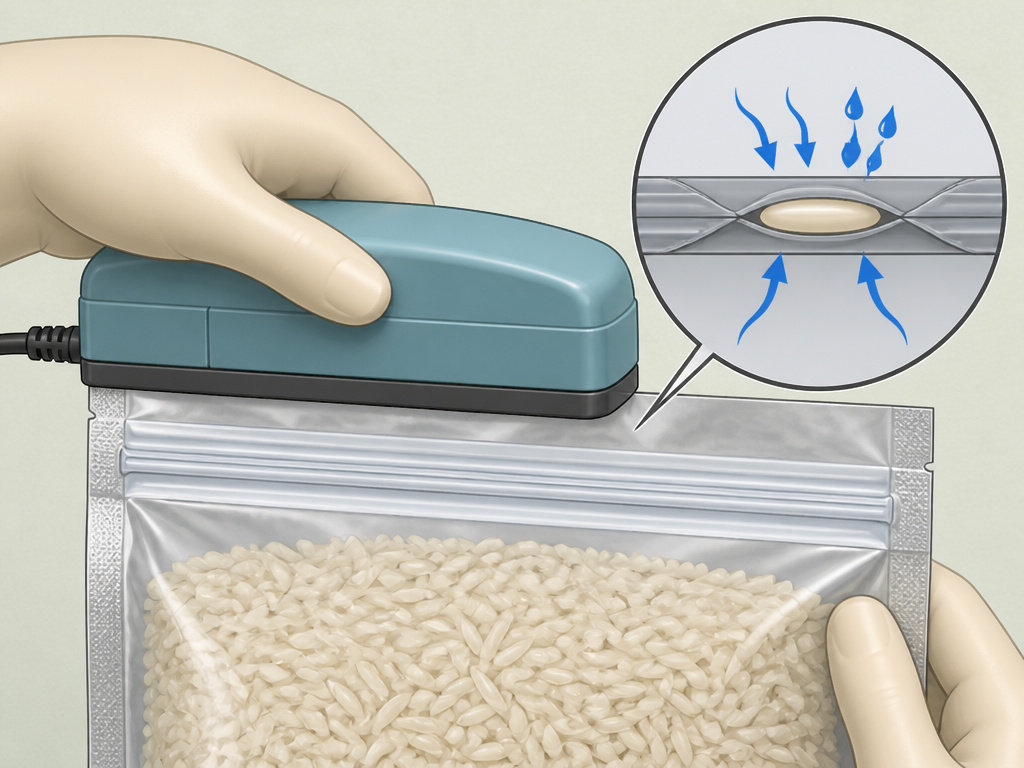 A bad seal usually looks fine. The problem reveals itself months later when you open a bucket to find spoiled grain or rust on your tools. These are the two most common causes.
Sealing over a fold or crumb. The inner plastic layer must meet itself perfectly. A tiny piece of rice or a crease in the bag acts as a spacer. The heat melts around it, but the spacer creates a microscopic channel for air and moisture. The fix is meticulous cleaning and flattening before the seal.
Incorrect heat or time for the thickness. A 7-mil bag needs more energy to melt its thicker plastic layer. Using a hair straightener on a low setting for 2 seconds will create a bond that feels solid but cracks under the tension of the oxygen absorber pulling vacuum 12 hours later. Always reference a temperature guide.
Common mistake: Assuming a zipper-lock on a Mylar bag is enough. Those zippers are for temporary convenience. For long-term storage, you must heat-seal the bag above the zipper. The zipper track itself is not an oxygen barrier.
If you discover a failed seal within a day, you can often re-seal just below the original line. Cut the bag open, ensure the oxygen absorber is still soft (replace it if it’s hard), and run a new seal. If it’s been weeks, assume the contents are compromised.
How to Choose the Right Oxygen Absorber
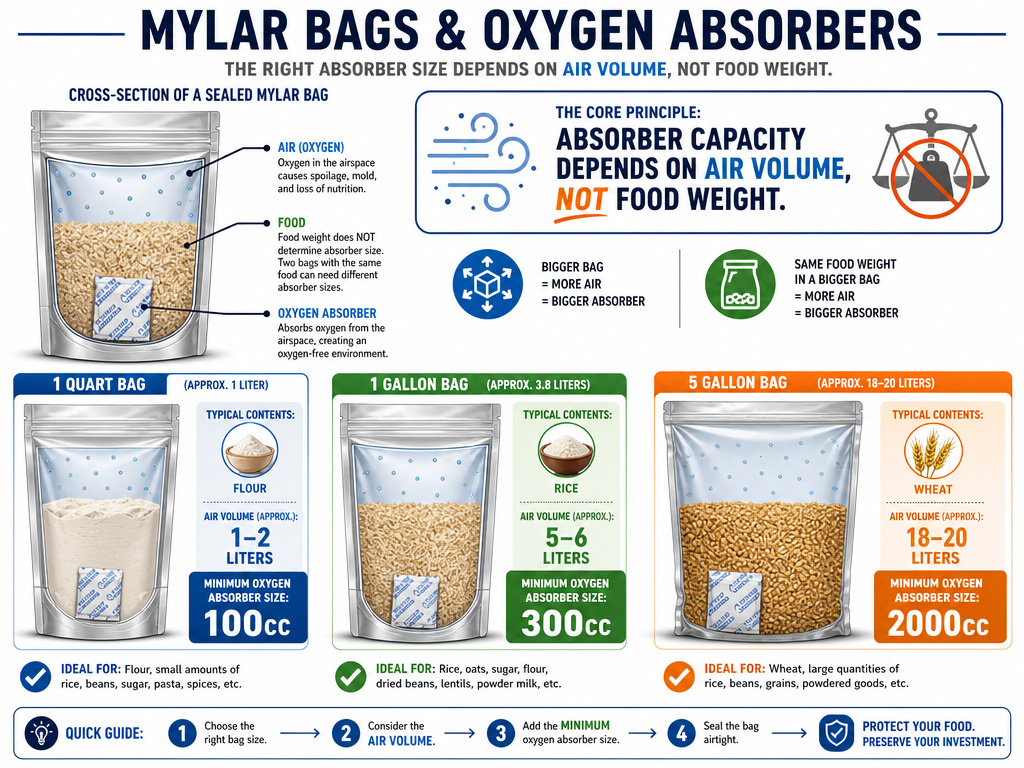 The absorber does the real preservation work. The seal just locks it in. Picking the wrong size is a waste of money and a storage risk.
Oxygen makes up about 21% of the air in your bag. The absorber’s job is to scavenge that down to below 0.01%. The required capacity depends on the volume of air left in the bag, not the weight of the food. That’s why pressing out excess air before sealing is critical—it reduces the workload.
| Bag Size (Approx.) | Food Weight Capacity | Minimum O2 Absorber | Why This Size |
|---|---|---|---|
| Quart (6″ x 8″) | 1-1.5 lbs flour | 100 cc | Enough for the air volume around fine powders. |
| Gallon (10″ x 14″) | 5-7 lbs rice | 300 cc | Standard for most dry grains and beans. |
| 5 Gallon (20″ x 28″) | 35 lbs wheat | 2000 cc | Large air volume in a bucket; often uses a 2000cc + 500cc combo. |
Most pre-packed kits, like those from PackFreshUSA, include correctly sized absorbers. If you’re buying separately, use an online cubic centimeter calculator. When in doubt, go one size larger. An oversized absorber will simply become inert faster; an undersized one leaves oxygen behind to spoil the food.
Store unused absorbers in a mason jar with a tight lid. Drop in a few marbles to take up empty space, reducing the air volume the packets have to scrub. They’ll stay viable for months this way.
Frequently Asked Questions
Can you use a regular vacuum sealer on Mylar bags?
No, most consumer vacuum sealers like FoodSaver models will not work. They are designed for porous plastic bags where air can be sucked through the material. Mylar is a solid foil laminate. The machine cannot pull a vacuum, and its sealing strip often cannot heat the thick layers sufficiently. Only a chamber vacuum sealer is appropriate for true Mylar bags.
How long does food last in a sealed Mylar bag?
With a proper seal and the correct oxygen absorber, shelf life extends dramatically. Dry grains like wheat can last 25+ years. Dried beans are good for 10 years. Dried dairy powders last about 4 years. These timelines assume storage in a cool, dark, and dry place. Heat and light are the enemies of long-term storage.
Why didn’t my bag get vacuum tight after sealing?
It might still be fine. The oxygen absorber only removes oxygen, which is 21% of the air. The remaining nitrogen and other gases are still present, so the bag may not look perfectly vacuum-shrunk. A more likely cause is a small leak. Do the tug test. If the seal holds, wait 24 hours. If the bag hasn’t tightened at all and the absorber feels hard, the seal likely failed.
Can you reuse a Mylar bag?
Yes, but carefully. Cut the bag open well below the original seal. Wash and dry it thoroughly. When refilling, you must use a new oxygen absorber and make a fresh heat seal below the cut line. The bag’s material remains a barrier, but each cut and reseal shortens its usable length.
Is a hair straightener or clothing iron better?
Metal hair straightener** is better. It provides focused, clamp-style pressure and heats to the ideal 375-425°F range. A clothing iron has a large, unstable surface area, making even pressure difficult. If you must use an iron, set it to the highest dry setting and press straight down onto a folded bag edge laid over a narrow board.
Before You Go
Sealing a Mylar bag is a simple physical act with high stakes. The difference between a 25-year stash of rice and a moldy mess is a 5mm strip of melted plastic. Remember the sequence: fill, add the absorber within its 10-minute window, clean the seal area, and match your heat to the bag’s thickness. For most home users prepping dry goods, a 5-mil bag sealed with an impulse sealer or a metal hair straightener is the reliable, repeatable solution. Trust the tug test, not your eyes. And always label what’s inside—your future self will thank you.
