
Make Your Chest Freezer Water Tight: How to Properly Seal It
This post contains affiliate links. As an Amazon Associate, we earn from qualifying purchases.
To properly seal a chest freezer and make it water tight, you need a three-part fix: inspect and clean the gasket every three months, test the seal with the dollar bill method, and apply a thin layer of petroleum jelly to the hinge side of the gasket to keep it pliable. A compromised seal drops internal temperature by 10-15°F, spikes energy use by 30%, and turns a 1/4-inch of frost into a solid ice block in under six weeks.
That 10-15°F drop isn’t a guess. It’s the measured outcome when cold air leaks out and warm, humid room air gets pulled in across the evaporator coils. The freezer works harder, the coils frost faster, and everything you’ve stored starts to dry out.
What follows is the mechanical breakdown — why a seal fails, the three diagnostic tests you can do in five minutes, and the maintenance schedule pulled directly from OEM manuals that stops the problem before it costs you food or a repair bill.
Key Takeaways
- Clean the door gasket every three months with a baking soda solution to remove food debris and mold that prevent a tight seal.
- Test the seal using the dollar bill method: close the lid on a bill; if you can pull it out easily, the gasket is failing.
- Apply a thin layer of petroleum jelly only to the hinge side of the gasket to maintain pliability, but never to the entire seal.
- Defrost when frost exceeds 6mm (1/4 inch) in thickness; thicker ice strains the compressor and worsens any existing seal gaps.
- Level the freezer front-to-back and side-to-side before troubleshooting the seal; an unlevel unit twists the lid and creates a permanent gap.
Why a Chest Freezer Seal is a Mechanical Seal, Not a Magic Barrier
A chest freezer gasket is a hollow rubber or vinyl tube pressed into a channel around the lid. When the lid closes, the gasket compresses against the cabinet’s metal flange. That compression creates the air-tight seal. The mechanism is simple, which is why the failure modes are predictable.
The seal doesn’t just keep cold in. It blocks warm, moist air from entering. When it fails, humid air contacts the cold evaporator coils inside and instantly deposits moisture as frost. This is why a faulty seal is a primary cause of excess frost buildup. That frost layer itself then acts as a wedge, preventing the lid from closing fully and making the leak worse in a feedback loop.
A compromised freezer seal can increase energy consumption by up to 30% as the compressor runs constantly to compensate for lost cold air, according to efficiency studies of appliance performance.
The stakes are food quality and hardware longevity. A steady leak leads to freezer burn through accelerated moisture loss and oxidation. A struggling compressor burns out years early. The fix is always the same: restore the gasket’s ability to compress evenly.
The Three-Point Seal Check (Visual, Sound, Paper)
Before you buy parts or start deep cleaning, run these three fast diagnostics. They tell you exactly where the problem is.
1. The Visual and Touch Inspection.
Open the lid and run your fingers along the entire length of the gasket, inside and out. You’re looking for three things: * Cracks or splits, especially at the corners where the gasket bends. * Brittleness or flat spots where the hollow tube has been compressed for too long and lost its spring. * Debris buildup — crumbs, sticky residue, or even a line of mold.
Debris is the easiest fix. Cracks or permanent flat spots mean the gasket must be replaced.
2. The Dollar Bill Test.
This is the definitive air-leak check. Take a dollar bill (or any piece of paper). Close the lid on it so the bill is halfway in, halfway out. Try to pull the bill out. * Good seal: You feel consistent, firm resistance. The bill might even tear. * Failing seal: The bill slides out with little to no tug. It feels loose.
Test at multiple points, especially near the hinges and the latch. A seal can be good in one spot and gone in another.
3. The Listen-and-Feel Test.
With the freezer running, hold the back of your hand close to the closed lid’s seam. Move slowly around the perimeter. A significant air leak will feel like a steady, cold draft. In a quiet room, you might even hear a faint hiss of air being drawn in.
If you fail test two or three, you’ve found your problem. The next step is to restore what you can and replace what you can’t.
Common mistake: Replacing a gasket before leveling the freezer. An unlevel cabinet twists the entire lid frame. The new gasket will fail in the same spot within months. Always check level first.
Step-by-Step Gasket Maintenance and Cleaning
This isn’t a yearly task. Manufacturer manuals, like those for the NewAir and Wards models, specify cleaning the door gaskets every three months. That frequency catches problems before they become failures.
Here’s the right sequence, and what happens if you cut corners.
Before you start: Unplug the freezer. Safety first. Gather a bowl of warm water, 3-4 tablespoons of baking soda, a soft cloth or sponge, a toothbrush for corners, and a dry towel.
Step 1: Inspect for damage.
Run the visual and touch check from the previous section. If the gasket is cracked, torn, or has lost its round, hollow shape, cleaning won’t fix it. You need a replacement. Note the model number (like Fisher & Paykel RC376 or Black+Decker BCFK356) to order the correct part.
Step 2: Clean the gasket and channel.
Mix the baking soda into the warm water. Dampen your cloth and wring it out well — you want it damp, not dripping. Wipe down the entire gasket, scrubbing gently to remove all debris. Use the dry toothbrush to dig out grime from the channel the gasket sits in. * Consequence of skipping: Left-behind grease or sugar residue acts as a lubricant, breaking the seal’s friction. It also attracts moisture and mold, which degrade the rubber.
Step 3: Dry thoroughly and condition (the right way).
Use the dry towel to wipe the gasket and channel completely. Any leftover moisture can freeze and stick the gasket to the cabinet. Now, take a tiny amount of petroleum jelly on a clean cloth. Apply the thinnest possible film only to the hinge side of the gasket. * Why only the hinge side? That’s the area under greatest stress, bending each time the lid opens. The jelly keeps it pliable. Smearing it all over attracts dirt and can cause the gasket to slip out of its channel. * Consequence of over-applying: A thick layer of jelly attracts dust and food particles, creating a gritty paste that abrades the gasket and ruins the seal.
Step 4: Final test and plug-in.
Before plugging the freezer back in, perform the dollar bill test again. You should feel improved resistance. Once confirmed, restore power.
When to Defrost: The 6mm Rule and Why It Matters for Sealing
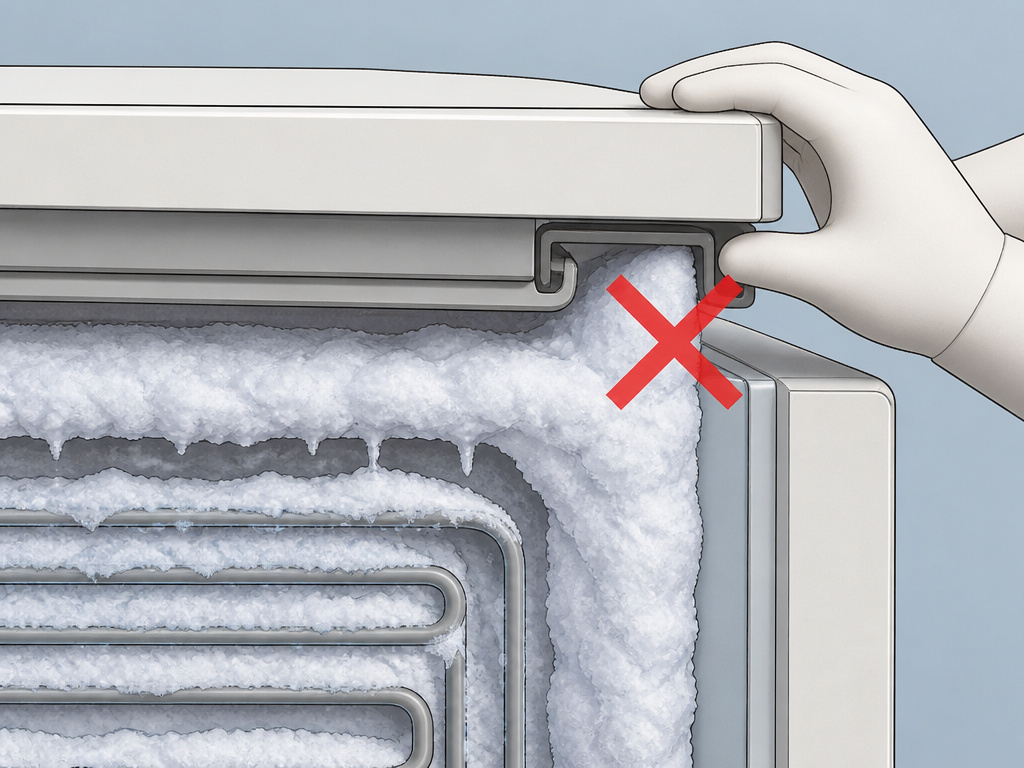 Frost is the enemy of a good seal. The official guidance from the Fisher & Paykel chest freezer user guide is clear: defrost when frost buildup exceeds 6mm (about 1/4 inch) in thickness.
This isn’t just about saving space. Ice is an insulator. A thick layer on the coils makes the compressor work longer and harder to pull heat out of the freezer compartment. That extra run time pumps more heat into the kitchen, raising the ambient temperature around the freezer. Warmer air makes the gasket work harder.
| Frost Thickness | Impact on Freezer | Impact on Seal |
|---|---|---|
| Less than 6mm | Normal operation; minimal efficiency loss. | Gasket closes against a smooth surface. |
| 6mm to 12mm | Compressor runs 15-20% longer; energy use climbs. | Ice can physically block lid closure near walls. |
| More than 12mm | Significant cooling loss; risk of food thawing during defrost cycles. | Lid may not latch; permanent cold air leak established. |
The process is straightforward but non-negotiable. Unplug the freezer, remove all food into coolers, and let the ice melt naturally. Never use ice picks or boiling water — you’ll puncture the interior lining or warp plastic. Use towels to soak up water. Most units have a drain plug; place a shallow pan underneath before removing it.
A full defrost is also your best chance to deep-clean the interior and check the door seal without obstruction.
Correct Installation: The Foundation of a Good Seal
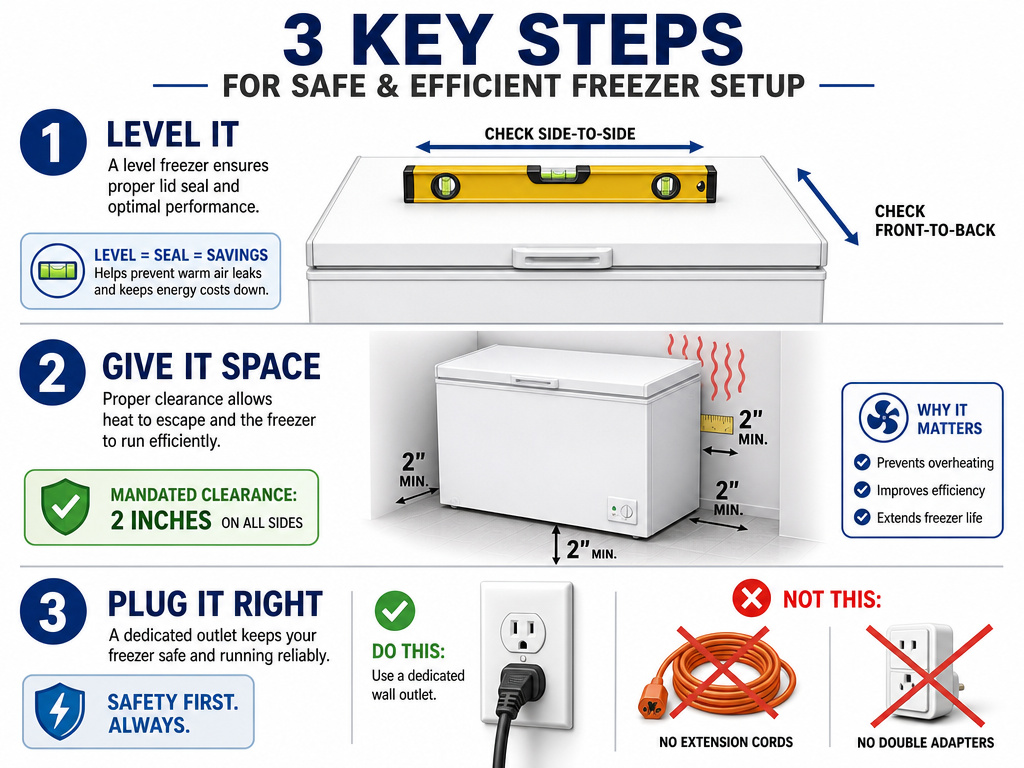 You can have a brand-new, perfectly clean gasket, and it will still fail if the freezer isn’t installed correctly. The manuals are unanimous on three points.
1. Level the Cabinet.
Use a carpenter’s level on the lid. Check side-to-side and front-to-back. The lid must sit perfectly flat on the cabinet rim. If it’s off, adjust the feet or place shims under the cabinet. An unlevel freezer causes the lid to twist, creating a gap at the high corner that no gasket can fill.
2. Provide Adequate Clearance.
The Home Depot use and care guide mandates at least 2 inches of clearance on all sides and the back of the freezer. This allows heat from the compressor to dissipate. If the unit overheats, the cabinet can warp slightly over time, changing the alignment between the lid and the rim.
3. Use a Dedicated Outlet.
Plug the freezer directly into a wall outlet. Don’t use an extension cord or a double adapter. The manual for the Wards Model FRF451 specifies a 60-inch cord length for a reason — it expects a nearby outlet. A sagging extension cord can get pinched in the lid or be pulled loose, causing power interruptions that lead to thaw-frost cycles.
Where this goes sideways: Placing the freezer in an unheated garage where winter temps drop below 0°F (-18°C). Most compressors are lubricated with oil that thickens in extreme cold. The strain of starting in thick oil can damage the compressor over time, causing vibrations that loosen cabinet components and affect lid alignment.
Troubleshooting Persistent Seal Problems
Sometimes maintenance isn’t enough. If you’ve cleaned, leveled, and tested but still feel a draft, this table maps symptoms to likely causes.
| Symptom | Likely Cause | Immediate Fix | Long-Term Solution |
|---|---|---|---|
| Dollar bill slides out easily at the hinge side. | Gasket is brittle or compressed from stress. | Apply petroleum jelly to hinge side. | Plan for gasket replacement. |
| Frost line only on one side or corner of the interior. | Freezer cabinet is not level. | Check and adjust level with a shim. | Ensure flooring is solid and won’t settle. |
| Lid is difficult to close or requires slamming. | Gasket is misaligned or popped out of its channel. | Unplug, inspect, and reseat the gasket fully into its track. | If channel is damaged, replacement of the entire lid assembly may be needed. |
| Seal looks good but freezer runs constantly, with heavy frost. | Possible leak in the refrigerated cabinet itself (rusted seam, puncture). | Consult a professional technician for a pressure test. | This is a repair beyond DIY; weigh cost against replacement. |
If a replacement gasket is needed, they are model-specific. Generic “universal” gasket tape is a temporary fix at best and often fails in low temperatures. Order the exact part for your Black+Decker, NewAir, or Frigidaire model.
Frequently Asked Questions
Can I use silicone grease instead of petroleum jelly on my freezer gasket?
No. Silicone grease is a better lubricant but is not recommended for food appliance seals. It can be difficult to clean off, may degrade certain rubber compounds over time, and isn’t certified food-safe in the same way petroleum jelly is. The thin film of petroleum jelly on the hinge side is the manufacturer-approved method.
How long should a chest freezer gasket last?
With proper quarterly cleaning and care, a gasket should last 7 to 10 years. Exposure to direct sunlight, cleaning with harsh chemicals, or constant stress from an unlevel lid can cut that lifespan in half. If your gasket is cracked or has permanent flat spots, it’s time for a replacement.
Will a bad seal cause my freezer to stop cooling completely?
Not usually. A bad seal causes the freezer to run more often and longer to maintain temperature, but it will usually still cool. However, in very warm rooms or if the seal is massively compromised, the compressor may run continuously and eventually overload or fail due to strain. You’ll notice higher energy bills and excessive frost long before a total cooling failure.
Is it worth repairing a seal on an old chest freezer?
It depends on the freezer’s overall condition. If the compressor is strong, the interior liner is intact, and it’s energy-efficient, a $50-$100 gasket is a worthwhile repair. If the freezer is 15+ years old, has rust spots, or is a known energy hog, the cost of the gasket and your labor might be better put toward a newer, more efficient model.
Can I use a space heater to speed up defrosting?
Never. Using a space heater, hairdryer, or pouring hot water to defrost risks melting plastic components, warping the interior liner, and creating electrical shorts. It can also thermally shock the cooling system. Always allow frost to melt naturally with the door open. Plan ahead and use coolers for your food.
The Bottom Line
A water-tight chest freezer seal comes down to consistent, simple maintenance. Clean the gasket every season, test it with a piece of paper, and keep it pliable with a dab of petroleum jelly on the hinges. Defrost before the ice gets thicker than a pencil lead, and make sure the unit is perfectly level.
Ignore those steps, and you’re not just losing cold air. You’re inviting frost, freezer burn, and a repair bill for a compressor that’s been running on overtime. The right packaging techniques with vacuum sealing or freezer bags protect your food from the inside; a solid seal protects everything from the outside. Start with the dollar bill test tonight. You’ll know in two minutes where you stand.
