
How to Preserve Pears Without Canning: Freezing & Drying
This post contains affiliate links. As an Amazon Associate, we earn from qualifying purchases.
To preserve pears without canning, you freeze or dehydrate them. Freezing requires packing sliced, pre-treated pears in syrup or juice within airtight containers. Dehydrating involves slicing pears ¼ to ½ inch thick, treating them to prevent browning, and drying at 130–140°F until leathery. Properly frozen pears last up to 18 months; dried pears can last 24 months at 40°F.
The “without canning” clause means you’re trading shelf-stability for speed and equipment simplicity. Freezing locks in texture for future baking, while drying creates a portable snack. The whole game is stopping enzymatic browning the moment you cut into the fruit—skip that step and your pears turn a unappetizing tan before the dehydrator even warms up.
What follows is a direct comparison: freezing for pies and smoothies versus dehydrating for snacks. You’ll get the exact pretreatment formulas from university extensions, the storage timelines that actually work, and the one variety mistake that ruins both methods.
Key Takeaways
- Freezing is for texture, drying is for shelf life. Frozen pears work in cooked applications like crisps; dried pears are a stable, chewy snack that doesn’t need a freezer.
- Treat for browning immediately. Use a solution of 1 teaspoon crystalline ascorbic acid per pint of water for 3-5 minutes. Lemon juice doesn’t work as well long-term.
- Winter pears (Anjou, Bosc, Comice) need special handling. They require 30-60 days of cool storage (35-40°F) after harvest to ripen properly before you preserve them.
- Storage temperature dictates everything. Dried pears last 24 months at 40°F but only 1 month at 90°F. Your pantry’s ambient heat is the biggest threat.
- Condition dried fruit before final storage. Spread cooled, dried pears in a large container for 7-10 days, shaking daily. Any moisture beads mean back into the dehydrator.
Why Skip the Canning Pot?
Canning pears is a fantastic method for fruit preservation, but it demands jars, a boiling-water bath, and a solid afternoon. Freezing and dehydrating are faster, require less specialized equipment, and carry no botulism risk. They answer the “I have a bushel and three hours” problem.
The trade-off is space and texture. A freezer full of pears is a commitment. Dehydrated pears lose their juicy crunch, trading it for concentrated sweetness and chew. Your goal decides the method. Want a pie filling in February? Freeze. Want lunchbox snacks that survive a power outage? Dehydrate.
Before you start: Pears ripen from the inside out. A pear that feels soft at the neck is overripe and will turn to mush when sliced. Use firm, ripe fruit. Test by applying gentle pressure near the stem; it should yield slightly. Overripe pears are only good for sauce or butter.
The Right Pear for the Job
Not all pears are equal for preservation. The variety dictates everything from slice integrity to final flavor.
Bartlett pears are the default. They’re widely available, have a classic pear flavor, and hold their shape when treated. They’re the safe choice for both freezing and drying. Anjou and Bosc pears are better for drying. Their denser, grainier flesh dehydrates into a meatier, less crumbly snack. Bosc, in particular, holds its shape so well it’s often the variety pictured in those perfect dried pear packages.
Here’s the catch with winter pears like Anjou, Bosc, and Comice. According to Oregon State University Extension, they require a period of cool storage (35-40°F) to ripen correctly. Anjou needs 45-60 days, Bosc 45 days, Comice 30 days. If you try to preserve them straight from the orchard, they’ll never develop their full sweetness and will taste bland. This is the edge case that breaks most generic guides.
| Pear Variety | Best For | Key Trait for Preservation | Special Requirement |
|---|---|---|---|
| Bartlett | Freezing & Drying | Holds shape, classic flavor | None |
| Anjou | Drying | Dense flesh, less juicy | 45-60 days cool storage to ripen |
| Bosc | Drying | Very firm, grainy texture | 45 days cool storage to ripen |
| Comice | Freezing (in syrup) | Juicy, buttery flavor | 30 days cool storage to ripen |
For canning pears, firmness is even more critical. For freezing and drying, a perfectly ripe Bartlett is your most forgiving starting point.
The Non-Negotiable First Step: Stopping the Brown
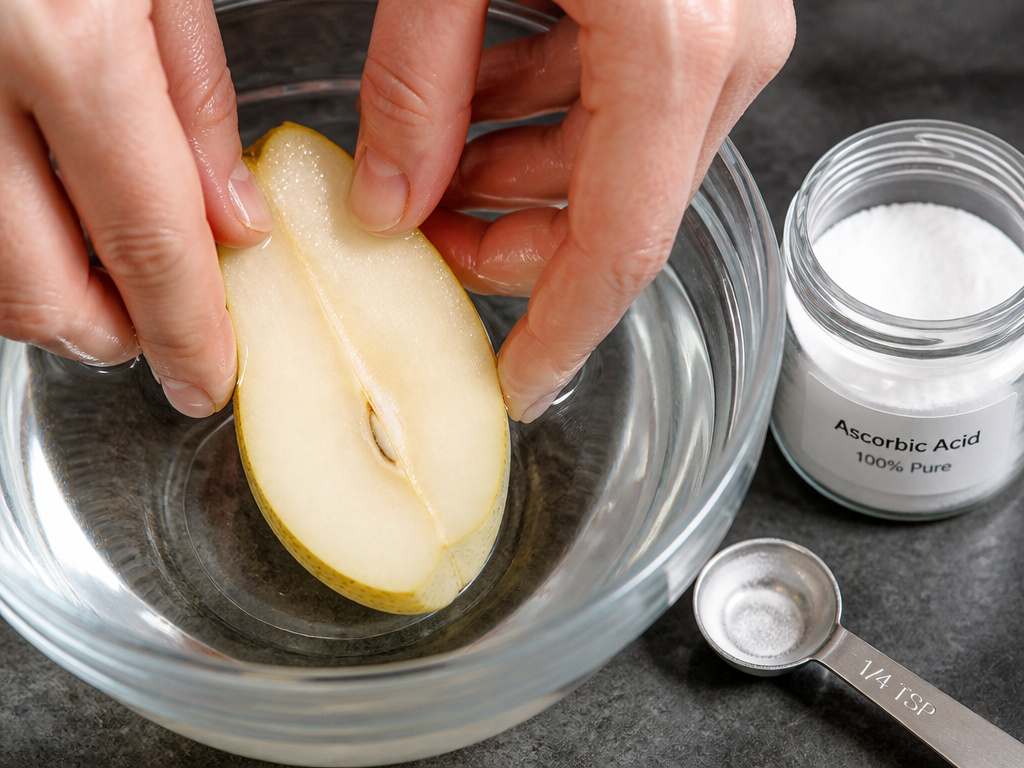 The moment you cut a pear, polyphenol oxidase enzymes meet oxygen and start turning the flesh brown. This is cosmetic for eating fresh, but for long-term preservation, it signals quality loss and can affect flavor. You must treat the slices before proceeding.
The most effective home treatment is an ascorbic acid (vitamin C) bath. Lemon juice works in a pinch, but its citric acid is less potent and can impart a slight flavor.
For a quart of water, dissolve 1 teaspoon of crystalline ascorbic acid. Soak pear slices for 3-5 minutes, then drain. Do not rinse. This is the method specified by both Utah State University and Colorado State University extensions.
You can also use a salt solution (2 tablespoons per gallon of water) but don’t soak longer than 20 minutes or the pears will taste salty. The ascorbic acid method is cleaner. Have your solution ready in a large bowl before you make the first cut. As you slice, drop the pieces directly into the bath.
The Step-by-Step Freezing Method
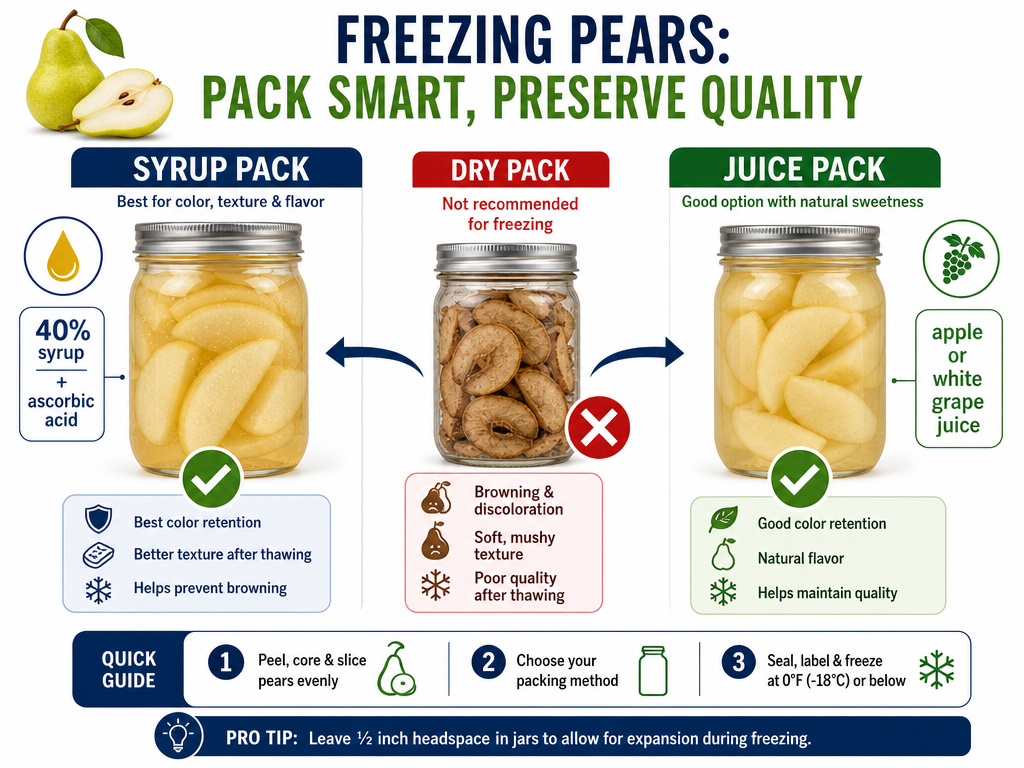 Freezing is the best way to preserve food for later cooking while retaining a fresh-like texture. The goal is to lock in that texture and prevent freezer burn.
1. Prep and Treat. Wash, peel, and core firm pears. Slice them uniformly—about ½ inch thick for halves, or into chunks. Submerge in the ascorbic acid bath for 5 minutes. Drain.
2. Choose Your Pack. You can freeze pears dry, but they’ll oxidize and get freezer-burned fast. Packing in a syrup or juice is standard for quality. * Syrup Pack: Use a 40% syrup (3 cups sugar dissolved in 4 cups water). For even better quality, add ¾ teaspoon (2250 mg) of ascorbic acid to each quart of cold syrup before using. This extra step is from the Michigan State University Fresh pears guide. * Juice Pack: Use apple juice or white grape juice for a no-sugar-added option. The juice flavor will transfer, so choose one you like.
3. Pack and Seal. Place drained pear slices in a rigid, airtight freezer container or a heavy-duty freezer bag. Cover with cold syrup or juice, leaving 1½ inches of headspace for rigid containers (to allow for expansion). If using a bag, squeeze out as much air as possible before sealing.
4. Flash-Freeze (Optional). For loose pieces you can scoop later, spread treated pear slices on a parchment-lined baking sheet. Freeze solid (2-3 hours), then transfer to a freezer bag. This prevents a solid block of fruit.
Where this goes sideways: Skipping the syrup or juice pack. Pears are about 84% water. When that water freezes into ice crystals, it ruptures the cell walls. A syrup pack surrounds the fruit with a sugary solution that freezes at a lower temperature, cushioning the cells. Dry-packed frozen pears thaw into a mushy, brownish mass.
How to Dehydrate Pears for Snacks
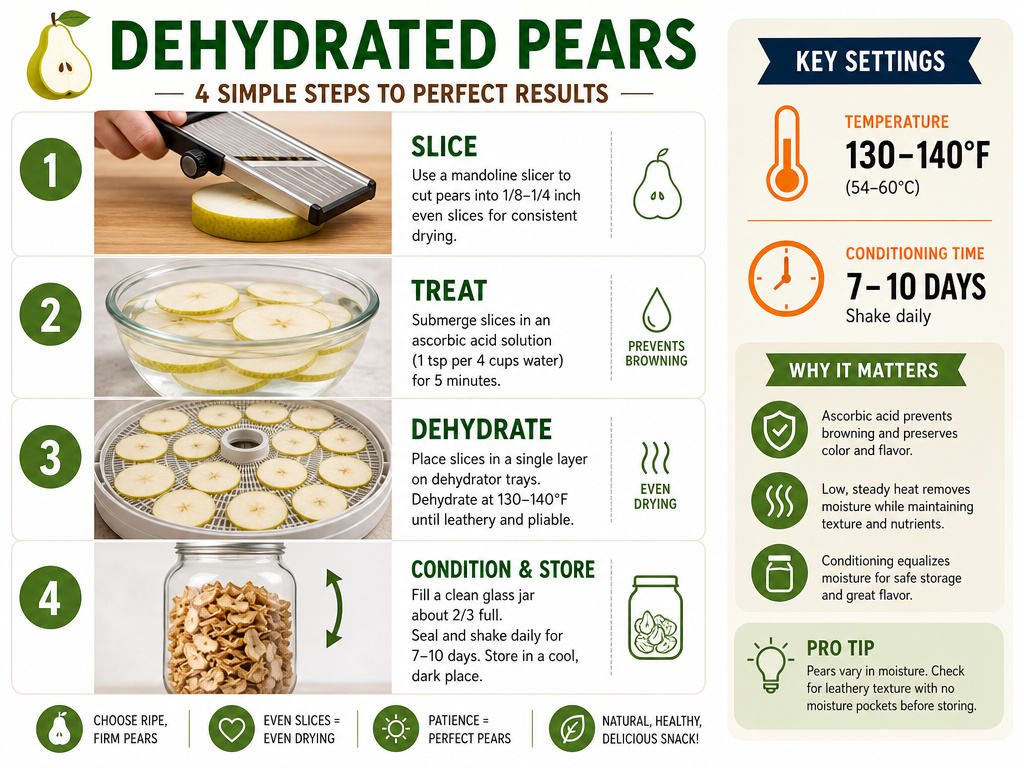 Dehydrating removes enough water to inhibit microbial growth, creating a shelf-stable product. It’s the same principle used to preserve lemon zest or herbs.
1. Slice Thick. Cut peeled or unpeeled pears into uniform slices, ¼ to ½ inch thick. Thin slices will over-dry into brittle, tasteless chips. Thick slices dry slowly but become pleasantly chewy. A mandoline slicer ensures even thickness.
2. Treat for Color. Use the same ascorbic acid bath as for freezing. Soak for 5 minutes, drain well. Pat slices dry with a clean towel to remove surface moisture—this speeds up drying.
3. Load and Dry. Arrange slices in a single layer on dehydrator trays, ensuring no overlap. Dry at 130°F to 140°F. The process takes 6 to 12 hours, depending on slice thickness, humidity, and dehydrator model. They are done when pliable and leathery, with no visible moisture pockets when torn.
4. Condition. This is the step everyone misses. Place cooled, dried pears loosely in a large glass or plastic container, filling it only two-thirds full. Seal it and let it sit for 7-10 days, shaking the container daily. This allows residual moisture to equalize throughout all the pieces.
If beads of moisture form on the inside of the container during conditioning, the pears are not dry enough. Immediately return them to the dehydrator for another 2-3 hours, then repeat the conditioning step. This warning comes straight from the Colorado State University Preserve Smart tool.
Storage & Longevity: The Temperature Rule
Your storage location is more important than your preparation method. Heat is the enemy of preserved food.
| Preservation Method | Storage Temp | Maximum Quality Duration | Visual Failure Sign |
|---|---|---|---|
| Dried Pears | 40°F (Fridge) | Up to 24 months | Mold spots, moisture beads |
| Dried Pears | 70°F (Pantry) | About 3 months | Loss of pliability, hardening |
| Dried Pears | 90°F (Hot Garage) | About 1 month | Sticky texture, possible mold |
| Frozen Pears (Syrup Pack) | 0°F (Freezer) | Up to 18 months | Freezer burn (grayish-white patches) |
| Fresh Pears | 32-40°F (Fridge) | Up to 3 weeks | Skin wrinkling, soft spots |
These timelines are from the USU Extension pear preservation guide. They are based on laboratory storage tests, not guesswork.
For dried pears, use airtight glass jars, Mylar bags with oxygen absorbers, or vacuum-sealed bags. For frozen pears, prevent freezer burn by ensuring containers are truly airtight. Label everything with the date. You will forget.
This long-term approach is similar to the one needed for alliums when you learn how to preserve onions at home—cool, dark, and dry wins.
Frequently Asked Questions
Can I freeze pears without sugar?
Yes, but manage your expectations. You can use an unsweetened juice pack (like apple juice) or the dry-pack/flash-freeze method. Without sugar’s protective effect, the texture will degrade more, resulting in softer, mushier thawed pears. They’ll work fine for pear sauce or smoothies but not for a pie where you want distinct slices.
Do I have to peel pears before dehydrating?
No. The skin adds fiber and texture, and it dehydrates perfectly well. For freezing or canning, peeling is recommended because the skin can become tough and stringy. For dehydrating, it’s a personal preference. If you leave the skin on, make sure to wash the pears thoroughly first.
Why are my dried pears turning dark?
They are oxidizing. This usually means your pretreatment was ineffective, too brief, or you skipped it entirely. It can also happen if your dehydrator temperature is too low, prolonging the drying time and giving enzymes more time to work. Next time, ensure your ascorbic acid solution is fresh and your drying temperature is at least 130°F.
Can I use an oven instead of a dehydrator?
You can, but it’s less efficient and more hands-on. Set your oven to its lowest temperature (usually 150-170°F). Prop the door open 1-2 inches with a wooden spoon to allow moisture to escape. Rotate the trays every few hours. Drying will take longer, and your results will be less even than with a dehydrator’s fan-driven airflow.
What can I do with overripe pears?
Overripe pears are too soft for freezing or drying in slices. Their destiny is sauce, butter, or fruit leather. Cook them down with a little water, then puree. For leather, spread the puree on dehydrator trays lined with parchment sheets and dry at 135°F until peelable. It’s a great way to avoid waste, much like finding a use for soft tomatoes when you preserve tomatoes.
The Bottom Line
Freeze pears for future baking in a syrup pack with added ascorbic acid. Dehydrate them for shelf-stable snacks, slice them thick, and never skip the conditioning week. Your single biggest lever for success is the pretreatment bath—one teaspoon of ascorbic acid per pint of water, five minutes, no excuses.
The methods here apply to much more than pears. The principles of blanching, packing, and cold storage are the foundation of how to preserve vegetables, while the careful drying and conditioning process is similar to what you’d use to preserve mushrooms. Start with a basket of firm Bartletts, block an afternoon, and you’ll have summer’s sweetness locked down for the year ahead.
