
Guide to Storing Fresh Greens in Your Fridge for Longevity
This post contains affiliate links. As an Amazon Associate, we earn from qualifying purchases.
To store fresh greens in the fridge, you must manage three things: humidity, temperature, and airflow. Wrap unwashed greens in a damp paper towel, place them in a perforated plastic bag or breathable container, and store them in the high-humidity crisper drawer. This system slows moisture loss without trapping rot-inducing condensation.
That system works because greens wilt when their cells lose water. Your fridge is cold but dry, constantly pulling moisture from anything inside it. The damp towel and sealed environment replace that lost humidity at the leaf surface, keeping the cells turgid.
What follows is the breakdown of why that three-part system works, the evidence behind the conflicting wash-before-storage advice, and a direct comparison of bags, containers, and professional towel methods. You’ll also get the blanching times for freezing collards versus kale, and where to place greens to avoid ethylene gas from apples.
Key Takeaways
- Store unwashed greens in the high-humidity crisper drawer, ideally between 32°F and 40°F. The back of the fridge is colder and better for longevity.
- Do not wash greens before refrigerating unless they are pre-packaged and wet. Washing removes natural protective coatings and introduces free water that accelerates bacterial decay.
- Use a perforated plastic bag or a vented container with a damp paper towel. The towel supplies humidity; the perforations allow minimal airflow to prevent sogginess.
- Freeze greens by blanching: 3 minutes for collards, 2 minutes for all others (kale, spinach, chard), then cool for the same duration before packing with a ½-inch headspace.
- Keep greens away from ethylene-producing fruits like apples, melons, and tomatoes, which are often stored on warmer shelves near the door.
The Three-Part System: Humidity, Temperature, Airflow
Every method for storing fresh greens manipulates one of these three variables. Get them wrong, and the result is predictable: sogginess in two days or wilted leather in four.
Refrigerators provide cold but dry the air. Creating a “cool and moist” environment (32–40°F and 95% relative humidity) is the most challenging storage condition to create at home. Perforated plastic bags are preferable to solid ones for retaining moisture while allowing air movement. , University of Wisconsin-Madison Extension, “Storing Fruits and Vegetables from the Home Garden”
Humidity is the main event. Leaf cells are about 90% water. When the air around them is drier, that water evaporates through the stomata, the tiny pores on the leaf surface. The cells shrink, the leaves droop, and you get a limp salad. A damp paper towel placed alongside the greens raises the relative humidity inside the bag or container to near 95%, matching the leaf’s internal moisture and stopping the outflow.
Temperature is straightforward. Colder is better, but only down to a point. 32°F to 40°F is the ideal band. Below 32°F, ice crystals form in the leaves and rupture cell walls; you get mushy, waterlogged greens when they thaw. Your fridge’s temperature isn’t uniform. According to the USDA, the back wall and bottom shelf are the coldest zones. The crisper drawer is designed for high humidity, and the front door shelves are the warmest. Greens belong in the crisper.
Airflow seems counterintuitive. You want a sealed environment to hold humidity, but a completely sealed one traps the ethylene gas the greens themselves emit as they respire, along with any excess moisture from the towel. That stagnant, wet air is what causes slime, the bacterial breakdown of leaf tissue. A few holes in a plastic bag or the built-in vents of a container like the OXO Greens Keeper allow just enough gas exchange to prevent this.
Should You Wash Greens Before Storing?
This is where official advice splits, and the reasoning matters. Health Canada and the Canadian Produce Marketing Association say to rinse leafy greens before storing. Michigan State University Extension and the University of Wisconsin-Madison say to wash only when ready to use.
The why-layer reveals the winner. Greens have a thin, waxy cuticle that slows water loss. Washing under water, especially with any agitation, damages this layer. It also leaves free water clinging to the leaves. In a sealed bag, that water has nowhere to go, dramatically increasing the surface moisture that bacteria and fungi need to multiply. The CPMA guide itself notes that washing most produce “removes some of nature’s natural preservatives” and makes them spoil faster, making an exception only for leafy greens, an exception not backed by the physical mechanism.
The professional kitchen hack from the YouTube transcript uses a dry or barely-damp cloth, not a wash. They’re absorbing external moisture and buffering humidity, not introducing water directly to the leaf surface.
Common mistake: Washing greens before bagging them. The added water speeds bacterial growth, and you’ll find slimy spots in the bag within three days, even with a paper towel.
The rule holds: store them dry, wash them just before you eat. The only exception is if you buy pre-washed, wet greens in a clamshell; for those, the dry paper towel hack, placing one inside the container to absorb pooled water, can extend life by a couple of days.
Bag, Box, or Towel? A Method Comparison
You have three main vessels: the ubiquitous plastic bag, the dedicated container, and the chef’s towel wrap. Each creates a different microclimate.
| Method | Best For | How It Controls Humidity | Lifespan Expectation |
|---|---|---|---|
| Perforated Plastic Bag | Everyday, cost-effective storage | Damp paper towel inside bag adds moisture; holes allow slight gas exchange. | 5–7 days |
| Vented Storage Container | High-volume, frequent users | Built-in vents regulate airflow; sealed lid maintains humidity. May include a drip tray. | 7–10 days |
| Cloth Towel Wrap | Delicate herbs, professional prep | Towel wicks excess moisture away while providing a humid buffer. Allows maximum breathability. | 3–5 days (herbs) |
Perforated plastic bags are the default. Take a standard produce bag, poke 5-6 holes with a fork, line it with a damp paper towel, add your dry greens, and squeeze out most of the air before tying. The Rubbermaid FreshWorks vented bags are a store-bought version of this principle. They work. Their weakness is that the paper towel can dry out or become oversaturated if the greens were wet.
Vented containers like the OXO Greens Keeper or Glasslock Fresh Food Keeper are a step up. They have a dial-controlled vent and an elevated basket that keeps greens out of any condensate. You still add a damp paper towel at the bottom. The seal is better than a twisted bag, so humidity stays more consistent. This is the move if you go through a lot of spinach or kale each week.
The chef’s towel wrap is for fresh herbs like parsley and cilantro. You take a clean, lint-free kitchen towel (not sopping wet, just barely damp), lay the herbs on it, roll tightly, and place the roll inside a loosely tied bag. The towel absorbs ethylene and excess moisture while providing a humid cocoon. This is the method detailed in our guide on storing herbs, and it beats sticking them in a glass of water.
Step-by-Step: Prepping and Storing Fresh Greens
This sequence assumes you’re starting with bunched or loose greens from the market.
- Inspect and Trim. Remove any bands or ties. Pick out visibly wilted, yellowed, or slimy leaves. Trim the very end of the stems if they are dried out or dirty.
- Do Not Wash. Leave them dry. Shake off any loose soil or grit.
- Prepare the Vessel. For a bag: dampen a paper towel so it’s moist but not dripping, and place it inside. For a container: place the damp towel at the bottom.
- Pack with Care. Place the greens inside loosely. Do not cram or crush them. You want air to circulate slightly between leaves.
- Seal and Store. If using a bag, press out most of the air, twist the top, and secure with a tie or clip. Place the bag or container in the high-humidity crisper drawer. If your drawer has a humidity slider, set it to high.
Where this goes sideways: Stuffing the bag too full. The leaves in the middle get crushed, their cells rupture, and that released cell sap becomes the focal point for rot. It spreads outwards in two days.
What about pre-washed, ready-to-eat salad mixes? They’re the trickiest because they’re already wet and often damaged from processing. Your goal is damage control. Open the clamshell or bag, insert a dry paper towel on top of the greens, reseal, and store. Flip the container upside down for the first day so the towel can absorb pooling water from the top. Use these mixes within 3-4 days.
The Freezing Fallback: Blanching Times Explained
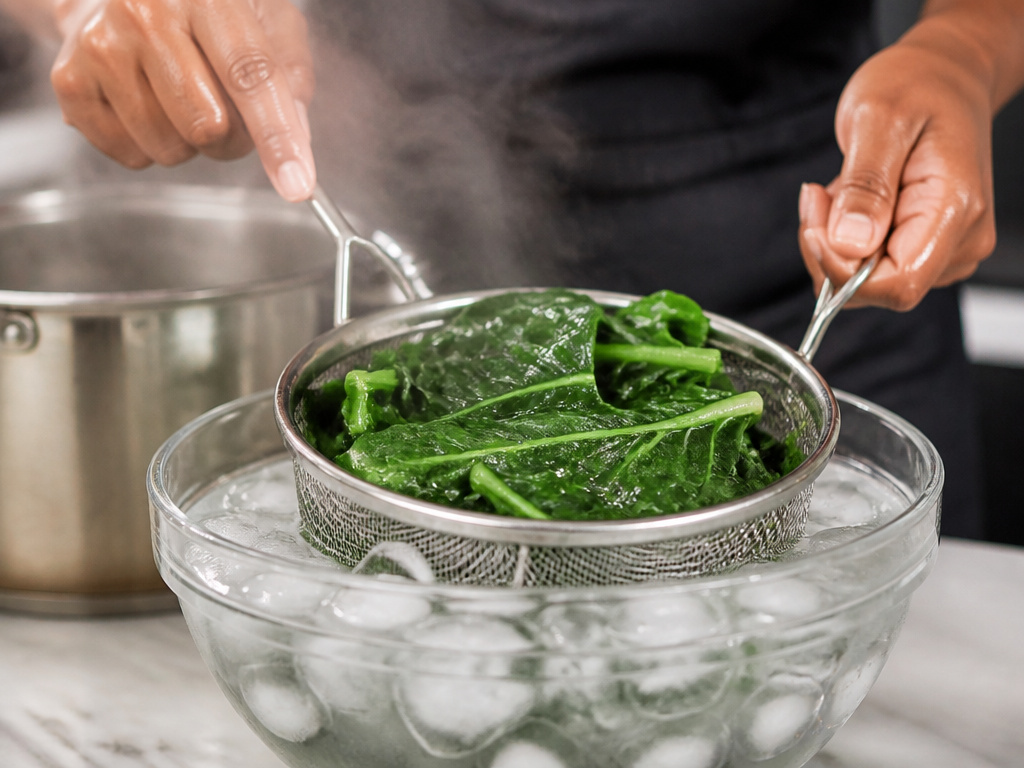 Freezing is not for salad greens. It’s for cooking greens: kale, collards, spinach, Swiss chard. The process is blanching, a quick boil to deactivate enzymes that cause loss of flavor, color, and texture over time.
The Michigan Fresh greens storage guide specifies different times: collard greens blanch for 3 minutes; all other greens for 2 minutes. The reason is thickness. Collard leaves are tougher and more fibrous; they need the extra minute for the heat to penetrate fully and shut down the enzyme activity throughout the leaf. Kale, while hardy, has a thinner leaf structure and only needs two minutes.
Here’s the full sequence: 1. Wash the greens thoroughly now, as you won’t later. 2. Bring a large pot of water to a rolling boil. 3. Submerge the greens (in batches) for the specified time, 3 minutes for collards, 2 for the rest. 4. Immediately plunge them into an ice water bath. Cool them for the same duration you blanched them. This stops the cooking. 5. Drain thoroughly, squeeze out excess water in batches, and pack into Stasher silicone bags or freezer containers, leaving a ½-inch headspace for expansion.
Skipping the ice bath is the critical error. The residual heat will continue to cook the greens, turning them mushy and dull green before they even freeze.
Fridge Geography and Ethylene Gas
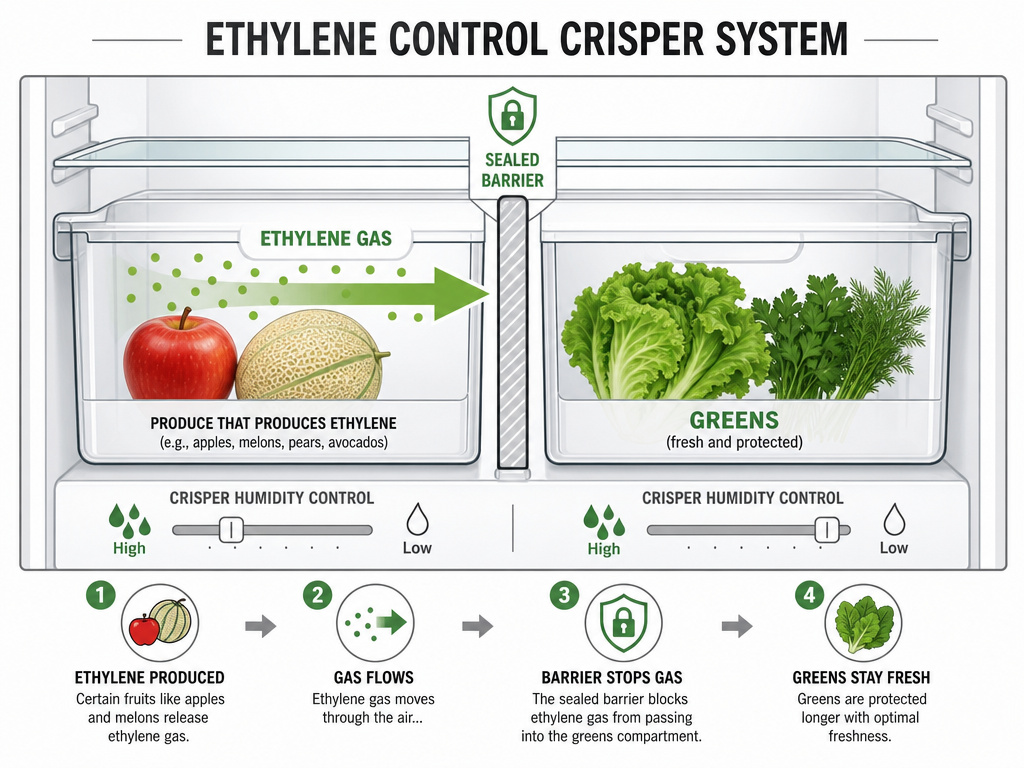 Placement within the fridge isn’t just about temperature. It’s about chemical warfare. Many fruits produce ethylene gas, a natural plant hormone that accelerates ripening, and decay.
According to the USDA storage guide, your refrigerator has zones. Ethylene-producing items (apples, cantaloupe, honeydew, tomatoes) should be stored as far as possible from ethylene-sensitive ones (greens, cucumbers, peppers, herbs). Often, the fruit drawer or warmer door shelves hold these producers.
Easy to miss: The apple you save for a snack, placed next to your lettuce in the crisper. The ethylene it emits will cause brown spots and premature wilting on the lettuce within 48 hours.
Store your greens in one crisper drawer (set to high humidity) and your apples, pears, or melons in the other (set to low humidity, if available), or on a shelf. This simple separation can add days of freshness. If your fridge starts to hold onto food odors, which can transfer to greens, our guide on eliminating fridge smells has the fixes.
Troubleshooting: Why Are My Greens Still Wilting or Slimy?
Diagnosis is about matching the symptom to the variable you got wrong.
| Symptom | Likely Cause | The Fix for Next Time |
|---|---|---|
| Wilted, dry leaves | Humidity too low. Paper towel dried out or bag wasn’t sealed. | Use a damper towel, check seal, store in crisper. |
| Slimy, brown spots | Humidity too high. Free water on leaves, insufficient airflow. | Don’t wash before storing. Ensure bag has holes or use a vented container. |
| Yellowing leaves | Aging, but accelerated by warm temperature or ethylene exposure. | Store in colder back part of crisper, isolate from fruits. |
| Off smells | Bacterial or fungal decay has set in. | Discard. Start with drier greens and a clean container. |
If you consistently get slimy greens, switch from bags to a vented vegetable container. The OXO Greens Keeper or similar produce containers provide more consistent humidity control without the risk of trapped stagnation.
Frequently Asked Questions
How long do fresh greens last in the fridge?
It depends on the green and the method. Heartier greens like kale and collards can last 7-10 days in an ideal setup. Tender lettuces and spinach will last 5-7 days. Bagged, pre-washed salad mixes are a 3-4 day proposition. The countdown starts the moment they’re harvested.
Can I store greens in a glass container with a lid?
Yes, if the lid is vented or you don’t seal it completely. A fully sealed glass container will trap 100% humidity and ethylene, creating a swamp. Crack the lid slightly or use a container designed with a vent, like many best salad containers.
Is it better to store greens in a plastic bag or a reusable bag?
Reusable produce bag** made of breathable cotton or mesh is excellent for short-term storage (1-2 days) as it allows maximum airflow. For longer storage, it doesn’t retain enough humidity. Pair a breathable bag with a damp towel inside a plastic bag or container for the best of both worlds.
Why do chefs wrap greens in cloth towels?
It’s a precision humidity tool. A cloth towel can be dialed in from very damp to barely moist, and it wicks moisture away from direct leaf contact while maintaining a humid microclimate. It’s the best method for delicate fresh herbs like parsley, cilantro, and basil, which rot easily in plastic. See our specific guides on keeping parsley fresh and storing basil properly.
Should I remove the stems from greens before storing?
For heartier stems like kale and collards, no, the stem helps retain moisture in the leaf. For tender greens like spinach, you can leave them. The main rule is to remove any thick, woody, or damaged stems that take up space and don’t get eaten.
The Bottom Line
Stop treating all greens the same. Kale is not spinach, and lettuce is not a herb. Match the method to the green’s density and your own fridge’s geography.
For most people, the winning combination is the unwashed green, the damp paper towel, and the perforated bag in the crisper drawer. It’s cheap, it’s effective, and it leverages the basic physics of humidity. If you eat greens daily, invest in a dedicated vented container, it pays off in reduced waste. And always, always keep them away from your apples.
