
Fast Freezer Defrosting: The OEM-Approved Hot Water Method
This post contains affiliate links. As an Amazon Associate, we earn from qualifying purchases.
To defrost a freezer fast, turn it off, unplug it, and use pans of hot tap water (under 120°F) placed inside on shelves. A fan blowing into the open freezer speeds evaporation. Remove large frost sheets before they melt to minimize water. Never use boiling water, sharp tools, or electrical heaters inside the unit—these damage the liner and refrigerant lines.
The 120-degree cap on the hot water is the temperature GE prints in its FCM16 chest freezer manual because water hotter than that can warp the plastic liner.That liner is what keeps the cold in. Crack it, and the freezer never seals right again.
What follows is the breakdown of that hot-water method, the one pre-cooling trick Liebherr manuals swear by, and the five mistakes that turn a two-hour job into a weekend repair bill. You’ll also get the exact frost thickness that triggers the whole process.
Key Takeaways
- The fastest safe method uses pans of hot tap water under 120°F placed on shelves, with a fan blowing into the open freezer.
- Defrost when frost reaches 1/4 inch to 1/2 inch (6-13mm) thick for efficient operation.
- Unplug the freezer first. This is non-negotiable for safety and to stop the compressor from burning out.
- Use only plastic or wood scrapers to remove frost. Metal or sharp tools puncture the liner and flammable refrigerant lines.
- For Liebherr and similar models, activate the SuperFrost function 24 hours before defrosting to create a “cold reserve” that protects food and speeds thawing.
The Fastest OEM-Approved Method
This isn’t about hairdryers and steam. The quickest defrost that won’t void your warranty uses physics you already own: hot water and moving air.
Place pans of hot tap water (less than 120°F) on the freezer shelves. Directing air from an electric fan into the open freezer will also help. Do not place the fan or any electrical device inside the freezer.
Start by turning the temperature control to OFF and pulling the plug from the wall. This stops the compressor immediately. A freezer trying to cool while you’re pouring heat into it will fight you the whole way and can burn out its motor.
Next, empty all the food. You need space for the pans and to catch falling ice. Have a plan for the food—insulated coolers, cardboard boxes lined with towels, or a neighbor’s freezer. Layer items and keep the cooler closed.
Now, set up for the water. Grab two or three deep pans or baking dishes. Fill them with hot water from the tap. Check that it’s hot but not scalding—under 120°F. Place them on different shelves, ideally where frost is thickest.
The science is simple. The hot water radiates warmth into the freezer cavity, raising the ambient temperature and melting frost from all sides at once. A fan at the door opening replaces the warm, moist air inside with drier room air, which accelerates evaporation. This combo cuts defrost time by more than half compared to just waiting.
Leave the pans for 15-20 minutes. That’s the window Electrolux manuals cite for hard frost to soften. Then, put on some rubber gloves.
Reach in and gently pull on large, loosened sheets of frost. They’ll often come off in big plates. Toss them into a sink or a large bucket. This is the critical move—removing solid ice before it turns to water saves you from mopping up gallons later.
As the frost layer thins, use a plastic scraper or a stiff silicone spatula to clear the remaining ice from walls and shelves. Work top to bottom so melting water drips down onto areas you’ll clean next.
| Step | Action | Why It Speeds Things Up |
|---|---|---|
| 1. Hot Water Pans | Place on shelves. | Radiant heat melts frost from multiple surfaces simultaneously. |
| 2. Fan at Door | Blow room air into cavity. | Replaces humid air with dry air, accelerating evaporation. |
| 3. Remove Ice Sheets | Pull off large plates early. | Prevents solid ice from adding to the total water volume you must handle. |
| 4. Scrape (Plastic Only) | Clear remaining frost. | Exposes the cold liner so it can warm to room temperature faster. |
Keep cycling: replace the cooled water with fresh hot water, run the fan, and pull ice. For a standard upright freezer, this process typically takes 60 to 90 minutes. A packed chest freezer might need two hours.
When the ice is gone, you’re left with water. Sop it up with towels or a sponge. For freezers with a drain plug (common in chest models), pull it out and let the water flow into a tray. Don’t forget to plug it back in before you restart.
What NOT to Do: The Shortcuts That Break Things
Speed is good. Haste that wrecks a thousand-dollar appliance is not. Manufacturer manuals are unanimous on a short list of forbidden actions.
Common mistake: Using a metal ice pick, knife, or screwdriver to chip at ice. By the time you hear the hiss of escaping refrigerant, the repair bill is already over $500.
The liner inside your freezer is thin plastic. Behind it are coils carrying refrigerant under pressure. Puncture that liner, and you pierce a coil. The repair involves recovering the refrigerant, brazing the line, recharging the system, and verifying the seal. It’s a professional job that costs more than many freezers are worth.
Never use an open flame or electrical heater inside the freezer. This includes hair dryers, heat guns, space heaters, or portable radiators. The risk involves creating a hot spot that weakens the liner while the surrounding area stays frozen, leading to cracks. Electrical devices can also short out if they contact water.
Avoid boiling water. Water above 120°F can thermally shock and warp plastic shelves and the interior liner. A warped shelf won’t sit flat. A warped liner compromises the airtight seal, letting warm air in and forcing the compressor to run constantly.
Don’t use chemical de-icers or “defrost sprays.” These are formulated for car windshields, not food storage surfaces. Residue can contaminate your food and may degrade the plastic over time. Stick to the physical methods the manual approves.
Finally, do not start without unplugging the unit. It seems obvious, but in the rush to get it done, people forget. A freezer that kicks on while you’re pouring water inside is an electrocution hazard. The compressor will also cycle on and off erratically, potentially damaging it.
The Liebherr “SuperFrost” Pre-Cool Trick
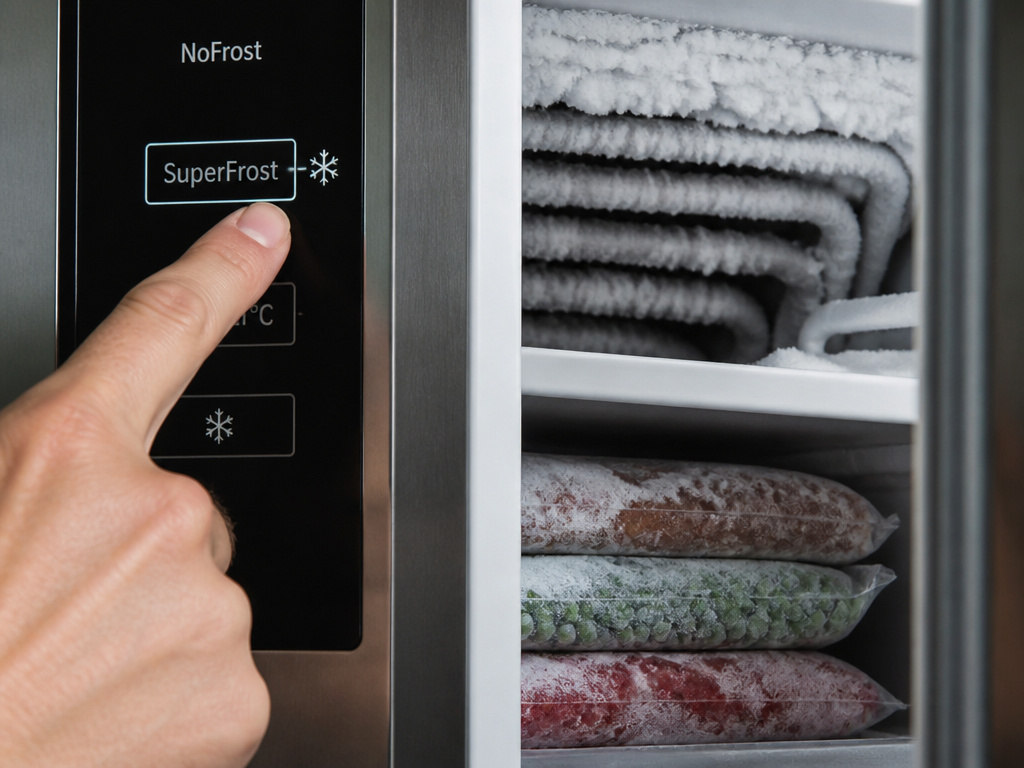
If you own a Liebherr or a freezer with a similar “fast freeze” or “super freeze” button, you have a legitimate head start. The manual for the Liebherr 7086664-01 details a specific pre-defrost procedure.
Activate the SuperFrost function 24 hours before you plan to defrost. This mode runs the compressor at maximum capacity to drop the temperature of everything inside the freezer well below its normal setting.
Switch on SuperFrost one day before defrosting. Defrosting is speeded up. In addition, frozen food already in storage is given a “cold reserve”. The food stays frozen longer as a result when you defrost the appliance.
This “cold reserve” is the key. It’s not just about freezing new food fast. It’s about turning your existing frozen groceries into blocks of thermal mass. When you remove them to defrost, they stay rock-solid longer in their coolers. This gives you more time to complete the defrost without worrying about food thawing. Simultaneously, a deeply pre-chilled freezer cavity takes slightly longer to warm up, which sounds counterproductive, but it means the frost itself becomes more brittle and tends to release in larger, cleaner sheets when the hot water is introduced.
Is this necessary for a small defrost? No. If you’re just clearing a light frost layer, skip it. Use this trick when you’re facing a major defrost with a full freezer, or when frost is over half an inch thick. It’s a strategic move for a big job.
When Is It Time to Defrost?
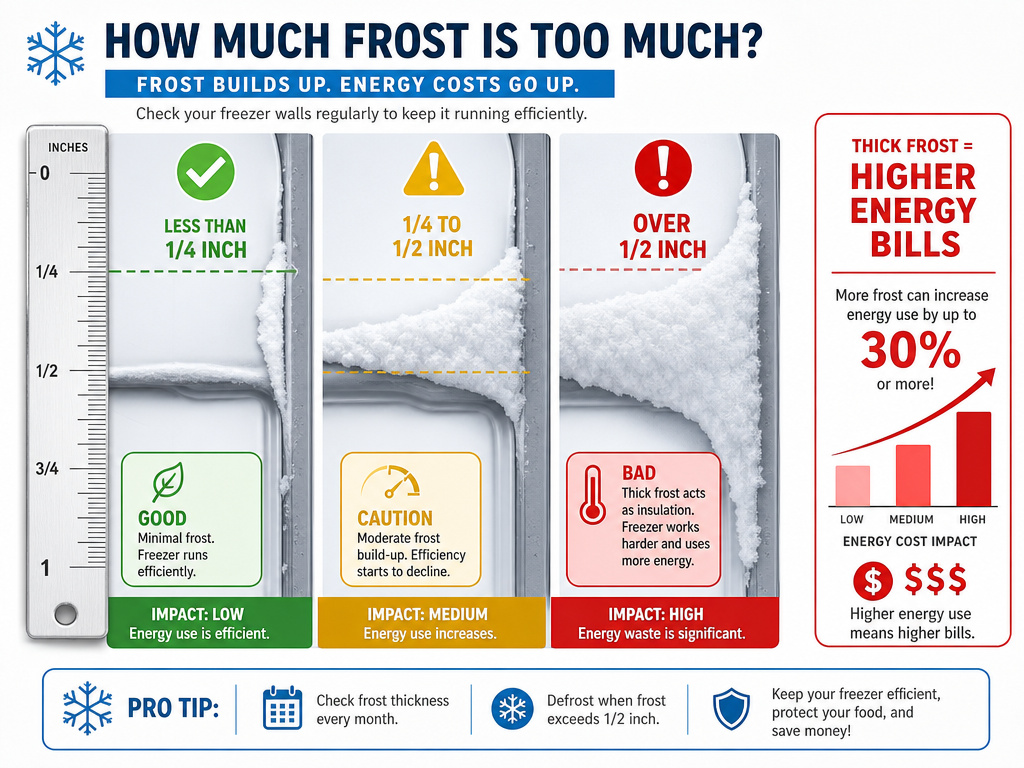
Defrosting twice a year is the old rule of thumb. The real trigger is frost thickness, not the calendar.
Check the walls, especially near the door seal and on the upper sections of an upright freezer. Warm, moist air enters every time you open the door, and that moisture freezes on the coldest surfaces first. According to GE’s general manual, you should not permit more than 1/2 inch (13 mm) of frost to accumulate for efficient operation. Electrolux says to defrost when frost reaches 1/4 inch to 1/2 inch.
Why does thickness matter? Frost acts as an insulator. A thick layer of ice on the evaporator coils makes the compressor work harder and longer to pull heat out of the freezer compartment. This spikes your energy bill and wears out the compressor prematurely. You’re paying more money to freeze less effectively.
| Frost Thickness | Impact on Freezer | Recommended Action |
|---|---|---|
| Less than 1/4 inch (6mm) | Minimal efficiency loss. | Wipe away during regular cleaning a freezer. |
| 1/4 to 1/2 inch (6-13mm) | Compressor runs 10-15% longer. | Plan a full defrost soon. |
| Over 1/2 inch (13mm) | Significant energy waste, reduced cooling. | Defrost immediately. |
Climate plays a role. In a humid garage in summer, you might hit that half-inch mark in three months. In a dry, cool basement, it could take a year. Let the frost gauge be your guide, not the season.
Step-by-Step: The Full Fast Defrost
Here is the complete sequence, integrating the speed tricks with the necessary safety and cleanup steps.
- Plan and Pre-Cool (Optional). If your freezer has a SuperFrost mode and is very full, activate it 24 hours ahead. Gather supplies: towels, deep pans, a plastic scraper, a fan, coolers or boxes for food, and gloves.
- Unplug and Empty. Turn the control to OFF and pull the plug. Remove all food, packing it tightly into coolers with towels for insulation. A well-packed cooler will keep food frozen for 24 hours.
- Contain the Water. For an upright, place towels on the floor and a shallow pan at the base if needed. For a chest freezer with a drain plug, place a tray underneath, pull the plug, and unscrew the interior cap.
- Apply Heat and Air. Place pans of hot water (under 120°F) on the shelves. Position a fan to blow room air into the open freezer. Close the door to other rooms to contain humidity.
- Remove Ice Aggressively. After 15 minutes, put on gloves and pull off any large, loosened ice sheets. Use the plastic scraper on stubborn areas. Replace water pans as they cool.
- Dry and Clean. Once all ice is gone, unplug the drain (if used) and wipe the interior completely dry with towels. This is the perfect time to sanitize your freezer with a mild solution.
- Restart and Reload. Plug the freezer back in. Turn the control to its normal setting (usually midway). Wait 1-2 hours for it to reach temperature before returning food. This is an ideal moment to organize your freezer for better efficiency.
Where this goes sideways: Reloading food while the walls are still wet. The moisture will flash-freeze into a new layer of frost instantly, and you’ll be back to square one within a week. Dry every surface thoroughly.
Troubleshooting a Slow or Incomplete Defrost
What if you’ve done everything right, but the frost on the back wall just won’t budge?
First, check that the freezer is truly off. If it’s plugged into a switched outlet, ensure the switch is off. A compressor cycling on at low speed can keep that back panel just cold enough to resist melting.
Second, assess your heat source. Is the water truly hot, or just warm? Refresh it more frequently. Is the fan powerful enough to move air across the back wall? Reposition it.
The most common culprit for a persistent frost patch, especially in one area, is a compromised door seal. If the gasket is torn, warped, or dirty, warm air is constantly leaking in and freezing on that spot. Even after defrosting, it will reappear quickly. Inspect the seal, clean it with soapy water, and ensure it’s making full contact. For a long-term fix, learn about maintaining a chest freezer’s seal.
If frost returns excessively fast after a proper defrost, you likely have a recurring source of moisture. The main causes are a faulty seal, frequently leaving the door ajar, or storing uncovered liquids or moist food. Address the root cause to extend time between defrosts.
Frequently Asked Questions
Can I use a hairdryer to defrost my freezer?
No. Do not use a hairdryer, heat gun, or any electrical heating device inside the freezer. This creates a severe electrocution risk if water contacts the device. It also creates intense, localized heat that can damage the plastic liner. Stick to the indirect heat of hot water pans.
How long does it take to defrost a freezer using the fast method?
For a standard 15-20 cubic foot upright freezer with moderate frost, the hot water and fan method takes 60 to 90 minutes. A larger, heavily frosted chest freezer may take 2 to 3 hours. The time varies based on frost thickness, room temperature, and how diligently you remove ice sheets.
Will my food spoil while defrosting?
Not if you handle it correctly. Pack frozen food tightly into insulated coolers or cardboard boxes lined with towels, newspapers, or blankets. Keep the cooler closed. A full cooler will maintain a safe, frozen temperature for 24 hours or more, giving you ample time. If you’re worried, use a refrigerator thermometer in the cooler.
Is it necessary to defrost a frost-free freezer?
Frost-free freezers have a heating element that automatically melts frost off the coils during regular cycles. You should not need to manually defrost them. However, they still require occasional cleaning and sanitizing to remove spills and odors. If ice is building up in a frost-free model, it indicates a malfunction in the defrost system.
What’s the ideal temperature to set my freezer after defrosting?
Set your freezer to 0°F (-18°C). This is the standard recommended freezer temperature setting for long-term food safety and quality. Allow the empty freezer to run for 1-2 hours to reach this temperature before reloading your food.
Before You Go
Defrosting fast is about working with the freezer’s design, not against it. The hot-water-and-fan method is the sweet spot between speed and safety, backed by every major manufacturer’s manual. Remember the hard limits: unplug first, keep water under 120°F, and never reach for a sharp tool.
The goal is an efficient appliance that doesn’t waste electricity and a reliable cold storage that keeps your food perfectly preserved. Tackle the frost at the half-inch mark, use the right technique, and you’ll add years to your freezer’s life.
