
Learn How to Defrost a Mini Fridge Correctly & Avoid Damage
This post contains affiliate links. As an Amazon Associate, we earn from qualifying purchases.
To defrost a mini fridge, unplug it, remove all contents, and let the frost melt naturally with the door open. Wipe out water, clean the interior, then let it run empty for about 4 hours before restocking. Never use knives, hairdryers, or boiling water to speed up thawing, this can puncture coolant lines or short-circuit the unit.
The 3–4mm frost thickness rule printed in manuals like the Inventor INVMS42A2 isn’t a suggestion. It’s the point where ice starts acting as an insulator, forcing the compressor to run longer and burn more energy. Waiting until the freezer compartment is a solid block of ice turns a 90-minute thaw into a six-hour cleanup.
What follows: the difference between auto-defrost and manual models, the exact steps that prevent mold and compressor damage, and what to do if you’re storing the fridge empty for a season.
Key Takeaways
- Defrost when frost reaches 3–5mm thick, about the width of two credit cards. Thicker ice drastically increases energy use.
- Never use sharp tools or heat guns. Puncturing a coolant line (R600a is flammable) or melting plastic seals voids warranties and creates safety hazards.
- Allow a 4-hour cooldown after defrosting before adding food. Plugging in a warm, wet fridge makes the compressor overwork to reach temperature.
- Auto-defrost models still need maintenance. Their drain hole clogs with dust and food debris, causing water to pool inside.
- Defrost before long-term storage. An empty, switched-off fridge grows mold in two weeks if left sealed with moisture inside.
How Do You Know It’s Time to Defrost?
Look at the freezer compartment or the cold plate. Frost should not be thicker than a standard pencil lead. The Inventor INVMS42A2 manual specifies 3–4mm as the trigger. The Eco 50L/75L manual says 5mm. Both numbers land in the same range: visible, structured ice that you can measure.
Common mistake: Waiting until the ice is an inch thick. At that point, the ice layer insulates the cooling element. The compressor runs constantly to push heat through the barrier, spiking your energy bill and wearing out the motor years early.
If your fridge lacks a freezer but has a cold plate or evaporator coils in the main compartment, frost forms there too. The same rule applies. You’ll hear the compressor cycling on more frequently, and the interior light might dim slightly when it kicks on under the heavy load.
Automatic defrost models, like the KLARSTEIN Solve, handle thin frost layers during normal cycles. They fail when the drain clogs. If you see water collecting at the bottom of the fridge instead of vanishing, the auto-defrost system is blocked. That’s your signal to intervene.
Automatic vs. Manual Defrost Systems
Not all mini fridges work the same. Your method depends entirely on which type you own.
| System Type | How It Works | User Action Required | Common Models / Features |
|---|---|---|---|
| Automatic Defrost | Frost melts during the compressor’s off cycle. Water drains to a tray above the warm compressor, where it evaporates. | Keep the drain hole clear. Defrost manually only if the drain clogs and water pools. | KLARSTEIN Solve series, many modern compact fridge freezers with a fan. |
| Manual Defrost | Frost accumulates continuously on the cooling element. No heating cycle or drain exists. | User must unplug and thaw periodically based on frost thickness (3–5mm). | Most basic mini fridge without a freezer models, budget mini fridge with freezer combos, all manual defrost freezer units. |
The KLARSTEIN manual explains the automatic process: frost builds, then melts when the compressor rests. The water should channel away. If yours is a manual model, the entire process is your job. Confusing the two leads to problems. Pouring water into an auto-defrost drain to “help” it just overflows the tray. Assuming an auto-defrost model needs no maintenance lets the drain clog with sludge.
For a dedicated mini freezer, the principle is identical but frost builds faster. The steps to defrost a freezer are more critical because the ice volume is greater.
The Step-by-Step Manual Defrost Process
This is the core procedure for any fridge without an auto-defrost function. The goal is safety first, then thoroughness.
Before you start: Unplug the fridge from the wall. Not just turn the thermostat off, pull the plug. Water and electricity are a fatal mix. Move the fridge to a floor that can get wet (bathroom, kitchen, garage). Have towels, a sponge, a bowl, and a mild cleaner ready.
1. Empty and Prepare
Remove all food, shelves, and bins. Place perishables in a cooler. This is a good moment to audit what you have and organize your fridge better when you reload. Take out any removable parts like the drip tray or glass shelves. Wash these separately in warm, soapy water.
2. Contain the Meltwater
Place several thick towels on the floor around the fridge. Put a shallow bowl or tray inside the fridge to catch the initial drip. As the ice melts, you’ll be pouring this out every 20 minutes or so.
3. Speed Up Thawing Safely
The safest accelerator is room air. Keep the door open. You can place a bowl of hot water inside the fridge and shut the door for 10 minutes to raise the ambient temperature slightly. The steam softens the ice. Never use a knife, screwdriver, or any metal tool to chip ice. You will puncture the evaporator coils. The coolant (often R600a) is flammable. A leak here is a repair that costs more than the fridge. Never use a hairdryer, heat gun, or space heater. The extreme, localized heat can warp plastic liners, melt wiring insulation, and create a short circuit.
4. Clean and Dry
Once all ice has melted, soak up the water with towels. Use a sponge to get the last drops from corners. Now clean the interior. A mix of baking soda and water or a vinegar solution works well. This eliminates any lingering smells and prevents mold. If odors are stubborn, you’ll need specific methods to remove fridge odors. Dry every surface completely with a clean towel. Moisture left behind will turn into the first layer of your next frost batch.
5. The Critical Cooldown Wait
Plug the fridge back in. Set the thermostat to its median setting (often marked “3” or “MED”). Let it run empty for approximately 4 hours. This is the step every manual mentions and most people skip. The fridge needs to bring its own insulated walls and shelves down to the correct fridge temperature before you add the thermal mass of food and drinks. Loading it warm forces the compressor into a long, stressful run. After four hours, check that the interior is cold. Then restock.
Where this goes sideways: Loading food immediately after plug-in. The compressor strains for hours, the food doesn’t chill properly, and you get uneven cooling that wastes energy for days.
What If Your Mini Fridge Has Automatic Defrost?
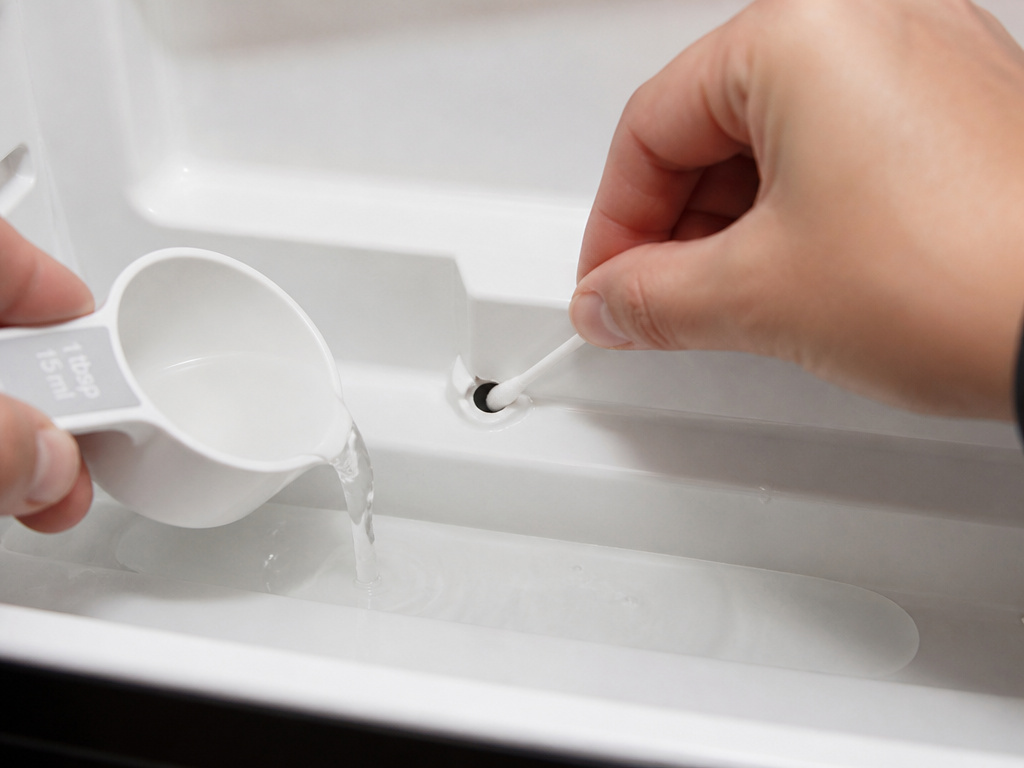
Your job is maintenance, not full thawing. The system has a tiny drain hole, usually at the back of the interior compartment, leading to a pan over the compressor.
Once a month, check that this hole is clear. Unplug the fridge. Use a pipe cleaner, cotton swab, or soft plastic straw to gently clear any debris from the drain channel. Pour a tablespoon of warm water down it to test the flow. If water backs up, the channel is blocked, keep cleaning until it flows freely.
If water is already pooling at the bottom, you’ve caught a clog late. You’ll need to manually thaw any ice blocking the drain inlet. Follow the manual defrost steps above, paying special attention to drying the drain area completely.
Defrosting Before Long-Term Storage
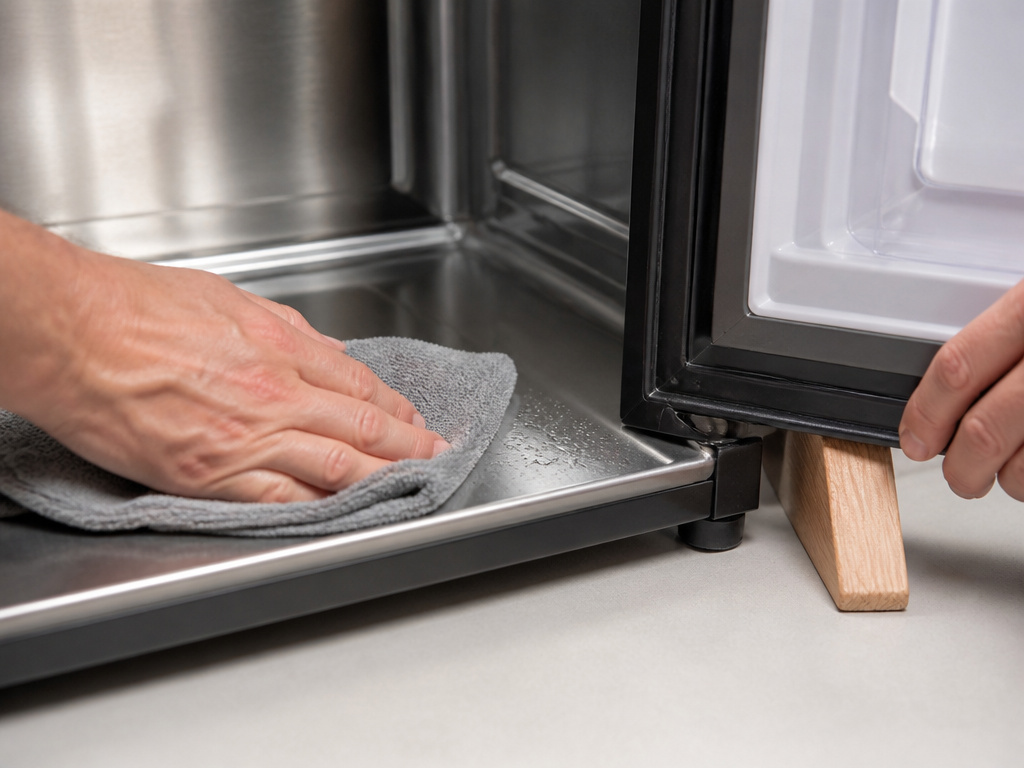
If you’re packing the fridge away for a season, like at the end of a school year, defrosting is non-negotiable. The MBF20 Classic Fresh manual is explicit: switch off, defrost, clean, dry, and leave the door open. A sealed, damp, dark box is a mold incubator.
Follow the full manual defrost process. After cleaning and drying, wedge the door open an inch. This allows air circulation. Store the fridge upright in a dry place. Doing this prevents a musty smell that’s impossible to remove without deep cleaning.
Troubleshooting Common Defrost Problems
Even a correct process can hit snags. Here’s what to do.
| Problem | Likely Cause | Immediate Fix | Long-Term Solution |
|---|---|---|---|
| Frost returns in less than a week | Faulty door seal letting moist air in. | Test the seal by closing the door on a dollar bill. If it slips out easily, the seal is weak. | Clean the seal with soapy water. If it’s cracked or hardened, replace it. |
| Water leaks under the fridge after defrosting | Overfilled catch bowl or clogged auto-defrost drain. | Empty the bowl. Clear the drain hole with a pipe cleaner. | Check the drain monthly. Don’t overfill the drip tray. |
| Fridge won’t get cold after defrosting | Thermostat accidentally left on “OFF” or compressor not restarting. | Verify thermostat setting. Listen for the compressor hum. If silent, check the power connection. | If compressor doesn’t start after 30 minutes plugged in, a internal overload may have tripped. Unplug for 2 hours, then retry. |
| Bad smell persists after cleaning | Mold or bacteria in the drip tray or seal grooves. | Remove and wash the drip tray with vinegar. Scrub seal grooves with a baking soda paste. | Use an activated charcoal odor absorber inside the empty fridge for 24 hours before restocking. |
The most common issue is a bad door seal. Moist room air constantly seeps in, freezes on the cold plate, and the cycle never ends. Fix the seal before you bother defrosting again.
Frequently Asked Questions
Can I use a hairdryer to defrost my mini fridge faster?
No. The concentrated heat can melt plastic interior liners, damage wiring, and create a fire risk. It also causes rapid temperature shifts that can crack the evaporator coils. The only safe external heat is ambient room air or a bowl of hot water placed inside the closed fridge.
How often should I defrost my mini fridge?
It depends on use and humidity. In a humid climate with frequent door openings, check monthly. Frost builds to 3–5mm in about 4–6 weeks under typical use. For a mini freezer compartment, check every 3 weeks. Let the thickness measurement, not the calendar, be your guide.
Why does my auto-defrost fridge have ice buildup?
The auto-defrost drain is clogged. When the frost melts, water has nowhere to go. It refreezes at the bottom or overflows. Unplug the fridge, locate the drain hole at the back of the interior, and clear it with a soft tool. Then dry the area thoroughly.
Is it necessary to defrost a mini fridge without a freezer?
Yes. Any fridge with a cold plate or cooling coils can accumulate frost. It might be slower and less visible, but the insulating effect is the same. Reduced cooling efficiency and higher energy bills happen with or without a dedicated freezer section.
What should I do with my food while defrosting?
Have a cooler with ice packs ready. Perishables should not sit above 4°C for more than two hours. For a longer defrost, consider using a secondary mini freezer or a friend’s fridge to store frozen items. Plan your defrost for when you have minimal perishables on hand.
Before You Go
Defrosting isn’t about ice. It’s about efficiency. A layer of frost just 5mm thick can increase a mini fridge’s energy use by nearly a third. The manual’s 4-hour cooldown rule exists because a compressor pushed too hard too soon fails years early.
Stick to the manual’s specs: 3–5mm of frost, no metal tools, a full clean and dry, and that patient wait before restocking. For auto-defrost models, your maintenance is the drain hole. Keep it clear, and the system will handle the rest. Whether you have a simple mini fridge without a freezer or a full compact fridge freezer combo, the principle is the same, remove the insulation so the cold can work.
