
Learn How to Make Freezer Corn That Stays Sweet, Not Mushy
This post contains affiliate links. As an Amazon Associate, we earn from qualifying purchases.
To make freezer corn, you must blanch the ears first. Shuck, de-silk, and wash fresh corn. Blanch in boiling water for 7 minutes (small ears), 9 minutes (medium), or 11 minutes (large). Cool immediately in ice water for the same time, then cut kernels from the cob. Pack into airtight containers, leaving a 1/2-inch headspace, and freeze at 0°F or below. Skipping the blanch lets enzymes turn the kernels starchy and mushy within weeks.
That 7/9/11 minute clock is the whole game. It’s not about cooking the corn; it’s about hitting a specific internal temperature in the cob to deactivate the natural enzymes that break down sugars and texture. Under-blanch, and those enzymes keep working slowly in your freezer, turning sweet summer corn into a bland, chewy disappointment by December.
What follows: the exact water-to-corn ratio for effective blanching, the two tools that make cutting kernels clean and safe, the headspace rule that prevents freezer burn, and the real shelf-life difference between corn on the cob and cut kernels. By the end, you’ll know why most YouTube tutorials get the timing wrong and how to fix a batch that’s been in the freezer too long.
Key Takeaways
- Blanching is non-negotiable. It stops enzyme activity that destroys flavor and texture; skipping it guarantees mushy, tasteless corn.
- Blanch by ear size: 7 minutes for small, 9 for medium, 11 for large. The heat must penetrate the cob, not just the kernels.
- Cool the corn in ice water for the same duration you blanched it. Slower cooling lets residual heat overcook the starch.
- Leave a 1/2-inch headspace in rigid containers or squeeze all air from quality freezer bags. Trapped air causes ice crystals and freezer burn.
- For best quality, use frozen corn on the cob within 3–6 months and frozen cut kernels within 8–12 months. It’s safe indefinitely, but flavor and texture fade.
Start With the Right Ears
Look for fresh-picked sweet corn, ideally processed within a few hours of harvest. The sugars in corn start converting to starch the moment it’s picked. A day on the counter costs half the sweetness.
The husks should be bright green and snug. Peel back a corner and press a kernel with your thumbnail—it should release a milky, not watery, juice. That’s the “milk stage,” the peak for freezing. Avoid ears with very large, deeply yellow kernels; they’re past prime and will be tough and starchy, even after blanching. For a standard batch, plan on 3 to 6 pounds of unshucked corn to yield about 1 quart of frozen kernels.
The 7/9/11 Blanching Rule That Stops Enzymes
Blanching isn’t optional. It’s a targeted heat treatment that inactiv peroxidase and catalase enzymes inside the cob. If you skip it, these enzymes remain active at freezer temperatures, slowly breaking down the corn’s sugars, vitamins, and cell structure. The result is off-flavors, loss of bright yellow color, and a mushy, rubbery texture that no amount of butter can salvage.
The timing is precise because the heat must travel from the boiling water through the kernel and into the dense cob. That’s why whole-kernel blanching takes 4–5 minutes, but corn on the cob needs nearly twice as long.
Blanch small ears (under 6 inches) for 7 minutes, medium ears (6–8 inches) for 9 minutes, and large ears (over 8 inches) for 11 minutes in a rolling boil. Start the timer when the water returns to a full boil after adding the corn.
Use a large pot with at least one gallon of boiling water for every pound of corn. Crowding the pot drops the water temperature too much, turning blanch into a slow cook. Work in batches. This specific procedure is documented in the OSU Extension corn preservation guide, which is the basis for most university recommendations.
Ice Bath Cooling: Don’t Rush It
The moment the timer goes off, pull the ears from the boiling water and plunge them into a prepared ice bath. This isn’t just to stop the cooking; it’s to halt it instantly.
Common mistake: Shortchanging the ice bath. Cool the corn in the ice water for the same amount of time it was blanched—7, 9, or 11 minutes. The cob holds heat like a thermal battery. Pull it early, and that residual heat continues to cook the kernels from the inside out, gelatinizing the starch and guaranteeing a mushy texture.
Your ice bath must be genuinely cold. Use a 1:1 ice-to-water ratio and refresh it between batches. The cob should feel completely cool to the touch in the center when done. Drain the ears thoroughly on a clean kitchen towel or a rack before cutting. Wet corn leads to ice clumps in the bag.
Cutting Kernels Cleanly (The Safe Way)
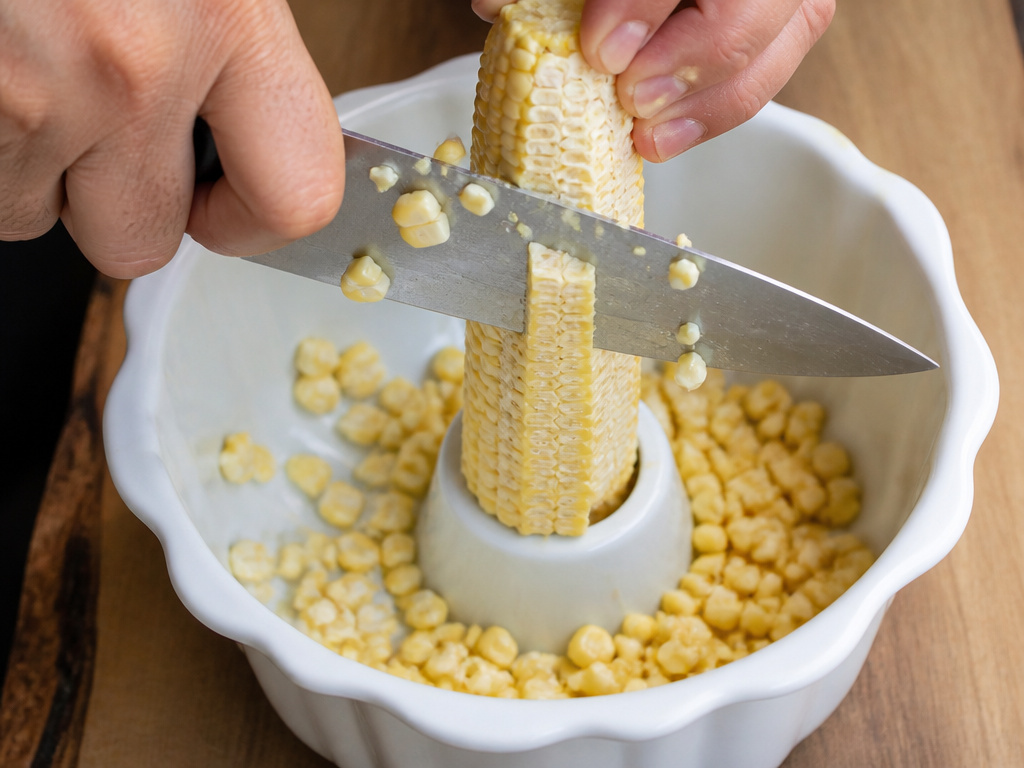 This is where you make the mess—or avoid it. The goal is to cut off the kernels without taking half the cob with them.
The best tool is a long, sharp chef’s knife or a serrated bread knife. Stand the ear upright in the center of a large, deep bowl or a Bundt pan. The center tube of the Bundt pan cradles the cob perfectly. Slice downward in smooth, controlled strokes, rotating the ear after each pass. The bowl catches every kernel and minimizes flying starch.
Cut to about three-quarters the depth of the kernel. Scraping the cob with the back of your knife to get the “milk” is for cream-style corn, not for freezing. That starchy pulp freezes poorly and turns gluey. For clean, whole kernels, just slice and move on.
Packaging for the Long Haul
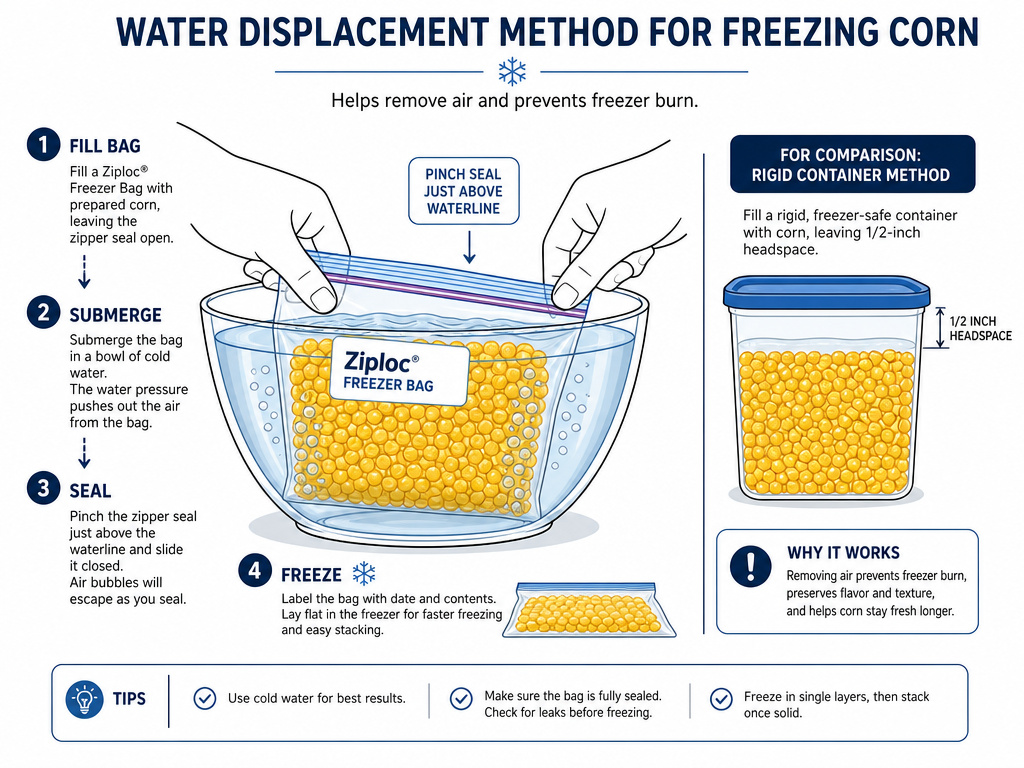 How you pack determines whether you get pristine kernels or a frosty brick. The enemy is air.
For rigid, freezer-safe containers, leave a 1/2-inch headspace. This gives the corn room to expand as it freezes without cracking the container. Press a piece of plastic wrap directly onto the surface of the corn before sealing the lid to eliminate an air gap.
For freezer bags, the method is different. Use quality, name-brand bags designed for freezing, like Ziploc Freezer Bags or Glad FreezerFlex. Fill the bag, then gently lower it into a bowl of water, letting the water pressure push out all the air before sealing the zipper just above the waterline. This water-displacement method is far more effective than sucking air out with a straw.
| Packaging Method | Headspace Needed | Best For | Risk If Done Wrong |
|---|---|---|---|
| Rigid Plastic Container | 1/2 inch | Stacking, reusing | No headspace → lid pops, container cracks |
| Freezer Bag (water displacement) | None – remove all air | Saving space, flat freezing | Trapped air → freezer burn in 2-3 months |
| Vacuum Sealer Bag | None – vacuum sealed | Maximum shelf life (12+ months) | Seal fails → entire bag spoils |
Label every package with the contents and date. “Corn, August 2025” is all you need.
The Freezer Itself Is an Ingredient
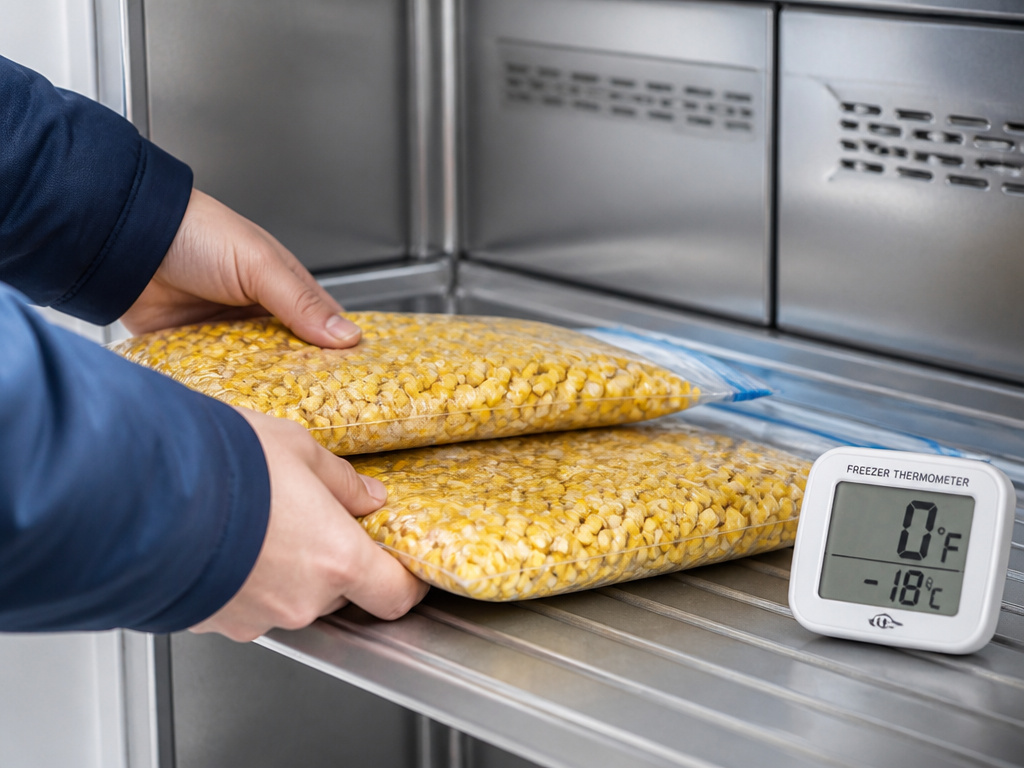 Your home freezer is not a commercial blast freezer. It freezes food slowly, which allows larger ice crystals to form. Those crystals puncture cell walls, leading to that soggy texture upon thawing.
To mimic a fast freeze, spread your filled freezer bags in a single layer on a freezer shelf for 24 hours before stacking them. This “flash-freezes” the corn quickly, creating smaller, less destructive ice crystals. Never freeze more than 2 pounds of food per cubic foot of freezer capacity per day. Overloading raises the freezer’s internal temperature, slowing the freeze and damaging everything inside, not just your corn.
Maintain a temperature of 0°F or below. Use a standalone freezer thermometer to check. At 10°F, the quality degradation happens twice as fast. If you need to make space, follow a step-by-step process for defrosting a freezer safely and efficiently.
How Long Does Freezer Corn Last?
Safety and quality are different clocks. Frozen corn is safe to eat indefinitely at 0°F, but its flavor, color, and texture have a finite peak.
- Corn on the cob: Best quality within 3–6 months. The cob itself absorbs off-flavors and becomes spongy over time.
- Whole kernels: Best quality within 8–12 months. The University of Minnesota freezing guide confirms this timeline for sweet corn.
This stark difference is why most extension services recommend freezing kernels, not whole ears. The Utah State University preserve corn research provides a direct comparison: well-packaged frozen kernels hold quality for up to 9 months, while canned corn lasts for years in a cool pantry. Freezing is for shorter-term, fresh-like quality.
Where this goes sideways: Storing corn in the freezer door. The temperature fluctuates every time you open it, accelerating freezer burn and quality loss. Keep your corn in the back, on a shelf, in the coldest part of the freezer.
Freezer Corn vs. Other Preservation Methods
Freezing is the best method for preserving the fresh taste and crisp-tender texture of sweet corn. Canning, by necessity, cooks the corn thoroughly, resulting in a softer, different product. Drying changes it completely into a shelf-stable ingredient for soups.
| Method | Texture Outcome | Best Use Case | Shelf Life (Quality) |
|---|---|---|---|
| Freezing (Kernels) | Closest to fresh, slightly less crisp | Side dishes, salads, chowders | 8-12 months |
| Canning (Pressure) | Soft, fully cooked | Soups, casseroles, creamed corn | 2-3 years |
| Drying | Hard, reconstitutes with chew | Stews, backpacking meals, grinding into meal | 1+ year |
If you find yourself with a surplus, the skills for freezing tomatoes in bags or making freezer jam follow the same principles: acidify or blanch, pack airtight, freeze fast.
Troubleshooting: Fixes for Common Problems
Problem: Kernels are tough and chewy after thawing.
Cause: The corn was too mature when frozen. You froze starchy field corn, not sweet corn in the milk stage.
Fix: Use it in blended soups or chowders where the texture will be pureed. Next time, test for the milky juice before you start.
Problem: A layer of frost crystals coats the kernels (freezer burn).
Cause: Air exposure in the package or temperature fluctuations.
Fix: Freezer burn is a quality issue, not a safety one. Cut away the affected layer and use the rest. It’s fine for cooked dishes like cornbread or fritters. Upgrade to bags to prevent freezer burn or a vacuum sealer for your next batch.
Problem: The corn tastes “off” or stale.
Cause: Enzymatic activity wasn’t fully halted (under-blanching) or the corn was stored too long.
Fix: Unfortunately, this is not reversible. Use it as compost. Adhere strictly to the 7/9/11 blanching rule and respect the 8–12 month quality window.
Problem: A giant, solid block of corn in the bag.
Cause: The corn was packed wet or the bag was stacked before the corn was fully frozen.
Fix: Thaw the entire block in the refrigerator and use it all at once. For future batches, ensure corn is fully drained after the ice bath and use the single-layer “flash freeze” method first.
Frequently Asked Questions
Can I freeze corn without blanching it first?
You can, but you shouldn’t. Unblanched corn will suffer severe quality loss within weeks. The enzymes will turn it mushy and dull-tasting. Blanching is the minimal processing required for edible long-term frozen corn.
Can I freeze corn on the cob?
Yes, but with managed expectations. Follow the same 7/9/11 blanching and cooling steps, then wrap each ear individually in plastic wrap and foil or place in heavy-duty freezer bags. It will be safe to eat, but the texture often becomes rubbery and the cob can impart a woody taste. It also consumes massive freezer space. Most experts, including those behind the USDA frozen corn standards document, note it’s best for short-term storage of 3-6 months.
My corn turned out mushy. What did I do wrong?
The most likely culprit is under-blanching. If the heat didn’t penetrate the cob fully, enzymes remained active. The second is over-blanching or inadequate cooling, which overcooks the starch. The third is using overmature corn that was already starchy. Follow the size-specific timing and ensure your ice bath is robust.
Is frozen corn as nutritious as fresh?
Properly blanched and frozen corn retains most of its vitamins and minerals. The quick heat treatment of blanching actually helps preserve nutrients by deactivating the enzymes that would otherwise break them down during storage. It’s often more nutritious than “fresh” corn that’s been sitting on a grocery store shelf for days.
Can I use frozen corn straight from the freezer?
Absolutely. There’s no need to thaw it for most cooked applications. Add frozen kernels directly to soups, stews, casseroles, or stir-fries. The cooking time may need to be extended by a minute or two. For salads or salsas, thaw it in the refrigerator first and drain any excess liquid.
The Bottom Line
Freezer corn succeeds or fails on three things: picking corn at the milky stage, blanching it by the 7/9/11 minute rule for its size, and packing it with zero air contact. Get those right, and you’ll open a bag in January that tastes like August.
The work is in the prep—the shucking, the boiling, the cutting. The payoff is a freezer stocked with bright, sweet kernels ready for chowder, skillet dishes, or a simple buttered side. Skip the guesswork and follow the extension service specs; they’ve tested this for decades. Your winter self will thank you.
