
A Guide on How to Make a Root Cellar for Winter Vegetables
This post contains affiliate links. As an Amazon Associate, we earn from qualifying purchases.
To make a root cellar for storing winter vegetables, you need a cold, dark, humid space between 32°F and 40°F. The simplest version is a 4×6 foot room built in the northeast corner of an unheated basement, insulated if necessary, with a dirt floor or pans of water for humidity. Store crops like potatoes, beets, and carrots in sand-filled buckets; keep onions and winter squash drier and warmer.
That temperature range isn’t a suggestion. It’s the metabolic brake. Vegetables are living organisms, and respiration, the process that turns stored sugars into energy, slows to a crawl just above freezing. At 50°F, a carrot uses its stored food roughly ten times faster than it does at 32°F. The difference between a cellar that holds at 38°F and one that drifts to 45°F is the difference between carrots that last until April and carrots that go limp by New Year’s.
What follows is the working plan: the non-negotiable specs for temperature and humidity, three construction paths from a basement corner to a buried hillside, and the specific harvest and packing steps that keep vegetables from touching each other in storage. The goal is a cellar you can check in January and find food that still tastes like it came from the October garden.
Key Takeaways
- Target 32–40°F and 80–95% humidity for most root crops, but onions and winter squash need drier, warmer conditions (55–60% humidity, 60°F for squash).
- A 4×6 foot space in an unheated basement corner is sufficient for a family; insulate the walls if your basement is heated.
- Store beets, carrots, and turnips in dry sand inside sealed buckets to prevent moisture loss and stop rot from spreading.
- Cure potatoes at 60°F for the first two weeks after harvest to heal wounds before moving them to the 38°F cellar.
- Ventilation is critical to remove ethylene gas and prevent mold, but you may need to partially close vents during extreme cold snaps to avoid freezing your produce.
The 4×6 Foot Plan: Temperature and Humidity Control
Forget a cavern. Most families need a space about 4 feet by 6 feet. The University of Alaska Fairbanks publication notes this size is easier to manage because a full cellar holds humidity better than a half-empty one. The vegetables themselves release moisture, creating a stable microclimate.
Temperature is the primary control knob. The optimum storage temperature for most vegetables is between 32° and 40°F, as stated in the same University of Alaska resource. This band is cold enough to dramatically slow decay but above the point where cell walls rupture from freezing.
This 50–60 word, third-person technical blockquote targets the featured snippet: A functional root cellar maintains 32–40°F (0–4°C) and 80–95% relative humidity. These conditions slow vegetable respiration and prevent wilting. Exceptions include onions and winter squash, which require 55–60% humidity and warmer temperatures (50–60°F). A 4×6 foot space with a dirt floor or water pans provides stable humidity, while insulation and ventilation regulate temperature.
Humidity keeps vegetables from shriveling. Most roots need 80-95% relative humidity. A dirt floor is the simplest regulator, releasing moisture as needed. If your floor is concrete, place several pans of water on it. The water will evaporate into the air, maintaining the necessary dampness.
Not all crops want the same environment. This is where most DIY cellars fail. They treat the space as a single zone.
| Crop | Ideal Temperature | Ideal Humidity | Key Storage Detail |
|---|---|---|---|
| Potatoes | 38°F | 85-90% | Cure at 60°F for first 2 weeks. Store in dark. |
| Beets, Carrots, Turnips | 32°F | 90-95% | Store in sand, leave 1-inch stem. |
| Onions, Garlic | 32°F | 55-60% | Cure for 2 weeks until papery, store in mesh bags. |
| Winter Squash, Pumpkins | 60°F | 55-60% | Leave 2-inch stem, store on shelves, not floor. |
The table above draws directly from the University of Alaska’s vegetable storage database. Notice the split: potatoes and beets want it cold and wet, onions want it cold and dry, and squash wants it downright warm and dry. A one-size-fits-all cellar loses food.
Three Construction Paths: Basement, Buried, and Barrel
You don’t need to dig a hole in the backyard. The best location is often the one you already have.
The Basement Corner Cellar (The Most Common)
An unheated, non-freezing basement corner is 90% of a root cellar. The northeast corner is ideal, it gets the least sun and stays coolest. Simply frame out a small room using 2x4s and plywood.
Where this goes sideways: Building in a heated basement without extra insulation. The warmth from your home will seep through the single wall, raising the cellar temperature 10-15 degrees. Your potatoes will sprout in December.
If your basement is heated, you must insulate the new walls. Use rigid foam insulation between the studs. Crucially, install a vapor barrier on the warm side (the side facing the heated basement) to protect your home’s structure from the cellar’s dampness. A simple door completes the room.
The Traditional Buried Root Cellar
This is the classic image: a separate, underground structure accessed from outside. It’s a bigger project but offers the most stable temperature. The 1940 Canadian government guide, “A practical farm root cellar,” recommended an excavation at least six feet deep to get below the frost line. You must account for your local soil frost depth, which in cold climates can exceed four feet.
Ventilation is non-negotiable. Install two vents: an intake vent low on the cool side and an exhaust vent high on the warm side. This creates passive airflow, removing ethylene gas and excess moisture. The Michigan State University handout on cold cellars emphasizes this cross-ventilation for year-round food and farming.
The Low-Effort Ground-Level Option
For a small yield or as a test, you can make a temporary cellar above ground. The Old Farmer’s Almanac method uses bales of hay or straw. Stack bales into a three-sided enclosure, place your crated vegetables inside, and cover the top with more bales. It’s surprisingly effective at buffering against frost, but it’s not secure against rodents and won’t handle deep winter in harsh climates.
Step-by-Step Harvest and Storage Prep
How you bring vegetables in matters as much as where you put them. Harvest on a dry, cool morning after the dew has evaporated but before the afternoon heat. Field heat is the enemy.
Perfect specimens only. Any nicks, bruises, or cuts are entry points for rot. One bad potato can spoil a whole crate. Sort ruthlessly. Eat the damaged ones first.
For root crops like carrots and beets, the sand-storage method is centuries old for a reason. You need clean, dry sand. Place a layer in the bottom of a clean 5-gallon bucket. Gently brush off dirt (do not wash), trim tops to a 1-inch stem, and lay the vegetables flat so they don’t touch. Cover completely with sand. Repeat. The sand maintains even humidity and isolates each root, preventing rot from spreading. Our guide on long-term carrot storage details this method.
I tried storing carrots in open bins one year. By February, the ones on the edges were rubbery and the center of the pile had a soft, black core of rot. The sand bucket method felt fussy, but the next spring I was still grating firm carrots for cake.
Potatoes need a two-stage process. After digging, let them cure in a dark, well-ventilated spot at about 60°F for two weeks. This allows the skins to thicken and minor wounds to heal. Then move them to the colder cellar. Stack them in milk crates, but don’t stack the crates too high, the weight crushes the potatoes on the bottom. For more on this, see our article on optimal potato storage.
Onions and garlic are the odd ones out. They need curing in a warm, dry, breezy place for up to two weeks until the necks are tight and the outer scales rustle. Then store them in mesh bags in the cool, dry section of your cellar. Our resource on curing onions for storage walks through this.
Ventilation, Monitoring, and Problem Solving
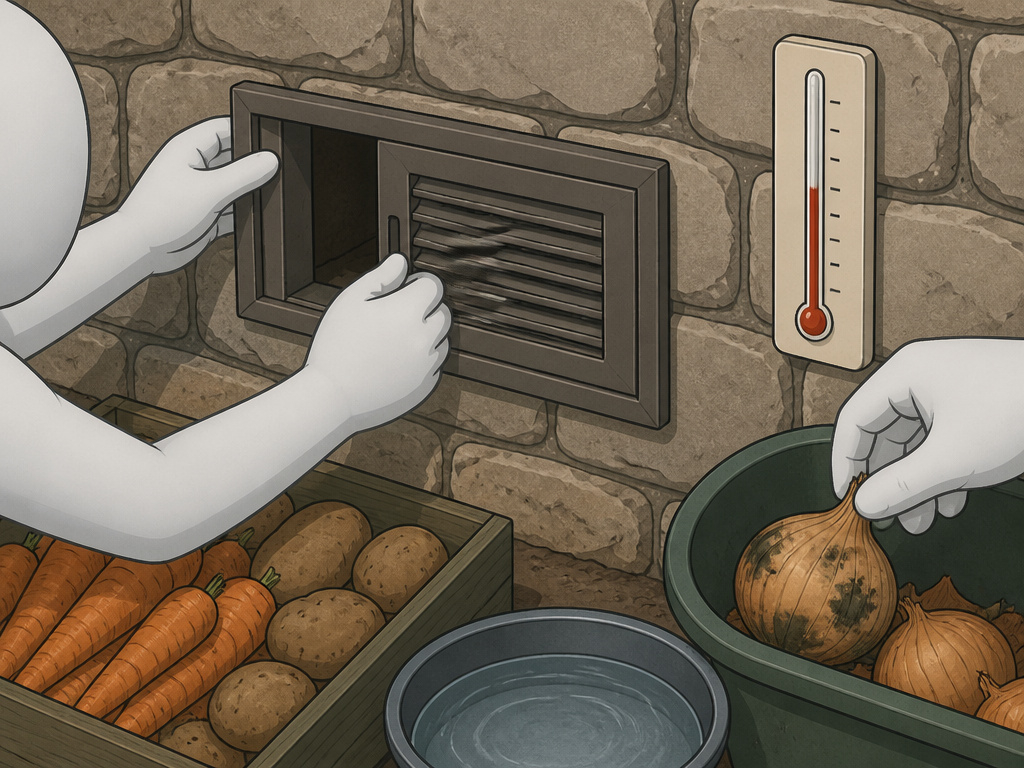 A root cellar is not a set-and-forget box. It’s a living environment.
Your two vents, low intake, high exhaust, should be adjustable. Open them in the fall to cool the space and remove moisture. In the heart of winter, you may need to partially close them to prevent the interior from dropping below freezing. The 1940 Canadian guide explicitly mentions shutting off ventilators temporarily during excessive cold.
Monitor with two thermometers: one high, one low. Remember, warm air rises. The difference between the floor and ceiling can be 5-10 degrees. Place your potatoes and carrots low, your squash and pumpkins higher up.
Check monthly for spoilage. Remove any soft, moldy, or sprouting produce immediately. A rotten onion can taint the flavor of everything nearby.
If humidity is too low (vegetables shrivel), add more water pans or dampen the dirt floor. If humidity is too high (condensation on walls, mold), open the vents wider to increase airflow.
What Not to Store Together
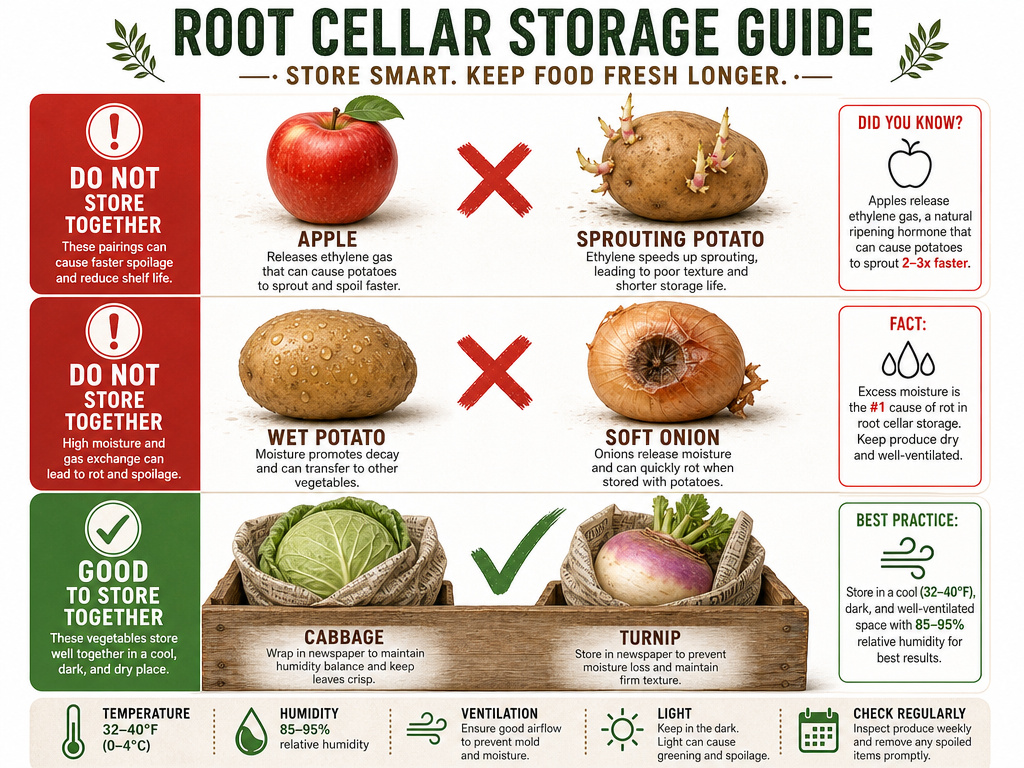 Ethylene gas is a silent spoiler. Some fruits and vegetables produce it, and it triggers ripening and decay in others.
- Never store apples with potatoes or carrots. The ethylene from the apples will cause the potatoes to sprout prematurely and give carrots a bitter taste.
- Keep onions and potatoes separate. The moisture from potatoes can make onions soggy, and the gases can cause each other to spoil faster.
- Store strong-smelling vegetables like cabbage and turnips in sealed containers or wrapped in newspaper to keep their odors from permeating other produce.
This separation is a physical necessity, not just good practice. Giving each crop type its own zone or container is the final step in a functioning cellar.
Frequently Asked Questions
How deep does a root cellar need to be?
Traditional buried root cellar should be excavated at least six feet deep to get below the seasonal frost line and access stable, cool ground temperatures. For a basement cellar, depth isn’t a factor; insulation and location are.
Can I build a root cellar in a basement with a furnace?
Yes, but it requires careful insulation. You must build an insulated room within the basement, with a vapor barrier on the warm side to protect your home’s structure from moisture. The insulation must be sufficient to keep the cellar within the 32-40°F range despite the nearby heat source.
Do I need a dirt floor?
Dirt floor is the easiest way to regulate high humidity, but it’s not mandatory. A concrete or wood floor can work if you place pans of water on it to evaporate and raise the humidity level. The key is achieving that 80-95% range for most crops.
Why are my potatoes sprouting in the cellar?
Potatoes sprout when temperatures are too warm (above 40°F) or when they’re exposed to light. Ensure your cellar is dark and that your temperature monitors are accurate. Also, check that you’re not storing them near ethylene-producing fruits like apples.
How long can vegetables last in a root cellar?
It varies by crop. Potatoes and onions can last 6-8 months. Beets, carrots, and turnips often last 3-5 months when stored in sand. Winter squash may keep for 3-4 months in a warm, dry section. Success depends on maintaining the correct temperature and humidity for each specific crop.
The Bottom Line
A root cellar is less about heroic excavation and more about matching three things: the right temperature band, the correct humidity for each crop, and a system for keeping produce separated and in the dark. Start with a 4×6 foot space in a basement corner. Insulate it if the basement is heated, add a dirt floor or water pans, and install adjustable vents.
Store carrots and beets in sand. Cure potatoes warm before moving them cold. Keep onions dry and squash warmer. Check the space monthly and remove anything that’s turning. The payoff is a January meal that tastes like October, with no electricity required. That’s the real point. It’s not just storage; it’s season extension done silently in the dark.
