
Does Thermos Keep Things Cold? The 5-10 Minute Rule
This post contains affiliate links. As an Amazon Associate, we earn from qualifying purchases.
A Thermos keeps things cold for up to 12 hours by using vacuum insulation and a reflective inner lining to block heat transfer. Its performance hinges on a mandatory 5-10 minute pre-chill with cold tap water before you add your beverage. Skip this step and you cut the cold-holding time by half or more.
That pre-chill window is the whole game. It’s not a suggestion buried in the manual. It’s the difference between a drink that stays cold through a workday and one that’s lukewarm by lunch. The vacuum barrier stops heat from getting in, but the stainless steel walls themselves start at room temperature. Pouring a cold drink into a warm bottle is like putting ice cubes in a warm glass, the container soaks up the cold first.
What follows is a breakdown of how the insulation actually works, the non-negotiable steps for maximum cold retention, and the specific mistakes that turn a high-performance bottle into a mediocre one. By the end, you’ll know exactly why a Thermus works and how to make sure yours does.
Key Takeaways
- Pre-chill for 5-10 minutes with cold tap water before adding your cold drink. This is the manufacturer’s directive for maximum thermal efficiency.
- Vacuum insulation works by eliminating air, which stops heat transfer via conduction and convection. A reflective inner lining bounces radiant heat away.
- Dairy spoils faster. While a Thermos inhibits bacteria growth by keeping contents cold, milk and yogurt spoil on their own timeline, don’t leave them in longer than a few hours.
- Never store carbonated drinks or dry ice. Pressure builds and can force the stopper to eject violently.
- Clean it after every use. Residue left for over 24 hours can spoil, creating pressure and making the bottle difficult or dangerous to open.
How Does a Thermos Keep Things Cold?
The answer is a three-part physical barrier against heat. A standard bottle loses cold because the outside warmth moves through the material to equalize with the liquid inside. A Thermos builds a wall.
First, there’s the vacuum layer. The bottle consists of two stainless steel walls with the air pumped out from between them. Heat needs a medium to travel through, a gas, a liquid, or a solid. By creating a vacuum, you eliminate conduction and convection. No air means no heat transfer.
Second, the inner wall is coated with a reflective lining, often a thin layer of copper or silver. This addresses radiant heat, the type that travels in waves (like sunlight). The lining acts like a mirror, bouncing radiant heat away from your cold contents.
Third, the entire construction uses 18/8 food-grade stainless steel. This is a poor conductor of heat compared to other metals, adding another small but meaningful hurdle for thermal energy.
A vacuum-insulated flask works by removing the air between two walls, eliminating conduction and convection. A reflective inner coating bounces radiant heat away, while the stainless steel itself is a poor thermal conductor. These three barriers combined can keep beverages cold for up to 12 hours.
The performance claim, “keeps drinks cold for up to 12 hours”, is tied directly to this architecture. But it’s a lab-tested maximum under ideal conditions: a perfectly sealed, pre-chilled bottle filled with an ice-cold liquid and left undisturbed. Your real-world results depend entirely on how you prep it.
The One Step You Cannot Skip: Pre-Chill Is Non-Negotiable
Every official Thermos care document states the same instruction: for maximum thermal efficiency, pre-heat or pre-chill the bottle for 5 to 10 minutes before use. This is not a helpful tip. It is the foundational step the 12-hour claim is built on.
The physics are simple. The stainless steel walls of your bottle are at ambient temperature. When you pour a cold drink into it, the metal acts as a heat sink, absorbing the cold from your liquid until both the container and the contents reach equilibrium. That process saps the initial chill right out of your drink. Pre-chilling with cold tap water brings the container down to a cold baseline first. Now, when you add your beverage, the bottle isn’t stealing its cold, it’s preserving it.
| Step | Action | What Happens If You Skip It |
|---|---|---|
| 1. Pre-Chill | Fill with cold tap water, seal lid, wait 5-10 min. | The bottle walls start warm, absorbing your drink’s cold and cutting retention time by 30-50%. |
| 2. Empty & Fill | Dump pre-chill water, immediately add your cold drink. | Delaying lets the bottle warm up again, negating the pre-chill benefit. |
| 3. Seal Immediately | Close the lid and stopper tightly. | A loose seal lets cold air escape and warm air seep in, ruining insulation. |
Where this goes sideways: Assuming room-temperature stainless steel is “cold enough.” It isn’t. On a 75°F day, pouring 40°F lemonade into a 75°F bottle is a losing battle from the start. The drink will climb several degrees within minutes. That initial temperature loss is what you never get back.
Do this every single time. It takes five minutes and costs nothing but a cup of tap water. The difference in performance isn’t subtle.
What Can You Actually Keep Cold in a Thermos?
Not all cold items are equal in a vacuum-insulated environment. The container’s job is to slow temperature change, but it doesn’t stop chemical or biological processes.
Water, Juice, Iced Tea, Sports Drinks: These are ideal. They have a long shelf life, aren’t prone to rapid spoilage, and benefit directly from sustained cold. A Thermos FUNtainer bottle is rated to keep these kinds of beverages cold for up to 12 hours.
Dairy Products (Milk, Yogurt, Smoothies): This is where you must be careful. The manufacturer explicitly warns against storing dairy for “long periods” due to spoilage risk. The thermos inhibits bacteria growth while the contents stay cold, but dairy spoils from its own natural processes. A milk-based smoothie left for 8 hours might still be cold but could be unsafe to drink.
Carbonated Drinks and Dry Ice: Never. This is a major safety warning. Carbonation releases gas. Dry ice sublimates from solid to gas. In a sealed vacuum bottle, this gas has nowhere to go. Pressure builds until it can violently eject the stopper or lid, causing injury. The care manuals state this in all-caps warnings.
Leftovers with Mayo or Dairy (Chicken Salad, Pasta Salad): Treat these like dairy. The cold slows bacteria but doesn’t halt it. These are higher-risk foods that shouldn’t be kept in a thermos food jar for more than a few hours, especially if partially consumed and reopened.
Common mistake: Treating the thermos like a fridge. It’s a temperature retainer, not an active cooler. It slows down spoilage but doesn’t prevent it. Food safety clocks keep ticking.
For cold food, the principle is the same: use a pre-chilled Thermos food jar, fill it with food that’s already refrigerator-cold, and don’t exceed the 24-hour storage limit the manuals specify.
Why Performance Fails: Diagnosing a Thermos That Won’t Stay Cold
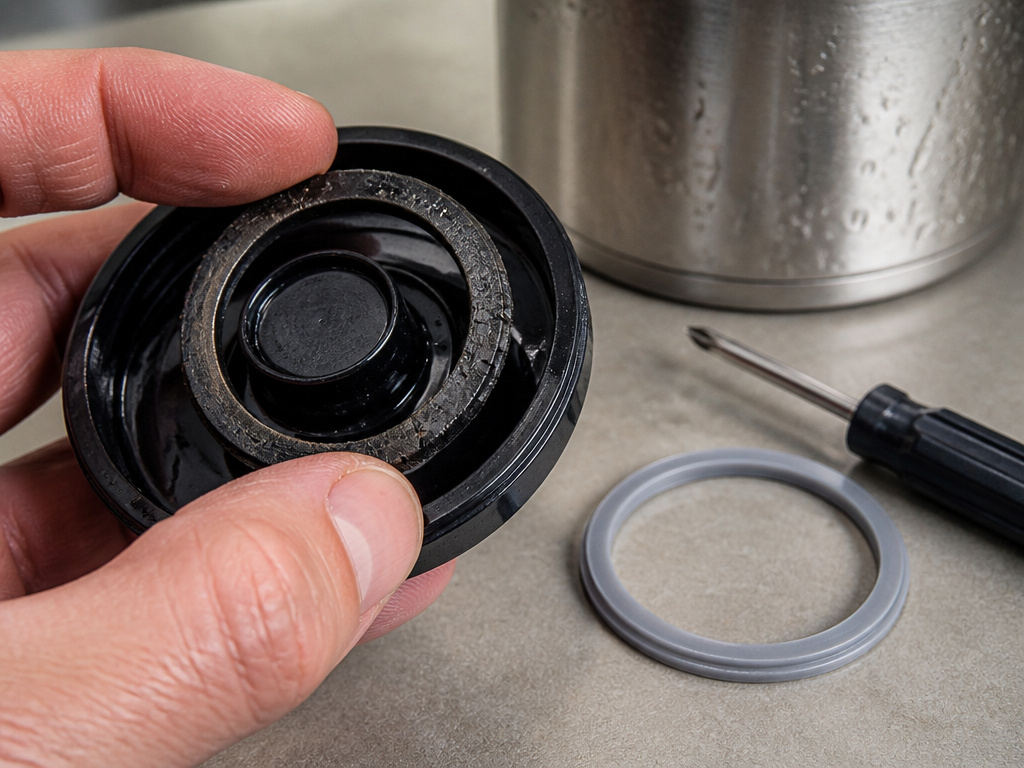
If your bottle isn’t keeping things cold, the problem is almost always one of three things: a missed prep step, a damaged seal, or a compromised vacuum.
First, test the insulation. Fill the bottle with ice water, seal it, and let it sit undisturbed at room temperature for 6 hours. Open it and feel the water. If it’s noticeably cool but not cold, performance is degraded. If it’s room temperature, the vacuum is almost certainly lost.
The seals and gaskets are the weakest link. The vacuum is sealed at the factory, but the lid uses a rubber or silicone gasket to make an airtight closure. If this gasket is cracked, deformed, dirty, or misaligned, cold air leaks out and warm air seeps in. You’ll often see condensation on the outside of the bottle when this happens, a sure sign the insulation is fighting a losing battle.
I’ve seen bottles returned under warranty for “not keeping things cold” where the fix was just a new $3 gasket. The owner had been washing the lid in the dishwasher for a year, which degrades the rubber. Hand-wash only keeps that seal pliable.
Physical damage can break the vacuum. A significant dent, especially on the double-walled body, can bridge the gap between the inner and outer walls. This creates a thermal short circuit, ruining the insulation. A drop that leaves a deep crease is often a death sentence.
The manufacturer’s 5-year warranty covers defects in workmanship and materials, which includes a vacuum failure under normal use. It does not cover physical damage from drops or misuse, and it explicitly excludes plastic components and color fading. If your bottle fails the ice-water test and shows no external damage, a warranty claim is your next step.
Thermos Care: Cleaning and Storage for Longevity
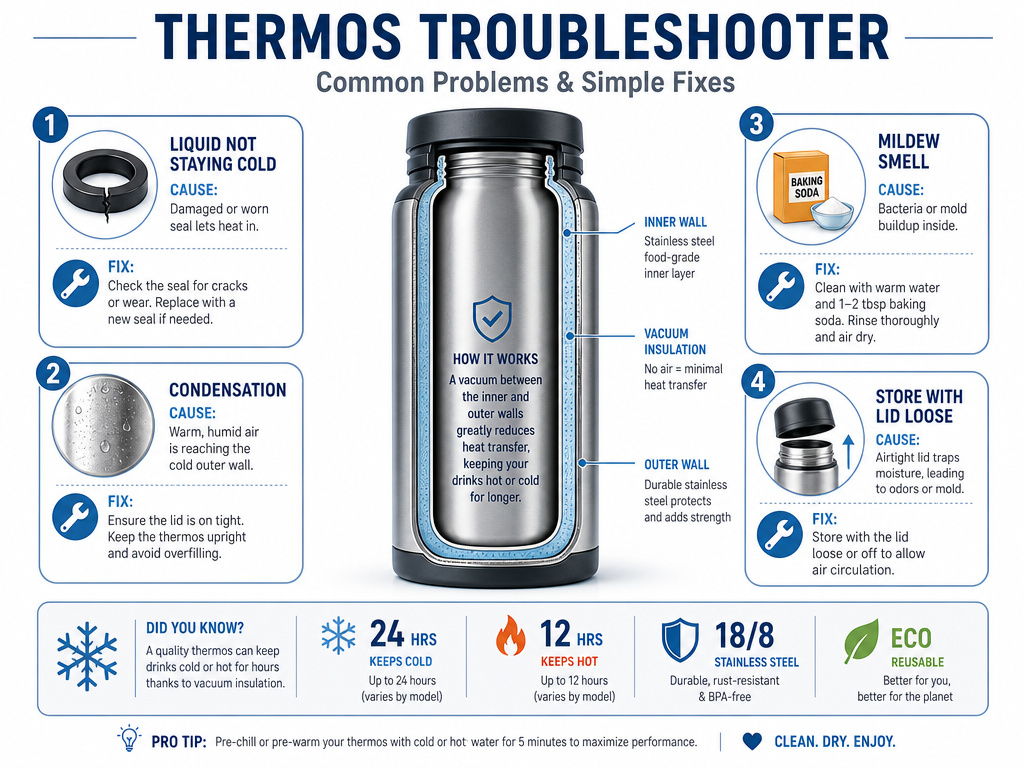
Proper care does more than keep your bottle clean; it preserves the seals and prevents odors that can taint your drinks.
Hand-wash only, with warm soapy water. Every official guide recommends this. Dishwashers subject the bottle to high heat and harsh detergents that can degrade the reflective lining over time and will definitely warp and crack the plastic lid and rubber gaskets. The high-pressure spray can also force water into microscopic seams.
Dry it completely, upside down, with the lid off. Storing a thermos sealed while it’s damp inside is asking for mold. Moisture trapped in a dark, airtight space grows mildew, which leads to foul smells that are notoriously difficult to remove. Let air circulate through it.
For stubborn stains or smells, use baking soda or vinegar. The manufacturer suggests a paste of baking soda and water or a soak with diluted white vinegar. Never use bleach or abrasive cleaners. Bleach can damage the stainless steel, and abrasive pads can scratch the reflective interior coating.
| Problem | Likely Cause | Fix |
|---|---|---|
| Liquid not staying cold | Failed vacuum, damaged seal, skipped pre-chill. | Test insulation, inspect/replace gasket, always pre-chill. |
| Condensation on outside | Faulty lid seal letting moisture through. | Check and clean gasket, ensure lid is tightly screwed on. |
| Mildew smell | Stored while damp, leftover residues. | Soak with baking soda paste or vinegar solution, dry thoroughly. |
| Difficulty opening lid | Pressure buildup from spoiled contents. | Point opening away from face, unscrew slowly, dispose of if stuck. |
Store it with the lid loose. This allows any residual moisture to evaporate and prevents a vacuum seal from forming on an empty bottle, which can make the lid extremely hard to open.
Following these steps isn’t just about hygiene. A clean, dry, undamaged thermos performs better and lasts for years. Neglect it, and you’ll be shopping for a replacement long before the 5-year warranty is up.
Thermos vs. Other Cold Storage Methods
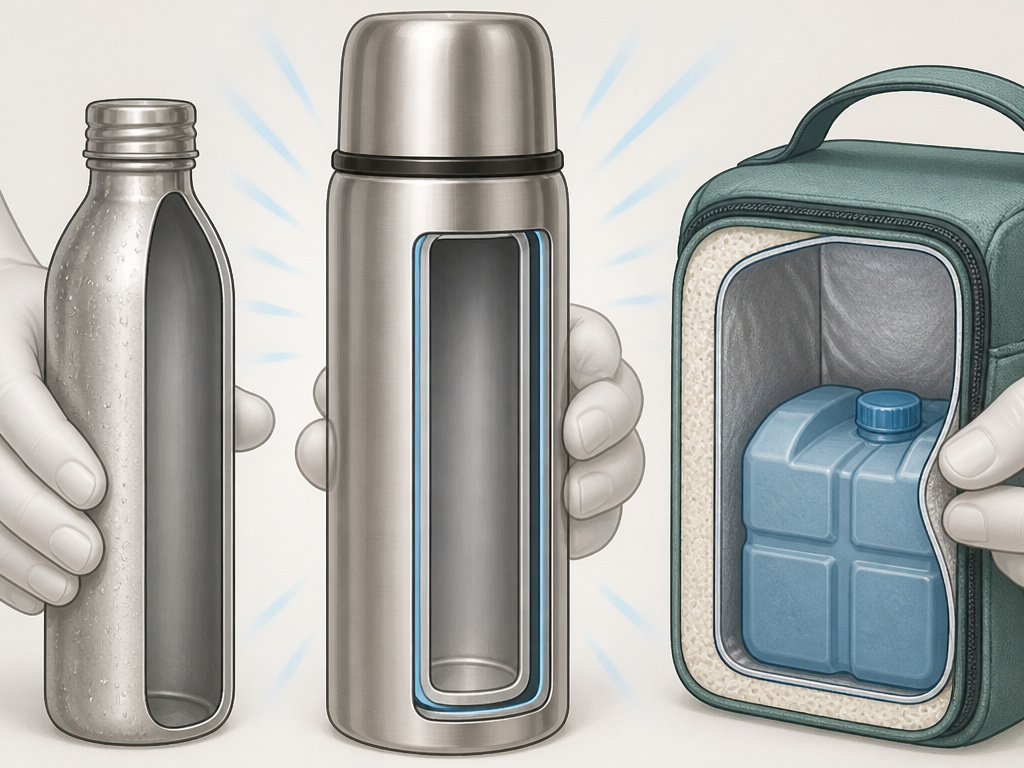
A thermos is a specific tool. Understanding what it beats and where it falls short helps you use it right.
Thermos vs. Insulated Lunch Box: A soft-sided insulated lunch bag relies on thick foam walls and an ice pack. It’s great for keeping multiple items cold together but doesn’t create an airtight seal. A thermos provides superior, individual-item temperature retention and prevents spills. For a single very cold drink or a food jar item that must stay chilled, the thermos wins. For a whole lunch, you might use both, a thermos inside an insulated lunch bag.
Thermos vs. Simple Stainless Steel Bottle: A single-wall stainless steel bottle might feel cool, but it offers almost no insulation. It will sweat heavily and let your drink warm up quickly through conduction. The vacuum layer is what you pay for.
Thermos vs. Plastic Insulated Bottle: Plastic bottles often use foam insulation. They can work well but are generally less durable and more prone to retaining flavors. A stainless steel thermos is more robust and easier to clean thoroughly.
For the ultimate in cold-keeping for drinks, a high-quality vacuum-insulated thermos is still the benchmark. Its limitation is capacity and single-item use. That’s its job.
Frequently Asked Questions
How long does a Thermos actually keep things cold?
Thermos FUNtainer bottle is rated to keep beverages cold for up to 12 hours. This assumes you’ve followed the pre-chill procedure, used an already-cold liquid, and kept the bottle sealed. Real-world results vary, but 8-10 hours of solid cold is typical for a well-prepped bottle.
Can you put milk in a Thermos?
You can, but with caution. Thermos states that its Foogo and Thermos Baby lines inhibit bacteria growth while contents stay cold. However, milk spoils due to its own composition, not just bacteria. They advise against keeping dairy in the bottle for “long periods.” For milk or a milk-based smoothie, treat it as a short-term option, a few hours at most.
Why does my Thermos sweat on the outside?
Sweating (condensation) on the outside means the outer wall is getting colder than the surrounding air. This usually indicates a compromised seal at the lid, allowing the cold from inside to conduct through the lid material to the bottle’s exterior. Check and clean the rubber gasket on the lid.
Is the Thermos warranty worth it?
The 5-year warranty against defects in materials and workmanship is solid for a vacuum failure. However, it does not cover plastic parts, color fading, or damage from drops or misuse. It’s a manufacturer’s warranty on the insulation, not a full replacement plan. Keep your receipt.
How do I clean a smelly Thermos?
For odors, the manufacturer recommends natural cleaners: a teaspoon of baking soda with water to make a paste, scrub, and rinse, or a soak with diluted white vinegar. Never use bleach. Ensure you dry it completely afterward, as moisture is the root cause of most smells.
The Bottom Line
A Thermos keeps things cold by locking out heat with a vacuum, a reflective shield, and smart prep. The 12-hour claim is real, but it’s not automatic. It demands your participation: a five-minute pre-chill with tap water, immediate filling with a cold drink, and a perfect seal.
Forget the pre-chill and you’ve lost before you start. Treat it like a fridge and you risk spoilage. Put carbonated drinks in it and you create a safety hazard. But follow the rules, hand-wash it, dry it thoroughly, store it open, and a good thermos will deliver reliable cold for years. It’s a simple piece of engineering that works exactly as advertised, provided you do your part first.
