
How to Open a Rice Bag: The Seam Method Prevents Spills
This post contains affiliate links. As an Amazon Associate, we earn from qualifying purchases.
To open a rice bag without spilling a grain, locate the two red or white pull-strings on one side. Hold the bag steady over a bowl, pull the single-threaded string first, then pull the two-threaded string. The seam will unravel cleanly, leaving a wide, straight opening for pouring. For bags without strings, use sharp scissors to cut 1–2 cm below the top seam.
That single-thread/two-thread order is the difference between a clean open and a knotted mess. Most people grab both strings at once, which tangles the mechanism every time. The bag’s design is simple, but it only works if you pull in sequence.
What follows: why the seam matters more than the tool, how to handle a 10kg sack without a hernia, and the one inspection you must do before any cut or pull. By the end, you’ll be transferring rice to your container without a single grain hitting the floor.
Key Takeaways
- Pull the single-threaded string first, then the two-threaded one. Reversing this tangles the knot.
- For bulk bags (5kg or larger), cut 1–2 cm below the seam line to create a wider, more stable opening.
- Always inspect the bag for punctures or webbing before opening, a single hole can introduce pests.
- Vacuum-sealed bags need a knife prick to break the seal before you cut; scissors can slip and tear the plastic.
- Transfer rice to an airtight container immediately after opening, especially in humid environments.
Why Your Rice Bag Has Two Strings
Rice bags are engineered for portability and spill control, not user intuition. Those two strings are a continuous thread laced through a reinforced seam. Pulling the single thread first draws the locking stitch tight. Pulling the double thread second pulls that locked stitch through the channel, unraveling the entire seam in one motion.
The single-threaded side is the lock. The two-threaded side is the key. Pull the lock, then turn the key.
Reverse the order and you pull the key against a locked door. The threads jam, the knot tightens, and you end up reaching for scissors anyway. This isn’t a design flaw. It’s a specific sequence the packaging assumes you’ll follow.
The plastic itself is a specific grade of low-density polyethylene. It’s tough enough to hold 10kg of grain but thin enough for the thread to glide through. Woven polypropylene bags use a heavier thread and a tighter stitch. They need scissors.
The Seam Method: Step-by-Step
This works on any standard plastic rice bag with the red or white pull-strings. The goal is a clean, straight opening wide enough for a measuring cup.
Before you start: Hold the bag over a large bowl or your intended storage container. Even a perfect unravel can release a few loose grains.
- Identify the strings. Find the side with two strings emerging close together. One will be a single strand; the other will be two strands twisted or looped together. The single strand is your starting point.
- Pull the single thread first. Use a firm, steady pull straight away from the bag. You should feel slight resistance, then a smooth release as the locking stitch tightens. If it feels stuck, check for a manufacturing knot, sometimes you need to wiggle it free.
- Pull the two-threaded string. Now grasp the double thread and pull in the same direction. The entire seam should unravel in one continuous motion, leaving a clean, straight edge.
- Inspect the opening. Run your finger along the new edge. If any small sections remain sealed, a quick snip with scissors will finish the job.
Common mistake: Pulling both strings at the same time. The threads cross, the knot jams, and you have to cut the bag anyway. That defeated the whole point.
If the strings break, which happens with cheaper bags or old stock, don’t try to salvage them. Switch to the scissor method below. Forcing a broken thread will only shred the plastic and create a jagged opening that spills more rice.
When the Strings Break: The Scissor & Knife Methods
Not all rice bags have functional strings. Bulk sacks, some premium brands, and vacuum-sealed bags often don’t. Your tool choice changes with the bag material.
| Bag Type | Best Tool | Cut Location | Why It Works |
|---|---|---|---|
| Standard Plastic Bag | Sharp Kitchen Scissors | Along the top seam | Scissors provide control; the seam is a perforated guide for a straight cut. |
| Woven Polypropylene (10kg+) | Heavy-Duty Shears | 1–2 cm below the top seam | The woven material frays if cut directly on the seam; cutting below creates a cleaner, stronger edge for pouring. |
| Vacuum-Sealed Bag | Small Paring Knife | Puncture seal first, then scissors along seam | A knife point breaks the vacuum without tearing the bag; scissors then follow the existing seam line. |
The Scissor Technique for Plastic Bags
Use sharp, clean kitchen scissors. Dull blades will crush the plastic instead of cutting it, leading to a ragged tear.
- Hold the bag steady over your container.
- Insert the scissor tip into the corner of the bag, right at the seam.
- Cut along the seam line, using the factory stitching as a guide. Go slow, the plastic can bunch.
- Stop about an inch from the other side. Leaving a small section uncut keeps the bag structurally intact while you pour, preventing a sudden total collapse.
This method gives you a clean, resealable flap if your bag has a built-in zipper. For bags going straight into a storage container, you can cut the entire seam off.
The Knife-Then-Scissors Method for Vacuum Seals
Vacuum-sealed bags are under tension. Stabbing them with scissors can cause a sudden, uncontrolled tear.
- Lay the bag flat on a cutting board.
- Use the tip of a small knife to prick a tiny hole in the corner of the bag, away from the rice. You’ll hear a hiss as the vacuum releases.
- Now use scissors to cut along the seam as described above.
The initial puncture relieves the internal pressure. Without it, the first scissor cut can cause the bag to split open violently along a weak point, spraying rice across your counter.
Opening Bulk Bags (5kg and Up)
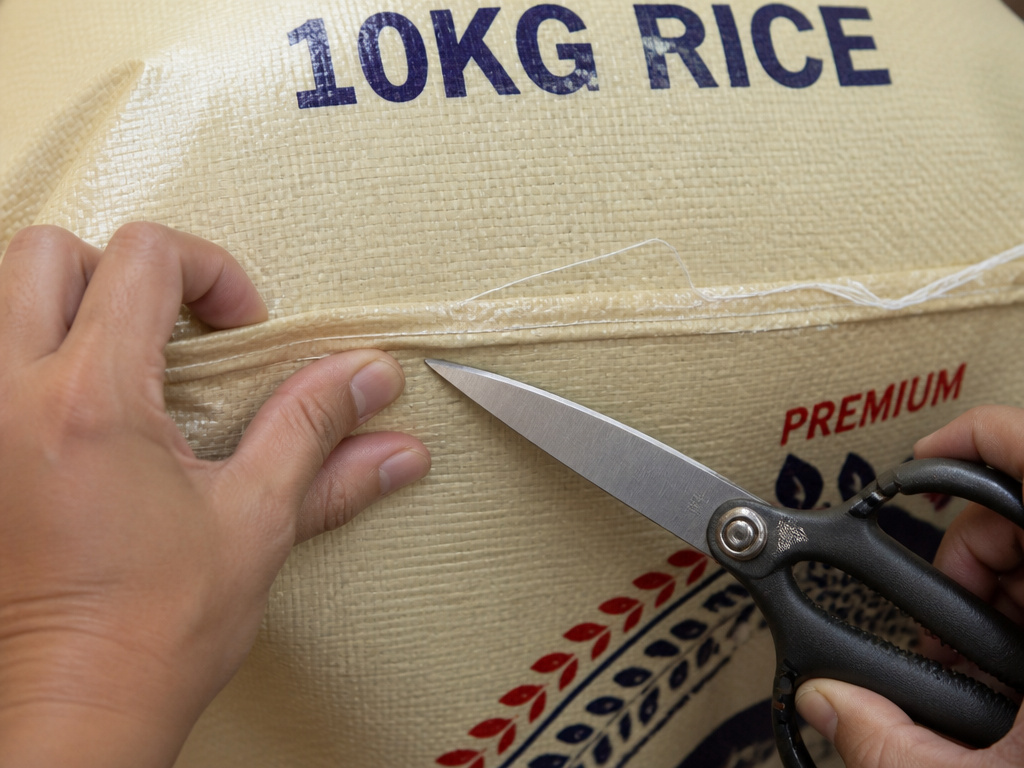 A 10kg bag of rice is a different beast. The sheer weight shifts, and the material is often a sturdy, woven polypropylene. The string method rarely works here, and cutting on the seam can cause the woven threads to unravel like a sweater.
For these, you need a wider opening.
Cut 1–2 cm below the seam. This leaves a reinforced cuff of material that won’t fray and gives you a stable pour spout.
The extra material also gives you something to grip if you need to fold and clip the bag closed temporarily. A cut directly on the seam on a woven bag often frays after a single use, leaving you with a crumbling edge that sheds fibers into your rice.
Step-by-step for bulk bags:
- Place the bag on a stable, flat surface, your floor or a sturdy table. Do not hold it in the air.
- Identify the top seam. Measure about two finger-widths below it.
- Using heavy-duty shears or a very sharp utility knife, make a straight, horizontal cut across the entire width of the bag. Go slow to keep the line even.
- Pour directly from this new, wide opening into your storage container. The bag will be heavy; support its bottom with one hand while pouring with the other.
Trying to pour a 10kg bag from a narrow, seam-cut opening is a recipe for a bent bag, a sudden rip, and a mountain of rice on the floor. The wider cut redistributes the stress.
The Pre-Open Inspection Most People Skip
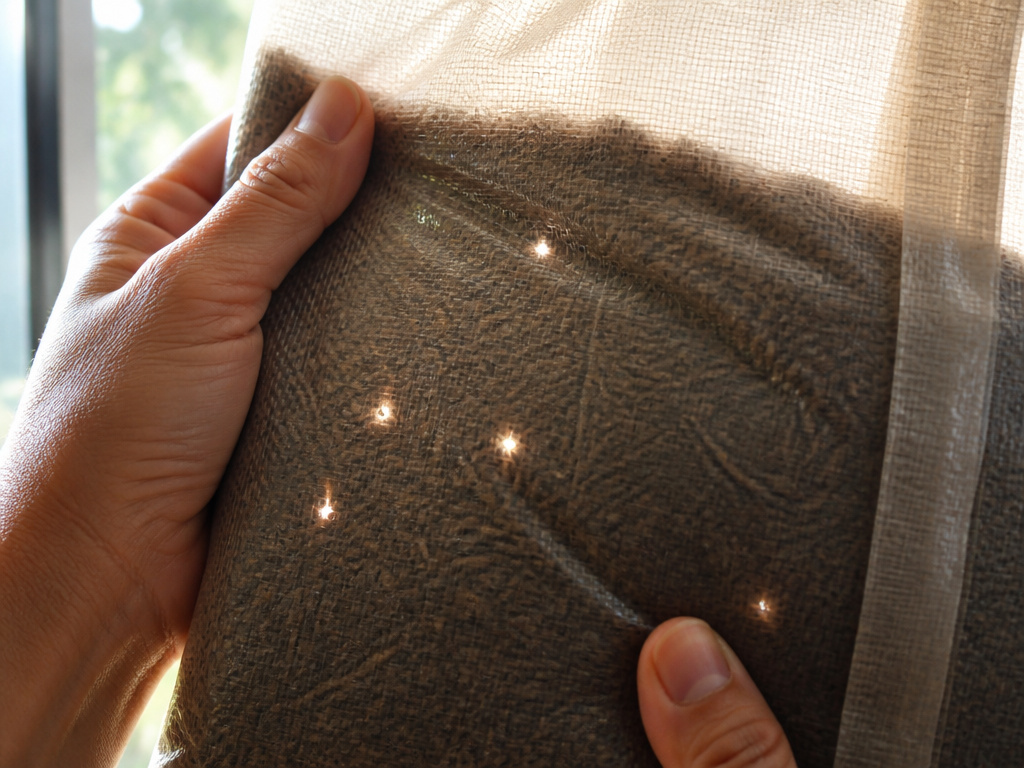 A torn or damaged bag is an open invitation for pests. Rice weevils can enter through a hole the size of a pinhead. Once inside, they lay eggs, and the larvae consume the grains from within.
Before you make any cut or pull any string, do this:
- Run your hands over the entire bag, especially along the seams and corners. Feel for any punctures, sticky patches, or unusual bumps.
- Hold the bag up to a bright light. Look for tiny pinpricks of light or dark spots that could indicate a breach or moisture damage.
- Check for fine, silky webbing near the seams, a telltale sign of moth larvae.
If you find damage, your decision point is simple. A small tear near the top might be salvageable if you open the bag immediately over a container and transfer all contents to an airtight vessel. Any sign of webbing, multiple punctures, or a musty smell means the bag is compromised. In that case, the safest move is to dispose of the entire bag without opening it. The cost of a bag of rice is lower than the cost of an infestation.
This inspection takes thirty seconds. It’s the difference between pouring out perfect grains and sifting through spoiled, insect-ridden remnants.
Common Mistakes and How to Avoid Them
 Everyone has dumped rice on the floor at least once. These are the specific slip-ups that cause it.
Mistake 1: Holding the bag in mid-air while cutting.
The bag’s weight shifts as you cut. The rice pushes against the newly opened section, and a clean cut becomes a ragged tear. Always place the bag on a stable surface or hold it directly over your container.
Mistake 2: Using dull scissors.
Dull blades don’t cut, they tear. They crush the plastic, creating a weak point that rips the moment weight presses against it. Keep a dedicated pair of sharp kitchen shears for packaging.
Mistake 3: Ignoring the vacuum seal.
Stabbing a vacuum-sealed bag with scissors is like popping a balloon with a pin. The release of pressure can blow rice everywhere. Puncture the seal with a knife point first, away from the grain.
Mistake 4: Not having a container ready.
You get the bag open perfectly, then realize your storage container is across the kitchen. You set the bag down, it tips, and the spill happens. Stage your airtight container directly under the bag or on the counter next to it before you make the first move.
Mistake 5: Assuming all bags are the same.
A flimsy 1kg plastic bag and a thick 10kg woven sack demand different tools. Scissors for the first, shears for the second. Trying to cut woven polypropylene with kitchen scissors will fray the edge and strain your hand.
What to Do Immediately After Opening
The clock starts the moment the bag is open. Rice begins absorbing ambient moisture and odors from the air. In a humid climate, this degradation accelerates.
Your first move after opening should be to transfer the rice to an airtight container. A proper rice storage container with a sealing lid and a moisture-absorbing packet is ideal. Glass jars with clamp lids or food-grade plastic bins with gaskets work well.
If you’re not using all the rice, do not leave it in the original bag, even if you roll the top down and clip it. Those bags are not designed for long-term storage. They are shipping containers. A bag clip is a temporary fix for a day or two, not a preservation strategy.
For large quantities, consider dividing the rice into smaller, portion-sized airtight containers. This limits the exposure of the entire supply every time you need a cup. It also makes it easier to inspect for any signs of bugs or spoilage later on.
This step is non-negotiable if you want to keep rice bug-free. An open bag in a pantry is a beacon for weevils and moths.
Frequently Asked Questions
Why does my rice bag have two different colored strings?
The colors are a manufacturing guide, not a user instruction. The single thread and double thread are often different colors so assembly-line machines can distinguish them during the bag-sealing process. Ignore the color; identify the threads by their number, single first, then double.
Can I reuse the bag for storage after opening?
No. The original bag is a barrier against physical damage and contamination during shipping, but it is not airtight. Once opened, the plastic is compromised and cannot be resealed to a food-safe standard. Always transfer rice to a dedicated storage container.
What if I accidentally cut the strings?
It happens. If the strings snap or you cut them, switch to the scissor method. Cut along the top seam carefully. Do not try to dig the broken threads out of the seam, you’ll likely tear the bag open unevenly.
How do I open those giant restaurant-sized rice bags?
For commercial 25kg or 50lb woven polypropylene sacks, use a box cutter or utility knife. Lay the sack on its side on a pallet or the floor. Cut a large panel out of the top, not just a slit. This allows you to scoop rice out with a dry measuring cup or ladle directly into storage bins. These bags are never designed for pouring.
Is it safe to open a rice bag with a hole in it?
Inspect the hole first. If it’s a small, clean puncture and the rice inside looks undamaged, open the bag immediately over a container and transfer the contents. Check the rice for any signs of insects or mold. If the hole is large, ragged, or you see any webbing or debris, discard the entire bag unopened. The risk of contamination isn’t worth it.
Before You Go
Opening a rice bag cleanly comes down to three things: identify the strings, pull in the correct order, and always cut over a container. The seam is your guide, not the enemy. For bulk bags, cut below the seam. For vacuum seals, puncture first.
The real work starts after the bag is open. Getting the rice into an airtight vessel within minutes is what keeps it fresh and pest-free for the long haul. A neat opening is just the first step in proper rice storage tips that save you money and waste.
