
Your Guide to Using a Pressure Cooker for Safe Home Canning
This post contains affiliate links. As an Amazon Associate, we earn from qualifying purchases.
You cannot safely use a standard pressure cooker for USDA-approved home canning. The USDA requires a pressure canner that holds at least four quart jars upright on its rack, with a verified gauge and a 10-minute pre-pressurization venting procedure. Small cookers heat and cool too fast, trapping air and underprocessing food, which can lead to botulism.
That four-jar rule is the physical minimum for the heat mass and water volume the USDA’s processing times were tested against. A smaller vessel changes the come-up and cool-down times, critical phases for destroying pathogens, and no amount of added process minutes can reliably fix that.
What follows: the exact specs that separate a canner from a cooker, the venting step almost everyone skips, and what to do if your only option is a small pot.
Key Takeaways
- The USDA defines a pressure canner as a vessel that holds at least four quart jars upright on its rack. Anything smaller is a pressure cooker or saucepan and is not recommended for canning low-acid foods.
- You must vent the canner for 10 full minutes after steam appears at the petcock before pressurizing. Skipping this leaves air inside, which lowers the temperature at a given pressure and guarantees underprocessing.
- A dial gauge must be tested for accuracy yearly. If it’s off by more than 2 pounds at 5, 10, or 15 PSI, replace it. A weighted gauge that jiggles is often more reliable.
- If pressure drops below your target during processing, you must bring it back up and restart the timer from zero. The entire thermal process is invalidated by a pressure dip.
- Electric multi-cookers with “canning” functions and small pressure saucepans are not supported by USDA research. Manufacturer directions are not equivalent to tested processes.
What Actually Defines a Pressure Canner?
Forget the label on the box. The USDA and the National Center for Home Food Preservation define a pressure canner by three verifiable specs: minimum capacity, a working pressure-measurement system, and the ability to follow the venting procedure.
If your pot misses any one of these, it’s a cooker, not a canner. Using it for low-acid foods like vegetables, meat, or fish is a documented risk.
The USDA’s 4-Jar Capacity Rule
The U.S. Department of Agriculture recommends that a canner be large enough to hold at least four quart-size jars to be used correctly for USDA-published processes. This is printed in their official pressure canning safety manual.
This is about thermal mass. The USDA’s process times were developed in the late 1980s using 16-quart or larger canners.A pot that size has enough metal and water volume to heat up and cool down at a predictable, slow rate. That slow rate is baked into the math that ensures Clostridium botulinum spores are destroyed.
A pressure canner, for USDA processes, must be able to hold at least four quart-size jars, standing upright on the canner rack, with the lid in place.
Small pressure saucepans, often sold as 4- to 8-quart pressure cookers, heat up and cool too quickly. The shortened come-up and cool-down times reduce the total processing heat, which may not be enough to destroy targeted microorganisms. This is why the USDA reversed its stance in the late 1980s and now explicitly recommends against using them.
Gauge or Weight: The Pressure Measurement Mandate
You must know, precisely, what pressure is inside the pot. There are two systems.
Dial gauges show pressure on a numbered face. They are fragile. – They must be checked for accuracy at least once a year before use. – If the gauge reads high or low by more than 2 pounds at pressures of 5, 10, or 15 PSI, it needs to be replaced. – Many local Extension offices test Presto, National, Maid of Honor, and Magic Seal brands.
Weighted gauges regulate pressure. They sit on the vent pipe and jiggle or rock when the correct pressure is reached and maintained. – They are generally more reliable and don’t require yearly testing. – Common weights are 5, 10, and 15 pounds.
A pot with no gauge, a broken gauge, or an electric multi-cooker with only “low/medium/high” settings cannot be used for safe canning. You cannot guess at pressure.
The Non-Negotiable 10-Minute Vent
This is the step that separates safe canning from dangerous guesswork. Before you ever put the weight on or close the petcock, you must purge all air from the canner.
Here’s why: air trapped in a closed canner lowers the temperature obtained for a given pressure. At 10 PSI with air inside, you might only reach 230°F instead of the required 240°F. The result is underprocessing, regardless of how long your timer runs.
The procedure is fixed. 1. Lock the lid, but leave the weight off or the petcock open. 2. Turn the heat to high until a steady, strong column of steam shoots from the vent pipe. 3. Start a timer. Let that steam flow continuously for 10 full minutes. 4. After 10 minutes, place the weight or close the petcock to begin pressurizing.
Where this goes sideways: Cutting the vent short at 5 or 7 minutes because “steam is coming out.” Incomplete venting leaves pockets of air. You won’t see it, but the temperature dial won’t reach the true value for your pressure, and botulism spores can survive.
This rule applies to every pressure canner, every time. It’s detailed in the Oregon State Extension safety bulletin and is non-negotiable.
Why Small Pressure Cookers Fail the Physics Test
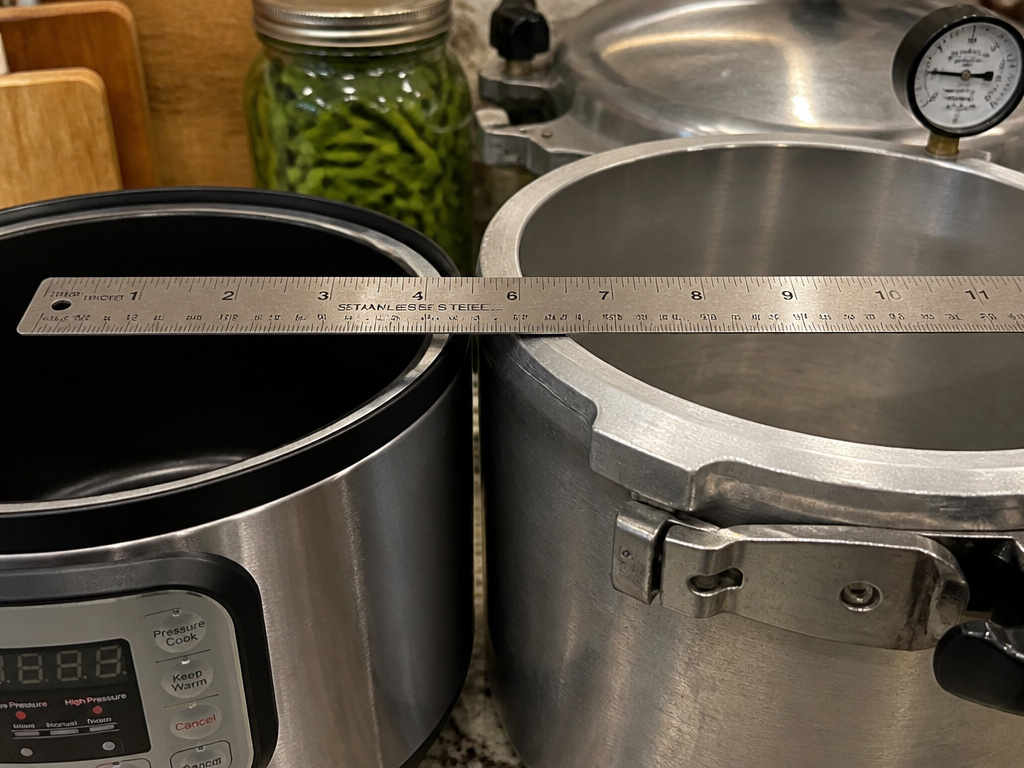 Manufacturers of small electric pressure cookers and multi-pots sometimes include “canning” buttons. The USDA and university extensions do not support this. The conflict isn’t about brands; it’s about thermal physics.
| Factor | Pressure Canner (16+ qt) | Pressure Cooker (4-8 qt) | Consequence for Canning |
|---|---|---|---|
| Wall Thickness & Mass | Heavy, thick metal | Light, thin metal | Cooker heats/cools 3-4x faster, altering total heat delivery. |
| Water Volume | 2-3 inches deep, several quarts | Minimal, often just 1 cup | Less water = less thermal buffer, leading to rapid temperature swings. |
| Venting Capacity | Designed for 10-min steam column | Small vent, often not designed for prolonged venting | Air may not fully purge, lowering processing temperature. |
| Pressure Stability | Weighted gauge or tested dial | Often just a “keep warm” cycle | Pressure fluctuates with element cycling, risking drops below target. |
The rapid heating and cooling are the core problem. USDA process times include the come-up and cool-down phases as part of the total lethal heat. If those phases are cut short, the food receives less total heat, even if the “at pressure” time is correct. This is why adding 10 minutes to a process time, an old guess from the 1970s, was abandoned, it doesn’t fix the underlying heat deficit.
You can discuss processes with a manufacturer, but their directions are not equivalent to the USDA’s tested processes for pressure canners. The agency’s position is clear: use a properly sized canner.
The Step-by-Step Safe Process
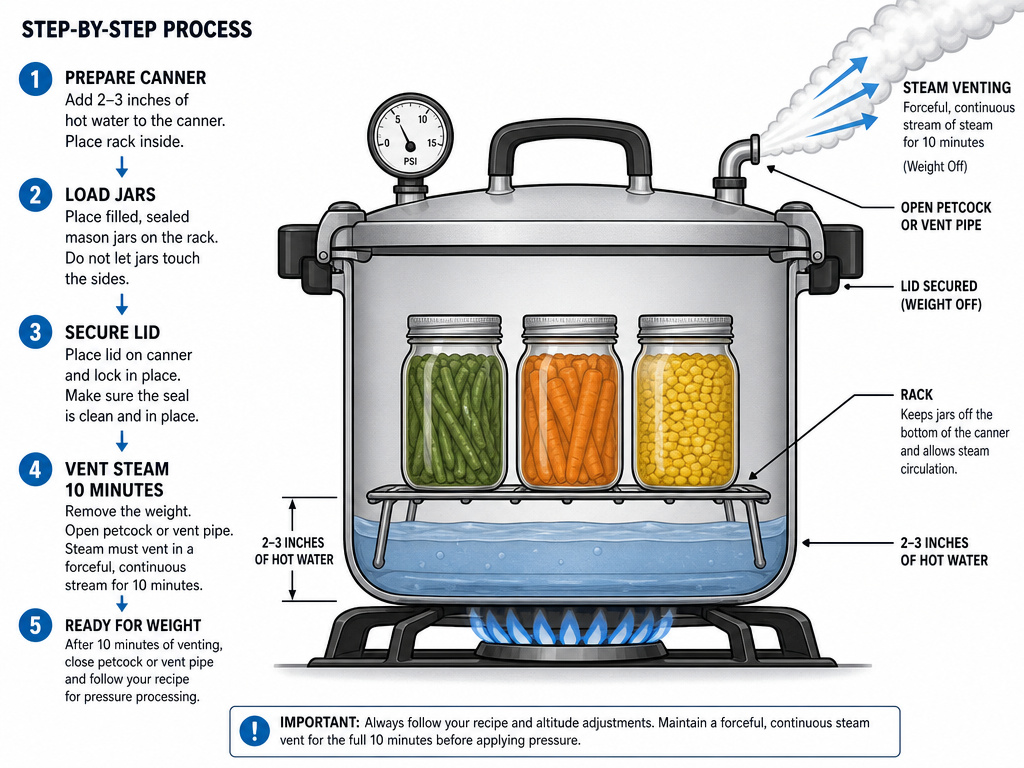 If you have a verified pressure canner, here is the full sequence. Missing one step invalidates the safety of the entire batch.
Before You Start:
- Check your gauge. If it’s a dial, ensure it’s been tested within the year.
- Inspect the gasket and vents. Clean any mineral deposits. A cracked or stiff gasket will leak steam and fail to pressurize.
- Use a level burner. A tilted canner means uneven water depth and potential jar tipping.
Step 1: Prepare the Canner and Jars
- Place the rack in the bottom of the canner.
- Add hot water. For most processes, this is 2 to 3 inches deep. Longer processes or specific foods (like smoked fish) require more, always follow the recipe.
- For raw-packed foods, heat water to 140°F. For hot-packed foods, you can go to 180°F.
- While the water heats, prepare your food and fill your jars for pressure canning. Wipe rims, apply recommended canning lids, and screw bands on fingertip-tight.
Step 2: Load, Vent, and Pressurize
- Using a jar lifter, place filled jars on the rack. Keep jars upright to avoid spilling food into the sealing area.
- Secure the canner lid. Leave the weight off or the petcock open.
- Turn heat to high. Wait for a continuous, forceful stream of steam from the vent pipe.
- Start a 10-minute timer. Vent steam continuously for the full 10 minutes.
- After venting, place the weight or close the petcock.
- Bring the canner to your target pressure (e.g., 10 or 11 PSI for most vegetables).
Step 3: Process and Cool
- Once pressure is reached, start your process timer. Adjust the heat to maintain a steady pressure. The weight should jiggle 2-4 times per minute or rock gently.
- If pressure drops below target at any point, bring it back up and restart the process timer from zero.
- When processing time ends, turn off the heat. Let the canner cool naturally until the pressure gauge reads zero. Do NOT force-cool with water or by lifting the weight.
- After pressure is zero, wait an additional 2-5 minutes, then slowly open the petcock or remove the weight. Unlock and tilt the lid away from you to open.
- Remove jars with a lifter. Place them on a towel, undisturbed, for 12-24 hours. Then check seals and remove bands.
Common mistake: Force-cooling the canner by running cold water over it. This creates a sudden vacuum inside the jars that can suck liquid out of the jar (siphoning), leading to failed seals and potential contamination.
Pressure Canner vs. Cooker: Your Real Choices
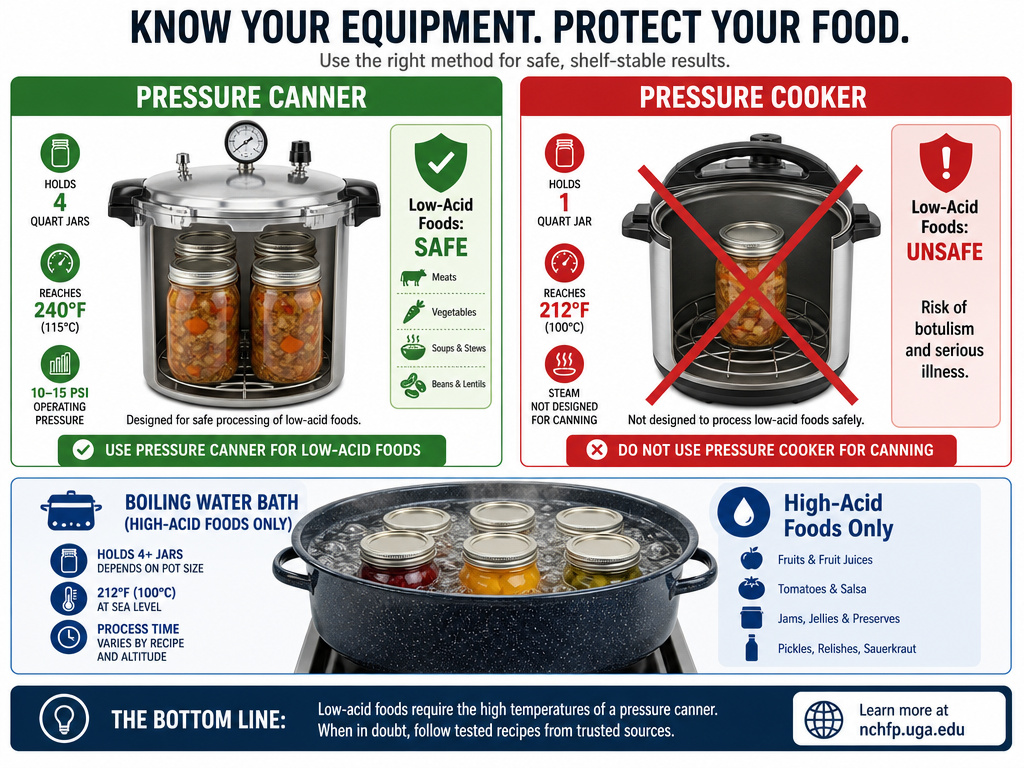 You have two safe paths forward. Picking the middle option is how people get into trouble.
1. Buy a Real Pressure Canner.
This is the only option for regular canning of low-acid foods. Look for: – A capacity of 16 quarts or more (holds 4+ quart jars). – A UL approval mark on the pot or in the manual. – Either a tested dial gauge or a weighted gauge system. Popular brands like Presto and All-American make models that meet this spec. These are the best pressure canners for home canning.
2. Use the Water Bath Method for High-Acid Foods Only.
If you only have a small cooker, limit your canning to high-acid foods that are safe with the water bath canning process. This includes fruits, pickles, jams, and properly acidified tomatoes. This method does not require pressure.
3. Do Not Use a Small Pressure Cooker for Low-Acid Foods.
This includes all vegetables, meats, fish, poultry, and soups. The Michigan State University guide is explicit: the equipment matters. Manufacturer claims do not override the physics of insufficient thermal mass.
For your first time, a complete canning kits can bundle the right canner with essential tools like a jar lifter, funnel, and bubble remover.
Frequently Asked Questions
Can I use my Instant Pot for canning?
No. Electric multi-cookers like the Instant Pot are not approved for pressure canning by the USDA or any university extension service. Their “canning” settings are not based on tested processes for low-acid foods, and their rapid heat-up/cool-down cycles make them unsafe for this purpose.
What happens if I forget to vent for 10 minutes?
If you vent for less than 10 minutes, air remains trapped inside the canner. This air lowers the temperature during processing, meaning your food is underprocessed. The safest course is to treat the batch as unsafe, reprocess it in a properly vented canner or refrigerate and consume it within a few days.
How do I test my dial gauge’s accuracy?
Contact your local county Cooperative Extension office. Many offer free testing for specific brands (Presto, National, Maid of Honor, Magic Seal). They will check if the gauge reads within 2 pounds of accuracy at 5, 10, and 15 PSI. If it’s outside that range, you need a new gauge from the manufacturer.
Can I reuse canning lids?
Standard metal canning lids are designed for one use only. The sealing compound flattens during processing and may not create a reliable vacuum a second time. Reusing lids is the most common cause of seal failure. Some brands now offer reusable lids with replaceable gaskets, follow those specific instructions.
Is a weighted gauge better than a dial gauge?
For beginners, a weighted gauge is often more reliable because it doesn’t require yearly testing and is less prone to damage. It regulates pressure automatically by jiggling. A dial gauge provides a visual number but must be checked annually. Many experts prefer weighted gauges for their simplicity and consistency.
Before You Go
Canning is about the pot first. A real pressure canner, defined by the USDA’s four-quart-jar minimum, is the only equipment that delivers the tested, predictable heat needed to make low-acid foods shelf-stable and safe.
Start with the right essential canning supplies: a certified canner, a jar lifter, and a tested recipe from the National Center for Home Food Preservation guide. That 10-minute vent is the required procedure that removes the invisible air that would otherwise ruin your food’s safety.
Then, and only then, focus on filling your properly sterilized jars. The jar is the last step in a chain that begins with the right metal pot on your stove. Skip the first link, and the chain breaks.
