
Learn How to Dry and Preserve Flowers with Pro Techniques
This post contains affiliate links. As an Amazon Associate, we earn from qualifying purchases.
To dry and preserve flowers, you match the method to the goal. Air-drying is best for shape, pressing is best for flat art, and silica gel is best for color. The critical factor is speed — drying quickly preserves pigments, while a slow process leads to limp, faded results. For a permanent display, embedding dried flowers in a 3:1 epoxy resin mix cured at 40°C yields the clearest, most stable result.
That speed requirement changes everything. A flower left in a cool, dark room for weeks will often brown. The same flower dried near a warm air source in days keeps its hue. This process is about beating the clock on pigment decay and moisture-driven mold.
What follows is the breakdown: when to hang, when to bury in desiccant, and when to press. You’ll get the exact ratios from peer-reviewed studies, the drying timelines that actually work, and the one storage mistake that undoes all your effort.
Key Takeaways
- Dry flowers as fast as possible to lock in color. Warm, dry airflow beats a cool, dark closet.
- For perfect three-dimensional form, use silica gel in a truly airtight container. Thin petals dry in 2 days, thick ones take a week.
- Pressing works for flat art. The microwave method delivers dried flowers in minutes, not weeks.
- To preserve flowers permanently, embed them in a 3:1 epoxy resin mix. Mixing in a 40°C water bath for 5 minutes gives the best clarity.
- Stored dried flowers are dust magnets. Keep them behind glass or in a sealed shadow box away from sunlight and humidity.
The Three Methods, Matched to Your Goal
You don’t pick a preservation method. You pick an outcome, then use the tool that gets you there. Want a bouquet for a vase? Air-dry. Need a flat specimen for a card? Press it. Dream of a paperweight with a perfect rose? That’s resin.
Each path has a different failure point. Hang a heavy-headed bloom like a peony and the stem snaps under the weight. Press a succulent petal and it turns to mush. Knowing which flower fits which process saves the harvest.
Common mistake: Using a foliage preservation method on delicate petals. A St Andrews University study found this leads directly to “limp sticky petals and colour loss.” Flowers need different chemical handling than leaves.
The table below is your cheat sheet. It names the winning method for common flower types, pulled from horticultural guides and the YouTube trenches where people actually do this.
| Flower Type | Best Method | Why It Wins |
|---|---|---|
| Roses, Peonies, Larkspur | Air-Drying (Upside Down) | Maintains stem strength and full bloom shape; hanging prevents head droop. |
| Pansies, Violets, Ferns | Pressing | Flat structure presses evenly; delicate pigments survive the rapid drying. |
| Hydrangeas, Daisies, Zinnias | Silica Gel | Desiccant supports intricate petal structures from all sides, preserving form. |
| Any fully dried specimen | Epoxy Resin Embedding | Encapsulates against air and humidity permanently; the only true archival method. |
Your starting flower quality dictates your ending quality. A bruised, wilting bloom cannot be rescued. This rule applies to all food preservation, from preserving basil to drying mushrooms. Begin with perfection.
Air-Drying: The Shape Keeper
Air-drying is the oldest trick. It’s simple, cheap, and incredibly effective for sturdy, low-moisture blooms. The goal is to evaporate water while gravity holds the flower’s natural posture.
You need a dark, warm, and dry space with good airflow. An attic, a spare closet, or even a corner behind a furnace works. Humidity is the enemy. It stretches the drying time and invites mold.
Tie small bunches of stems with rubber bands or string. The stems will shrink as they dry; a rubber band tightens with them, while string can loosen. Leave space between each stem for air to circulate. Hang them upside down from a hook, rod, or wire.
I won’t dry dahlias or chrysanthemums this way. Their dense, multi-petal heads trap moisture at the core. By the time the outside is crisp, the center is already molding. I lost a whole batch that way one humid September.
The process takes one to three weeks. You’ll know they’re done when the stems snap cleanly, not bend. This method is a close cousin to drying vegetables for pantry storage—both rely on controlling the environment to remove water without cooking the material.
The Science of Silica Gel Drying
Silica gel is a desiccant that pulls water vapor from the air and from anything touching it. For flowers, it acts like a supportive cast, holding petals in place as it removes moisture.This is the best method for preserving vibrant color and complex three-dimensional form.
You need an airtight container, silica gel crystals, and your flowers. Shallow plastic containers with locking lids are ideal. The Missouri Botanical Garden dried flower guide stresses the airtight seal. If the container leaks, the gel absorbs atmospheric humidity first and your flowers dry slowly or not at all.
Pour a one-inch base of crystals into the container. Trim your flower stems to about an inch. Place the bloom face-up on the base. Then, gently pour more crystals over and around the flower, using a spoon to direct flow between petals. Do not shake the container. You want to completely bury the flower without crushing it.
Where this goes sideways: Using blue-indicating silica gel. The blue color comes from cobalt chloride, a toxic compound. Use plain white or orange silica gel. It works just as well and isn’t a health hazard in your home.
Drying time depends entirely on petal thickness and density. Research from horticultural extensions provides a reliable timeline:
| Petal Texture | Drying Time in Silica Gel | Visual Check |
|---|---|---|
| Thin (Poppies, Delphiniums) | 2 days | Petals feel papery and rigid. |
| Medium (Roses, Carnations) | 3–4 days | Stem snaps; no flexibility in the bloom. |
| Heavy (Peonies, Sunflowers) | 5–7 days | The entire flower head is light and crisp. |
When time’s up, carefully pour the crystals off into a sieve. The flower is extremely fragile. Use a soft brush to remove residual dust. You can reactivate the silica gel by baking it on a sheet tray in a 200°F oven for a couple of hours. This drying principle is the same used for storing dehydrated fruit—absolute moisture removal is key.
The Two-Minute Microwave Press
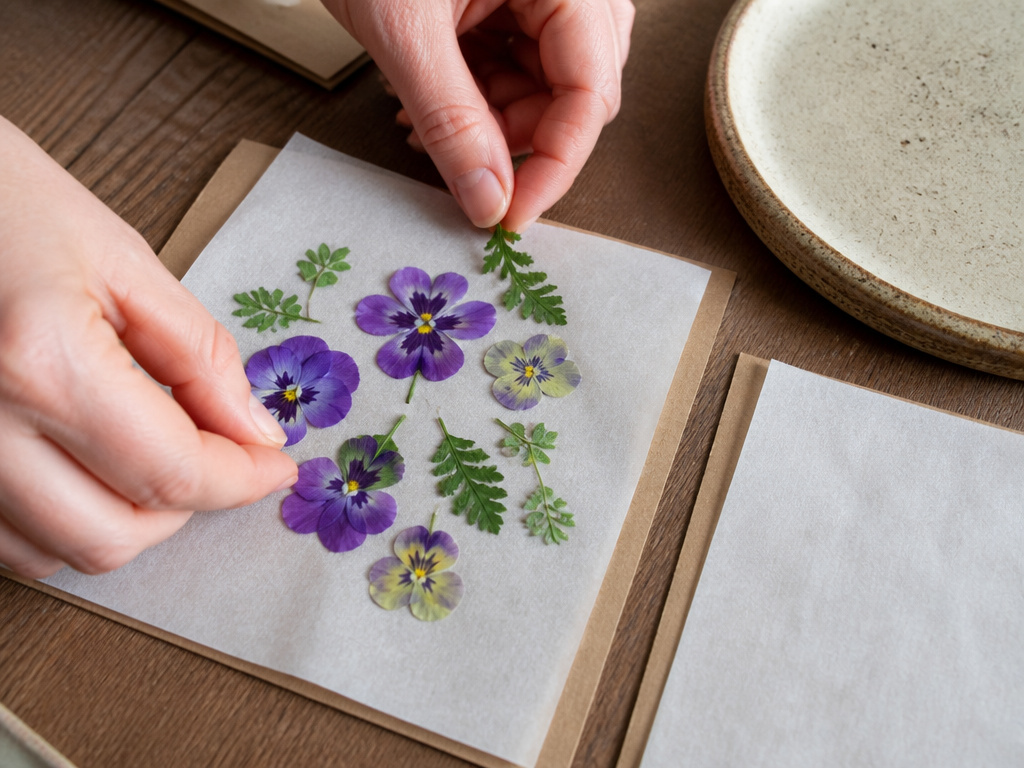 Pressing is for flat art. It smashes flowers between absorbent layers, forcing moisture out quickly. The traditional book-and-bricks method takes weeks. The microwave method takes minutes.
You need a microwave-safe plate, two pieces of plain cardboard, and several sheets of absorbent paper—paper towels or parchment paper work. Do not use newspaper; the ink can transfer.
Place one cardboard square on the plate. Add a sheet of paper, your arranged flowers, another sheet of paper, and the final cardboard square. This creates a stable, absorbent sandwich. Put a heavy, microwave-safe dish on top as a weight.
Microwave on half power for one minute. Check the flowers. They will likely still be damp. Repeat in 30-second bursts at half power, checking each time. Most small flowers are done in 2-3 total minutes. Over-microwaving cooks them, turning them brown and brittle.
The Natural History Museum pressing guide notes that quick drying preserves color. The microwave provides that speed. Once cool, the pressed flowers are ready to use. For long-term storage of flat specimens, follow the same principles as storing dried vegetables: keep them in a rigid, acid-free container away from light.
Preserving Flowers in Epoxy Resin
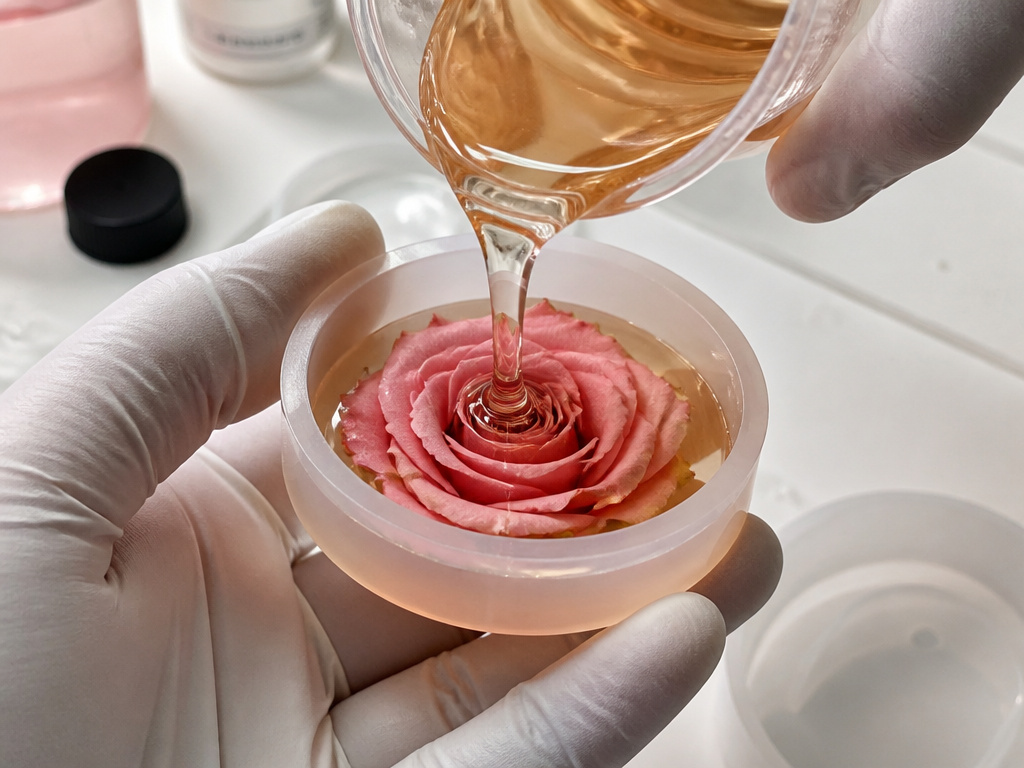 This is the final step. Resin encapsulation turns a dried flower into a permanent, waterproof object. It’s for jewelry, paperweights, and display art. The flower must be completely and utterly dry. Any residual moisture will turn to steam inside the resin, creating cloudy bubbles or even cracking the cast.
The process hinges on the resin mix. A 2024 study in the Journal of Ornamental Horticulture standardized the method. The researchers used a 3:1 ratio of epoxy resin to hardener. That ratio is not a suggestion. Deviating changes the chemical cure, leading to sticky spots or a rubbery finish.
They tested mixing temperatures and durations. The longest setting time was 25.05 hours for resin mixed in a hot water bath at 40°C for 5 minutes. The shortest was 17 hours for resin mixed at room temperature for 21 minutes. The warmer mix also won on quality.
The part nobody mentions: The 40°C mix won. It scored highest for transparency (4.13/5) and overall acceptability. The heat thins the resin slightly, letting it flow into petal crevices and release tiny air bubbles before it sets. Room-temperature resin is thicker and can trap air, creating a foggy finish.
Pour a thin base layer of mixed resin into your mold. Let it set until tacky. This gives the flower a stable bed. Place your dried flower, then slowly pour more resin to encapsulate it. Use a toothpick to guide the resin and pop any surface bubbles. Let it cure on a level surface, dust-free, for the full time listed on your product.
This creates a sealed environment, similar to the ideal storing dehydrated food in airtight containers with oxygen absorbers. The flower cannot reabsorb moisture or react with air.
Why Color Fades (And How to Stop It)
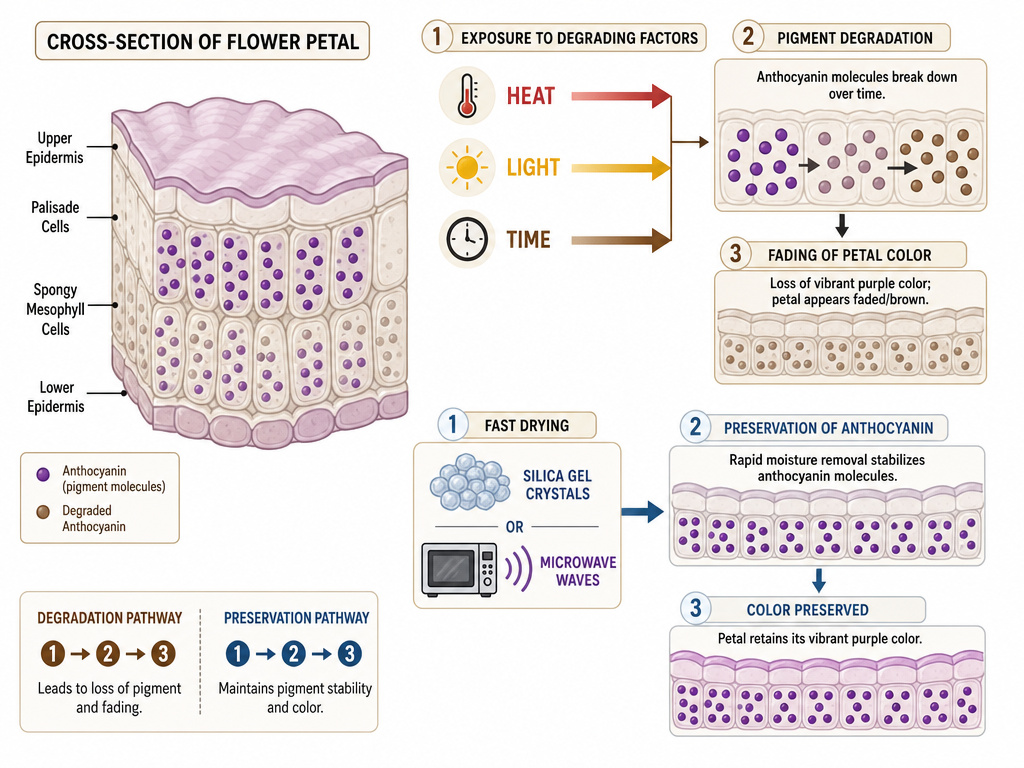 Flower color comes from pigments, mainly anthocyanins. These are pH-sensitive and break down with heat, light, and time. The St Andrews flower preservation study found that preserving foliage methods failed on petals because they didn’t address this pigment instability.
The fix is acid. In the study, adding acid to the preservation process maintained bright anthocyanin colors. At home, you can’t inject flowers with acid. But you can control the drying environment to minimize pigment damage.
Speed is your acid substitute. Drying quickly minimizes the time pigments spend in a degrading, moist state. Silica gel is fast. The microwave is faster. Air-drying in a warm, dark place is faster than in a cool one. This is the core technical insight most guides miss. It’s why your grandmother’s pressed flowers in a Bible are brown, but a microwaved pansy from yesterday is still purple.
Storing Your Preserved Flowers
A dried flower is a humidity sponge and a dust magnet. Storage is the final, mandatory step.
Keep them away from direct sunlight. UV radiation bleaches pigments within months. Avoid humid rooms like bathrooms or basements. Fluctuating humidity makes petals curl and become brittle.
The best storage is behind glass. A display case, a shadow box with a sealed front, or even a framed press under UV-protective glass. For loose dried flowers, use an airtight container with a silica gel packet tucked inside. Check the packet every few months; if it changes color, reactivate or replace it.
This long-term mindset is critical for all preserved goods, whether you’re storing dried beans or botanical specimens. The enemy is always air, light, and moisture.
Frequently Asked Questions
Can I use borax instead of silica gel?
Yes, but it’s messier. Borax is a powder. It can clump and leave a white residue on petals. A borax and white cornmeal mix (1:1 ratio) is a traditional desiccant. It works more slowly than silica gel and is harder to fully remove from dense blooms.
How do I keep dried flowers from shedding?
They shed because they’re brittle. The only real fix is encapsulation in resin. For display, you can use a light spray of clear acrylic sealant (test on one petal first). This creates a thin protective film. It will slightly darken the flower.
Can I preserve flowers with hairspray?
Hairspray is a temporary fix. It contains alcohols and plastics that can yellow over time and attract dust. It does not prevent moisture absorption. It’s a cosmetic layer, not a preservation method.
Why did my resin turn yellow around the flower?
This is usually caused by a chemical reaction between the flower’s residual acids or oils and the resin hardener. It’s a sign the flower was not fully dried or contained natural compounds incompatible with that resin brand. Always test with a single small flower first.
The Bottom Line
Dry fast for color. Choose silica gel for form, pressing for art, and resin for permanence. Your tools are simple: airtight containers, desiccants, and patience measured in days, not weeks. Start with perfect blooms, control the environment, and seal the deal with proper storage. That’s the difference between a dusty keepsake and a vibrant heirloom.
