
How to Store Baked Banana Bread: Expert Tips for Freshness
This post contains affiliate links. As an Amazon Associate, we earn from qualifying purchases.
Store baked banana bread at room temperature for 2-3 days in an airtight container, refrigerate for up to 2 weeks if your kitchen is warm or humid, or freeze slices for 2-3 months. The choice hinges on one trade-off: refrigeration and freezing prevent mold but accelerate staling, while room temperature keeps texture soft but risks spoilage after day 4.
That trade-off is the whole game. Staling isn’t just dryness; it’s starch molecules locking into a rigid crystal structure, a process called retrogradation that happens fastest around 40°F. Mold needs humidity and warmth, and a 2021 study clocked its appearance on pan wheat bread at room temperature as early as day 4. Your kitchen’s actual conditions decide which enemy you’re fighting.
What follows: the exact timelines and wrapping materials for each method, drawn from extension service guidelines and a peer-reviewed food science study. You’ll get the step-by-step for room temperature, the fridge, and the freezer, plus the one mistake that turns a fresh loaf into a science experiment in under 36 hours.
Key Takeaways
- Room temperature storage is best for texture but has a hard ceiling: mold appears as early as day 4 in a sealed plastic bag.
- Refrigeration at 32-40°F prevents mold but makes staling (starch retrogradation) 2.7 times faster than at room temperature.
- Freezing at 0°F is the only method that pauses both staling and spoilage, but you must wrap slices tightly in plastic wrap followed by foil to prevent freezer burn.
- Your local humidity decides the method. If your kitchen stays above 75°F or 60% humidity, skip room temperature and go straight to the fridge or freezer.
- Never, ever store warm bread in a sealed container. The trapped steam creates a condensation bath that promotes microbial growth within a day.
The Room Temperature Method (and Its Hard Limit)
This is the default for a reason. A fresh, fully cooled loaf in an airtight container delivers the ideal soft crumb and moist texture for about 2-3 days. The clock starts ticking the moment you seal it.
The container is non-negotiable. A loose cover won’t cut it. You need a true airtight seal, think Rubbermaid Brilliance, Pyrex Ultimate, or a similar latching container. This barrier slows moisture loss and keeps other kitchen odors out. For an extra layer of protection, line the container with a sheet of parchment paper before placing the loaf inside. The paper acts as a buffer, absorbing any residual surface moisture without drying out the crumb.
Common mistake: Sealing a warm loaf. The residual heat creates steam, raising the internal humidity to nearly 100%. That’s a prime environment for Aspergillus niger and other molds, which can establish visible growth within 36 hours. Always cool your banana bread completely on a wire rack, this usually takes 2-3 hours, before even thinking about storage.
But here’s the limit, straight from a 2021 study published in Foods: researchers stored pan wheat bread in low-density polyethylene (LDPE) plastic bags at room temperature (about 72°F). Visual mold growth was observed from day 4 in one sample and day 5 in others. The spoiling organism was identified as Penicillium spp. This gives you a clear, science-backed deadline.
| Storage Scenario | Ideal Duration | Risk If Exceeded |
|---|---|---|
| Airtight container, cool/dry kitchen | 2-3 days | Texture remains perfect; low mold risk. |
| Plastic bag alone, any kitchen | ≤ 3 days | High humidity inside bag promotes rapid mold growth after day 4. |
| Uncovered on counter | 1 day | Crust dries out, crumb firms up, attracts dust and insects. |
Why does mold win so fast at room temperature? It’s a function of water activity. Fresh banana bread has a high water activity (around 0.92-0.94), which is well above the threshold many molds need to thrive. Sealing it in any container, but especially a non-breathable plastic bag, traps humidity. That trapped humidity doesn’t cause staling, but it does create a spa day for spores already present on the bread’s surface. This is why proper bread storage always emphasizes a balance, containing moisture without incubating microbes.
Bottom line: Room temperature is for short-term enjoyment. Plan to eat the loaf within 72 hours, and use a proper airtight container, not just a bag. If your local climate is humid or your kitchen is warm, this method’s window shrinks to maybe two days.
When to Choose the Refrigerator (It’s a Trade-Off)
Refrigeration is your answer to the mold countdown. According to the UC ANR safe food storage guide, storing baked quick breads like banana bread in the fridge is recommended to prevent mold growth, with a guideline of 2-3 weeks. That same source, however, delivers the crucial caveat: refrigeration “will increase staling due to moisture reduction.”
Staling in the fridge isn’t about drying out; it’s about molecular restructuring. The starches in the bread, amylose and amylopectin, retrograde, or recrystallize, much faster at temperatures just above freezing than they do at room temperature. This process reorganizes the bread’s internal architecture from a soft gel to a rigid, crystalline network. The bread feels harder and tastes stale, even if its total water content hasn’t changed much.
Where this goes sideways: Putting an unwrapped loaf directly on the fridge shelf. The circulating, dry air will suck moisture from the surface at an alarming rate, giving you a brick-like crust in under 24 hours. Always wrap first.
So, when does the trade-off make sense? Follow this decision tree: 1. Your kitchen is hot or humid. If the temperature consistently stays above 75°F (24°C) or the humidity exceeds 60%, room temperature storage is too risky. The fridge is your safer bet. 2. You know you won’t eat it all in 3 days. If you’re a smaller household, the fridge extends your edible window, even if the texture changes. 3. Your recipe includes perishable add-ins. If you’ve added cream cheese swirls, fresh fruit chunks, or a custard layer, refrigeration is mandatory for food safety, not just quality.
The right way to refrigerate: – Let the bread cool completely. – Wrap the whole loaf or individual slices tightly in plastic wrap, pressing it directly against all surfaces to form an airtight seal. – Place the wrapped loaf inside a secondary barrier, a resealable plastic bag or an airtight container. This double layer minimizes moisture loss and prevents your loaf from absorbing refrigerator odors. – Store it on a middle shelf, not in the door (temperature fluctuates) or the crisper (too humid).
You regain some of that lost texture by bringing a slice to room temperature for 30 minutes before eating, or by giving it a quick 15-second warm-up in the microwave. It won’t taste just baked, but it will be palatable and safe for up to two weeks. For more on organizing this, see our guide on the best kitchen bread storage locations.
Freezing for Long-Term Storage (The Pause Button)
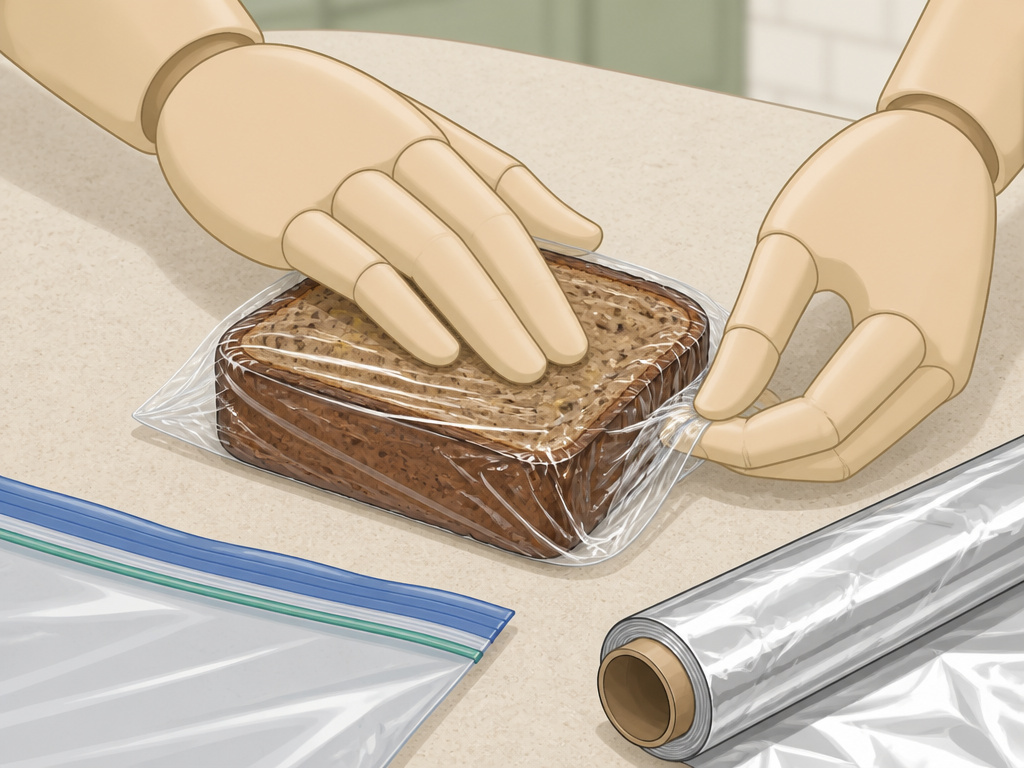
Freezing is the only technique that effectively pauses both staling and microbial growth. The University of California food safety publication lists baked quick breads with a freezer life of 2-3 months at 0°F. This is your best move for batch baking, impulse gifting, or simply not wasting a single slice.
The enemy here isn’t mold; it’s freezer burn. Freezer burn occurs when water sublimates, jumps directly from ice to vapor, out of the bread and then re-condenses as frost elsewhere. This leaves the bread’s surface dry, tough, and off-tasting. Prevention is all about airtight, vapor-proof wrapping.
Follow this sequence for a perfect freeze: 1. Cool completely. Never freeze a warm loaf. 2. Slice it. Freezing the whole loaf means thawing the whole loaf. Cut it into portions first. 3. Wrap tightly in plastic wrap. This is the critical, form-fitting layer. Wrap each slice individually, or wrap the entire loaf, pressing out all air pockets. 4. Add a fortress layer. Place the plastic-wrapped bread into a heavy-duty freezer bag, squeezing out all the air before sealing. For even better protection, wrap the plastic-covered loaf in a layer of aluminum foil before bagging it. 5. Label and date. Use a piece of masking tape and a permanent marker. You will forget what it is and when you froze it.
This method aligns with the best practices for freezing bread generally. When you’re ready to eat, you have options. For immediate consumption, toast a frozen slice directly in a toaster oven or air fryer, the heat denatures the ice crystals and re-gelatinizes the starches. For a room-temperature slice, move it from the freezer to the fridge for 8-12 hours (this is the ideal method for thawing frozen bread), then let it sit on the counter for an hour. Never thaw at room temperature for more than 2 hours; that’s the danger zone where surface thawing outpaces internal thawing, creating a condensation risk.
The Science Behind the Decisions: Staling vs. Spoilage
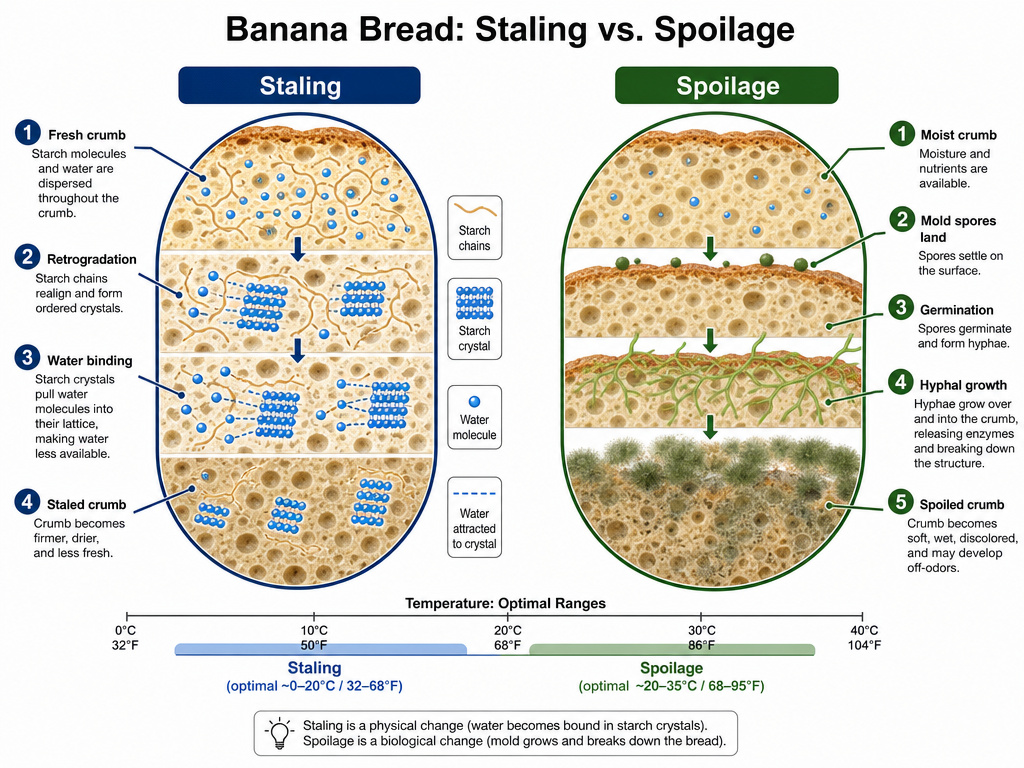
Most storage advice treats “going bad” as one thing. It’s not. You’re managing two distinct, competing processes: staling (a physical change) and spoilage (a microbial invasion). Knowing the difference changes how you choose your method.
Staling (Starch Retrogradation): This is what makes bread hard and crumbly. As bread cools, the gelatinized starch molecules begin to realign into an ordered, crystalline structure. This process pulls water molecules into the new crystal lattice, making the crumb seem dry even though the water is still there, it’s just trapped and unavailable. Crucially, this retrogradation happens fastest at temperatures just above freezing, around 32-40°F. That’s why refrigeration accelerates staling. Freezing, however, locks the starch molecules in place, pausing the process entirely.
Spoilage (Microbial Growth): This is what makes bread moldy. Molds like Penicillium and Aspergillus are ever-present spores. They need three things to grow: food (your banana bread’s sugars), warmth (room temperature is ideal), and moisture. A sealed plastic bag at room temperature provides a brutal combination: plenty of food and a humidity level around 90%. The 2021 Foods study showed this leads to visible colonies in 4-5 days. Refrigeration and freezing work by removing one of those factors: warmth. At 40°F, mold growth slows to a crawl; at 0°F, it stops.
The takeaway? Your storage method is a direct response to which process you’re most worried about. In a cool, dry climate for a few days, staling is your minor concern. In a hot, humid climate, spoilage becomes the immediate threat, and you accept faster staling as the cost of safety. This scientific framework supports all general bread storage methods.
Choosing Your Storage Gear: Containers, Bags, and Wraps

The right tool doesn’t just hold your bread; it manages the microclimate around it. Here’s what to use and when.
- For Room Temperature (1-3 days): An airtight plastic or glass container is king. The lock-down seal is what matters. Brands like Rubbermaid or OXO are reliable. The container should be just large enough for the loaf to fit without excessive empty space, which would fill with humid air.
- For Refrigeration (1-2 weeks): Your primary wrapper should be plastic cling film (e.g., Glad Press’n Seal). Its clinginess forms a true second skin. Then, place the wrapped loaf inside a reusable container or a reusable bread bag to block odors. Avoid standard bread boxes for fridge storage; they’re too air-permissive.
- For Freezing (1-3 months): This is a multi-layer defense. Start with plastic cling film, then add a barrier of aluminum foil, and finally seal everything inside a heavy-duty freezer bag (like Ziploc Freezer bags). For a greener option, reusable beeswax bags can work for shorter freezer stints (under a month), but ensure they are rated for freezer use and are completely sealed.
| Tool | Best For | Why It Works | A Specific Product |
|---|---|---|---|
| Airtight Container | Room temperature storage | Creates a stable, low-airflow environment, slowing moisture loss. | Rubbermaid Brilliance 9-cup container |
| Plastic Cling Wrap | Refrigeration & Freezing (first layer) | Forms a direct, airtight seal against the bread’s surface, blocking vapor transfer. | Glad Press’n Seal |
| Aluminum Foil | Freezing (secondary layer) | Provides an excellent vapor barrier and light shield, protecting against freezer burn. | Reynolds Wrap Heavy Duty |
| Freezer Bag | Freezing (final layer) | Adds a mechanical seal and protection from physical damage and odors. | Ziploc Freezer Gallon Bags |
| Beeswax Bag | Short-term room temp or freezer (eco-choice) | Breathable yet protective wax coating; reusable. | Abeego Beeswax Food Wrap or similar |
Investing in dedicated bread storage containers or a set of reusable bread bags turns the right method from a chore into a simple habit. The gear does the work of balancing humidity and airflow for you.
Frequently Asked Questions
Can I store banana bread in a bread box?
Not recommended for banana bread. Traditional wooden bread boxes are designed for crusty, yeast-based loaves that benefit from a bit of airflow. Banana bread’s high moisture content and tender crumb need a sealed environment to stay soft and prevent surface mold. A bread box’s semi-permeable walls can create a damp, still pocket of air, the exact condition the Foods study linked to faster spoilage.
Why did my refrigerated banana bread get hard so fast?
You’re experiencing accelerated staling, or starch retrogradation. At refrigerator temperatures (32-40°F), the starch molecules in the bread reorganize into a crystalline structure much more rapidly than at room temperature. This makes the bread firm and dry-feeling. It’s not that moisture evaporated; it’s that the moisture is now locked inside the new starch crystals. Tight wrapping mitigates this, but it’s an unavoidable trade-off for extended, mold-free storage.
How can I tell if banana bread has gone bad?
Use your senses in this order: 1. Sight: Look for any fuzz (usually white, green, or blue), even in tiny spots. Mold roots penetrate deep, so the entire loaf is compromised. 2. Smell: A sour, alcoholic, or distinctly “off” smell indicates fermentation or bacterial spoilage. 3. Touch: If it’s excessively sticky or slimy on the surface, it’s time to toss it. 4. Taste: If it passes the first three tests but tastes unpleasantly sour or bitter, don’t eat more.
Does freezing change the flavor of banana bread?
Properly frozen banana bread retains most of its flavor. The main risk is flavor loss from oxidation or absorption of freezer odors, which is why the double- or triple-wrapping is critical. Some volatile aromatic compounds may diminish slightly over very long storage (2+ months), but for the typical 1-3 month freezer life, the difference is minimal, especially if you toast the thawed slice.
Is it better to freeze banana bread as a whole loaf or sliced?
Slice it first. Freezing the whole loaf means you must thaw and potentially re-freeze the entire thing every time you want a slice, which degrades quality through repeated temperature cycling and ice crystal formation. Slicing before freezing lets you grab exactly what you need. Just separate slices with parchment paper before the final bagging so they don’t freeze together.
Before You Go
Your banana bread didn’t survive the bake just to be lost to bad storage. The rule is simple: match the method to your timeline and your kitchen’s climate. For a weekend treat, an airtight container on the counter is perfect. For a humid summer week, wrap it tight and use the fridge. To keep a second loaf for next month, slice, wrap, and freeze it without a second thought.
The goal isn’t just preventing waste; it’s making sure every slice, whether eaten today or two months from now, is as good as your baking deserves. Pick the right tool for the job, respect the timelines, and you’ll never face a stale, moldy loaf again.
