
The Complete Guide to Making Freezer Breakfast Burritos
This post contains affiliate links. As an Amazon Associate, we earn from qualifying purchases.
To make freezer breakfast burritos, you match three things: ingredient dryness, a tight wrap, and a controlled freeze. Cool all cooked fillings to room temperature, use room-temperature tortillas, wrap each burrito individually in parchment paper and foil, and freeze flat in a single layer. They keep for up to 3 months and reheat from frozen in 2-3 minutes.
The “dryness” clause is the whole game. Steam trapped inside the wrap turns to ice crystals, which melt into a soggy tortilla on reheating. Every step from cooling to wrapping exists to lock moisture out.
What follows: the ingredient swaps that guarantee a dry fill, the wrapping method that stops freezer burn cold, and the reheating times that bring back the crisp edge without a microwave mush.
Key Takeaways
- Cool every cooked component, eggs, meat, veggies, for at least 15-20 minutes before assembly. Hot fillings create steam, and steam creates a soggy, torn tortilla after freezing.
- Use large, burrito-size flour tortillas at room temperature, never warmed. A warm tortilla is more likely to rip during the tight rolling required for freezing.
- Wrap first in parchment paper, then in aluminum foil. The parchment prevents sticking; the foil blocks air and provides structure. Store them in a labeled freezer bag or airtight freezer-safe container.
- For best quality, thaw overnight in the fridge before reheating. For speed, reheat from frozen: microwave for 2-3 minutes or bake at 350°F for 12-15 minutes.
- Avoid watery vegetables like fresh salsa, tomatoes, or mushrooms. If using peppers and onions, sauté them first and drain on paper towels.
Why Most Homemade Freezer Burritos Fail
You scramble eggs, brown sausage, and roll everything up with hope. A month later, you pull a frost-bitten, soggy log from the freezer. The tortilla tears, revealing a watery, separated filling.
The failure isn’t random. It follows a predictable path: moisture migration. Liquid from warm fillings turns to vapor, hits the cold tortilla, and condenses. In the freezer, that moisture becomes ice. Upon reheating, the ice melts before the filling heats through, leaving a wet, gummy wrapper. The fix is a dry assembly line. Every ingredient must enter the tortilla at room temperature and with as little free water as possible. This isn’t about flavor, it’s about physics.
The part nobody mentions: A burrito wrapped with warm fillings will weep water into the tortilla within 48 hours in the freezer. By week two, the tortilla softens from the inside out, and reheating turns it to mush.
The Dry-Fill Rule: Ingredients That Freeze
Your filling choices decide whether you get a burrito or a sponge. The goal is maximum flavor with minimal moisture.
The Protein Base. Scrambled eggs are standard, but you must cook them dry. Pull them from the heat just as they set, not when they’re glossy. For a vegan swap, a pressed and crumbled firm tofu scramble works, but squeeze the block in a towel first. Pre-cooked sausage or bacon should be well-drained on paper towels after cooking.
Vegetables Are the Usual Suspects. Bell peppers, onions, and spinach need pre-cooking. Sauté them until soft and any released liquid evaporates. Let them cool on a plate lined with paper towels. Never use raw veggies, they release too much water as they freeze and thaw.
Potatoes and Beans. Pre-cooked diced potatoes (roasted or pan-fried) add heartiness. Canned beans must be rinsed and drained thoroughly. A salad spinner is your best tool here.
The Cheese Factor. Shredded cheddar, Monterey Jack, or a Mexican blend freezes well. Avoid fresh cheeses like queso fresco or cottage cheese, their high moisture content turns grainy.
What to Leave Out. Fresh salsa, sour cream, avocado, lettuce, or raw tomato. These become watery or brown. Add them after reheating.
| Ingredient | Prep for Freezing | Risk If Skipped |
|---|---|---|
| Eggs | Cook until just set, no liquid. Cool completely. | Weep water, make tortilla soggy. |
| Peppers & Onions | Sauté until soft, drain on paper towels. | Release water, cause ice crystals. |
| Potatoes | Cook until tender, cool to room temp. | Can become mushy or grainy. |
| Canned Beans | Rinse, drain, spin dry. | Add starchy, thick moisture. |
| Shredded Cheese | Use directly from bag. | Generally safe; binds filling. |
The 7-Step Assembly Line (and the One Step Nobody Skips)
This is a factory job, not a leisurely brunch. Set up a station: cooled fillings in bowls, tortillas stacked, wrapping materials ready.
- Lay the foundation. Place a room-temperature, burrito-size flour tortilla on a clean surface. Do not warm it, warm tortillas tear easier when pulled tight.
- Add fillings in the center. Keep everything in the middle third, leaving a 2-inch margin at the top and bottom. Maximum filling is about 1.5 cups total. Overstuffing is the main cause of busted wraps.
- Fold the sides. Lift the left and right edges and fold them inward over the filling. They should almost meet in the center.
- Roll from the bottom. Fold the bottom flap up and over the filling, tucking it tightly under the filling. Use your fingers to hold the tucked-in sides.
- Roll forward firmly. Continue rolling the burrito away from you, keeping tension on the sides. The final seam should be on the bottom.
- The non-negotiable step: rest the burrito seam-side down for 5 minutes. This lets the tortilla’s own moisture seal the seam. Skipping this lets the burrito unravel in the freezer bag.
- Wrap immediately. Proceed to the wrapping stage below before the burrito loses its shape.
Fold the sides, tuck the bottom, roll with tension. The burrito should feel firm, not loose. If it feels soft, you didn’t tuck tightly enough, unroll and try again. A loose roll guarantees a falling-apart reheating experience.
Parchment, Foil, or a Vacuum Seal?
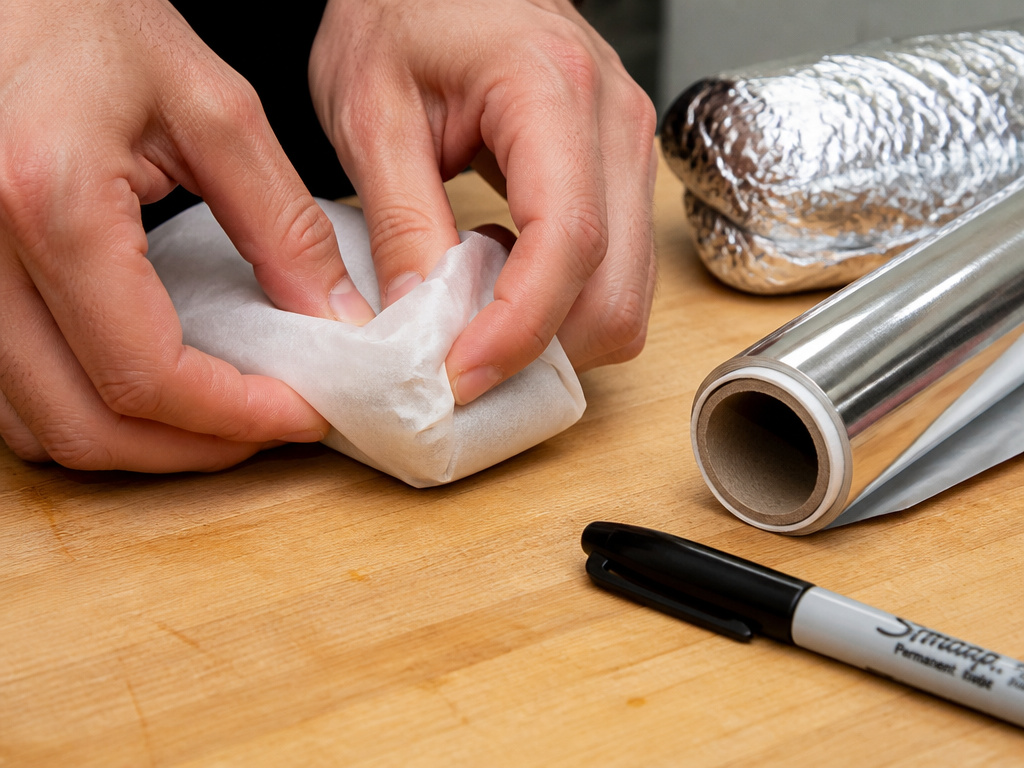 The wrap is your burrito’s armor against air and ice. Each layer has a job.
Parchment Paper First. Wrap the burrito snugly in a sheet of parchment paper, twisting the ends. This creates a non-stick barrier so the tortilla doesn’t fuse to the foil. It’s the difference between a clean unwrap and tearing off half your tortilla.
Aluminum Foil Second. Wrap the parchment-wrapped burrito tightly in foil. This layer blocks air, prevents freezer burn, and gives the package structure. Label the foil with the contents and date using a permanent marker.
For Long-Term Storage: The Vacuum Seal. If you have a vacuum sealer, place the foil-wrapped burrito into a vacuum bag and seal it. This removes nearly all air and can extend the quality life significantly. It’s the best defense against freezer flavor transfer.
Storage Protocol. Place wrapped burritos in a single layer on a baking sheet and freeze for 2 hours. This “flash freezes” them solid so they don’t stick together. Then, transfer them to a large, labeled freezer bag or meal prep container. They keep for up to 3 months for best quality.
| Wrap Method | Best For | Freezer Life (Best Quality) |
|---|---|---|
| Parchment + Foil | Standard home freezing, easy reheating. | 3 months |
| Vacuum Seal (over foil) | Maximizing shelf life, preventing burn. | 6+ months |
| Foil Only | Short-term storage (under 1 month). | 1 month |
How to Reheat Without the Sog
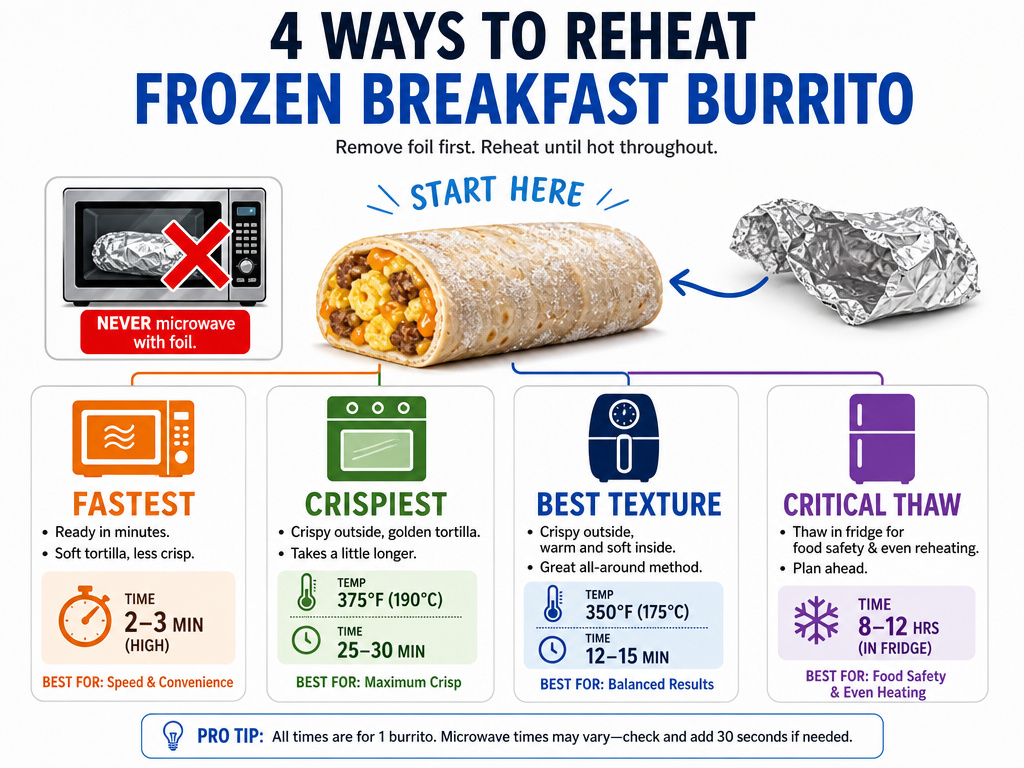 You can go from freezer to plate in under five minutes. The method changes the texture.
The Microwave (Fastest). Remove foil but keep the parchment paper on. Microwave on high for 2-3 minutes. Let it rest for 1 minute in the parchment, the residual heat finishes the job and the parchment soaks up excess steam. This is your weekday morning move.
The Oven or Toaster Oven (Crispiest). Preheat to 350°F. Remove all wrapping. Place burrito directly on the oven rack or a sheet. Bake for 12-15 minutes if thawed, or 25-30 minutes from frozen, flipping halfway. The direct heat gives you a crisp, toasted exterior.
The Air Fryer (Best Texture). Preheat to 350°F. Remove foil, keep parchment. Cook from frozen for 10-12 minutes, flipping once. The circulating air revives the tortilla’s texture better than any other method.
The Critical Thaw. For the absolute best result, move a burrito from the freezer to the fridge the night before. A fully thawed burrito reheats more evenly, eliminating cold spots in the middle while the edges burn. This is the method for freezing soup and freezing tomatoes too, consistent temperature change matters.
Where this goes sideways: Microwaving a frozen burrito in its foil wrapper. The foil arcs and sparks, and the burrito steams in its own moisture, guaranteeing a soggy mess. Always remove the foil first.
Customize Your Batch
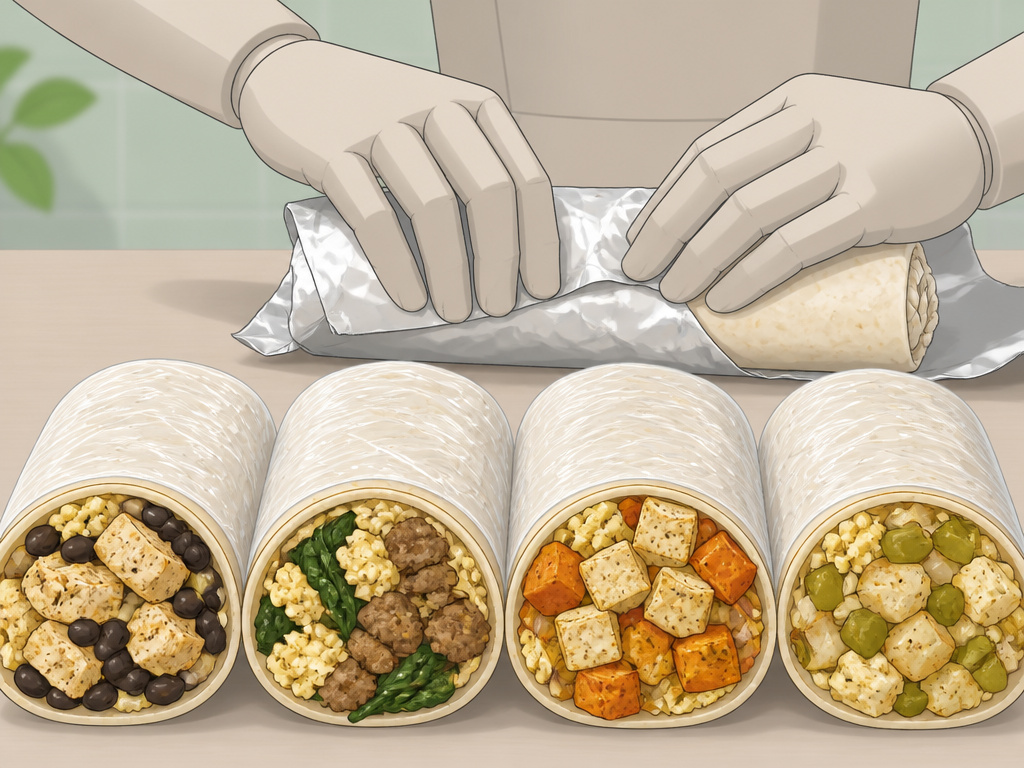 The basic formula is a canvas. Once you master the dry-fill technique, you can build any flavor profile.
Southwestern. Use seasoned ground turkey, black beans, corn, diced green chiles, and pepper Jack cheese. Add a sprinkle of cumin to the eggs.
Italian. Swap in cooked Italian sausage, sautéed spinach, and mozzarella cheese. Add a spoonful of marinara sauce after reheating.
Vegan Power. Use a firm tofu scramble with turmeric and nutritional yeast, roasted sweet potatoes, black beans, and vegan cheddar.
Green Chile & Potato. A classic. Use diced roasted potatoes, roasted green chiles, and a simple cheese blend.
The principle is constant: cook wet ingredients dry, cool everything, and wrap it tight. This technique works for preparing freezer jam or freezer corn, managing water content is the universal key to frozen food quality.
Frequently Asked Questions
Can you freeze breakfast burritos with cheese?
Yes, shredded cheeses like cheddar, Monterey Jack, and Mexican blends freeze and reheat well. The fat content helps them melt smoothly again. Avoid freezing burritos with fresh, high-moisture cheeses like queso fresco or goat cheese, as they can become grainy. For more details, see our guide on freezing cheese.
How long do homemade breakfast burritos last in the freezer?
For best quality and flavor, consume them within 3 months. While they remain safe to eat longer, the tortilla can develop freezer burn and the fillings may lose texture. Using a vacuum sealer can help extend this period.
Is it better to freeze burritos before or after cooking?
You fully cook all the components (eggs, meat, veggies) before assembling and freezing. The freezing process is for storage only. You are not freezing them to cook later; you are freezing a fully cooked, ready-to-reheat meal.
Why did my burrito tortilla get soggy after freezing?
The most common cause is assembling with warm fillings. The steam condenses inside the wrap and turns to ice. Another cause is using ingredients with high water content, like fresh salsa or under-drained vegetables. Ensuring everything is cool and dry before assembly prevents this.
Can I use aluminum foil instead of parchment paper?
You can, but the tortilla may stick to the foil, especially if reheated in an oven. For best results, use parchment paper as a non-stick liner first, then foil as an airtight outer layer. This is the same logic behind using reusable freezer bags, a barrier that prevents adhesion.
The Bottom Line
A perfect freezer breakfast burrito is a lesson in moisture management. Cool your fillings completely. Roll them tightly in room-temperature tortillas. Armor them with parchment and foil. Freeze them flat and fast.
The reward is 3 months of weekday mornings solved. Grab one, microwave it for three minutes, and you have a hot, hearty breakfast with no dishwashing. It turns a chaotic morning into a simple routine. Start with a basic batch of eggs, sausage, and cheese. Once you trust the process, the variations are endless.
