
How to Preserve Cherry Tomatoes: Freezing, Canning, Drying
This post contains affiliate links. As an Amazon Associate, we earn from qualifying purchases.
To preserve cherry tomatoes, you have three proven paths: freeze them whole or roasted, can them in a boiling water bath with added acid, or dry them in a dehydrator. The method dictates the final texture and best use. Frozen tomatoes turn soft and are ideal for cooked dishes. Canned tomatoes retain a firmer bite for sauces. Dried tomatoes concentrate flavor for snacks and garnishes.
The choice between these methods hinges on your kitchen tools and how you plan to cook later. Freezing is the simplest, requiring only bags and a freezer. Canning demands specific jars and a large pot, but yields shelf-stable results. Drying needs time and consistent low heat.
What follows is a breakdown of each technique, with the exact measurements, headspace rules, and safety steps drawn from university extension research. You’ll see where the official guides diverge from popular shortcuts, and which mistakes ruin a whole batch before it even hits the jar.
Key Takeaways
- Acidify for canning. Add 1 tablespoon of bottled lemon juice per pint jar to ensure safe pH levels, even for acidic cherry tomatoes.
- Leave the right headspace. Freezing needs 1 inch; canning requires 1/2 inch. Overfilling prevents a proper seal and causes spoilage.
- Never can tomatoes from dead vines. Frost-killed or diseased plants can have altered acidity, making home canning unsafe.
- Freezing changes texture. Thawed cherry tomatoes will be mushy, perfect for soups and sauces, not for salads.
- Dry until leathery. In a dehydrator, cherry tomatoes take 3.5 to 4.5 hours at 135°F. They should be pliable but not wet.
The 3 Main Methods for Preserving Cherry Tomatoes
Each preservation method transforms cherry tomatoes differently. Freezing bursts cell walls with ice crystals, yielding a soft product. Canning uses heat to sterilize and seal, maintaining more structure. Drying removes water entirely, concentrating sugars and flavor.
Your goal selects the tool. Want a ready ingredient for winter chili? Freeze them. Need pantry-stable tomatoes for quick sauces? Can them. Looking for an intense, chewy garnish? Dry them.
For safe canning of tomatoes, the Texas A&M canning guide mandates adding acid to each jar, 2 tablespoons of bottled lemon juice per quart, regardless of the tomato’s perceived acidity. This step is non-negotiable for preventing bacterial growth.
Freezing Cherry Tomatoes (The Easiest Route)
Freezing cherry tomatoes requires almost no prep and no special equipment beyond freezer bags or containers. It’s the fastest way to lock in summer flavor. The trade-off is texture. Thawed, they become soft and release a lot of liquid. This makes them useless for fresh eating but excellent for any application where they’ll be cooked down.
You have two solid approaches: freeze them raw and whole, or roast them first. The raw method is a five-minute job. The roasting method adds 30 minutes of hands-off oven time but delivers a deeper, caramelized flavor that shines in pasta and stews.
The Raw Freeze
- Wash and dry the tomatoes. Remove any stems.
- Spread them in a single layer on a parchment-lined baking sheet. This “flash freezing” step prevents them from clumping into a solid tomato brick.
- Place the tray in the freezer for 2-3 hours, until the tomatoes are solid.
- Transfer the frozen tomatoes to a labeled freezer bag or container. Squeeze out excess air and seal.
The Roasted Freeze
This technique mirrors the traditional Italian method for preserving flavor. Halve the tomatoes, toss with olive oil and salt, and roast at 300°F for about 45 minutes until they slump and caramelize at the edges. Let them cool completely before packing.
Packing for the Freezer
Whether raw or roasted, proper packing prevents freezer burn. The freezing tomatoes in bags technique is reliable. Use heavy-duty freezer bags or rigid containers. Leave 1 inch of headspace to allow for expansion as the contents freeze. This headspace rule is consistent across extension guides from Clemson to Michigan State.
Common mistake: Packing warm roasted tomatoes directly into a bag. The steam created will form ice crystals inside the bag, leading to soggy, frost-covered tomatoes. Always cool to room temperature first.
For the roasted method, you can also pack them in olive oil in a small jar, ensuring the tomatoes are fully submerged. This keeps for 3-4 months in the freezer and makes a fantastic ready-to-use condiment. For other long-term projects, a vacuum sealer removes nearly all air and dramatically extends quality.
Canning Cherry Tomatoes Safely
Canning creates a shelf-stable product, but it introduces specific safety protocols. The primary risk with tomatoes is Clostridium botulinum, a bacterium that can thrive in low-acid, anaerobic environments. Even though tomatoes are acidic, their pH can vary enough to be unsafe.
The universal fix from every extension service is acidification. You must add bottled lemon juice or citric acid to each jar before processing. Do not use fresh lemon juice, its acidity is variable.
| Jar Size | Bottled Lemon Juice | Citric Acid | Purpose |
|---|---|---|---|
| Pint | 1 tablespoon | 1/4 teaspoon | Lowers pH to a safe, stable level |
| Quart | 2 tablespoons | 1/2 teaspoon | Prevents bacterial spore germination |
The Canning Process
- Prepare the tomatoes. Wash them. You can leave cherry tomatoes whole, but piercing the skin with a toothpick prevents them from exploding during processing.
- Prepare the jars. Wash jars and lids in hot, soapy water. Keep jars hot until ready to fill.
- Add acid. To each hot jar, add the required amount of lemon juice or citric acid.
- Pack the jars. Fill with raw tomatoes, pressing gently. Leave 1/2 inch of headspace.
- Add liquid. Cover tomatoes with boiling water, maintaining the 1/2-inch headspace.
- Remove air bubbles. Slide a plastic utensil around the inside of the jar to release trapped air.
- Wipe rims, apply lids. Wipe the jar rim with a clean, damp cloth. Apply lids and bands, tightening until fingertip-tight.
- Process. Process pints in a boiling water bath for 40 minutes (adjust for altitude). Use a jar lifter to remove jars and let them cool, undisturbed, for 24 hours.
Where this goes sideways: Using tomatoes from dead or frost-killed vines. The NDSU canning tomatoes PDF explicitly warns against this. The fruit’s acidity can become unpredictable, making even the acidification step unreliable.
Check seals after 24 hours. The lid should not flex when pressed. Store sealed jars in a cool, dark place. The USU tomato preservation guide notes that quality is best within a year, though they remain safe as long as the seal holds. This process is a core part of broader preserving vegetables knowledge.
Drying Cherry Tomatoes (For Concentrated Flavor)
Drying removes moisture, inhibiting microbial growth and intensifying flavor. It’s the best method if you want a chewy, sweet, shelf-stable snack or a powerful ingredient to rehydrate in oils and sauces.
A food dehydrator is the most reliable tool. Oven-drying is possible but less consistent. Sun-drying, while traditional, is not recommended for most home gardeners due to humidity and insect concerns.
Dehydrator Method
- Wash and halve the tomatoes. Place them cut-side up on dehydrator trays.
- Optional: Sprinkle lightly with salt or herbs.
- Dry at 135°F (57°C) for 3.5 to 4.5 hours. Tomatoes are done when leathery and pliable, with no visible moisture pockets.
Oven Method
- Place halved tomatoes on a parchment-lined baking sheet.
- Set oven to its lowest temperature (ideally 140-150°F). Prop the door open 2-3 inches with a wooden spoon to allow moisture to escape.
- Dry for 6 to 10 hours, checking periodically.
| Condition | Texture When Dry | Storage Life |
|---|---|---|
| Properly dried | Leathery, pliable | 6+ months in pantry |
| Under-dried (too moist) | Tacky, soft centers | Will mold within weeks |
| Over-dried | Brittle, crisp | Safe but less versatile |
Storing Dried Tomatoes
Cool tomatoes completely before packing. Store in an airtight container, like a mason jar, in a cool, dark pantry. For the longest shelf life, you can store them in the freezer. This approach to sun-dried tomato storage applies to all home-dried tomatoes.
Choosing Your Method: A Side-by-Side Look
Your kitchen, your time, and your future meals decide the winner. This table cuts through the noise.
| Method | Best For | Hands-On Time | Storage Life | Final Texture |
|---|---|---|---|---|
| Freezing | Soups, stews, sauces | 10-60 minutes | 8-12 months in freezer | Very soft, mushy when thawed |
| Canning | Pantry staples, sauces | 2-3 hours | 12+ months in pantry | Firm, holds shape |
| Drying | Snacks, oils, bread toppings | 5 min prep + wait | 6+ months in pantry | Chewy, leathery, concentrated |
Freezing vs. Canning
Freezing wins on simplicity and preserves a brighter, fresher tomato flavor. Canning wins on shelf stability and space, your pantry holds more than your freezer. If you lose power, the canned goods are fine. The freezing cherry tomatoes guide is your friend for the former; the broader preserving tomatoes resource covers the latter.
When to Dry
Choose drying when you have a dehydrator and want ingredient versatility. A pint of fresh cherry tomatoes reduces to a handful of intense dried gems. They reconstitute in warm water for sauces or can be packed in oil. It’s a specialized technique within the wider world of food preservation.
Essential Tools and Prep Work
Gathering the right tools before you start is what separates a smooth preservation day from a frantic, messy one. You don’t need everything for every method.
For All Methods:
- A large bowl for washing
- Sharp paring knife or serrated tomato knife
- Cutting board
- Clean kitchen towels
Method-Specific Tools:
- Freezing: Baking sheets, parchment paper, freezer bag soup-style heavy-duty bags or containers.
- Canning: Large stockpot or boiling water canner, canning jars (pints are ideal), lids and bands, jar lifter, funnel, bubble remover.
- Drying: Food dehydrator with mesh screens, or an oven that can maintain a low temperature.
The Non-Negiable Prep Step
Wash your tomatoes thoroughly under cool running water. Even homegrown tomatoes carry microbes from the garden. For canning, this is a critical safety step. For all methods, it’s simply good practice. After washing, stem the tomatoes. A small hole where the stem was is fine, but remove any large, tough core.
Troubleshooting Common Problems
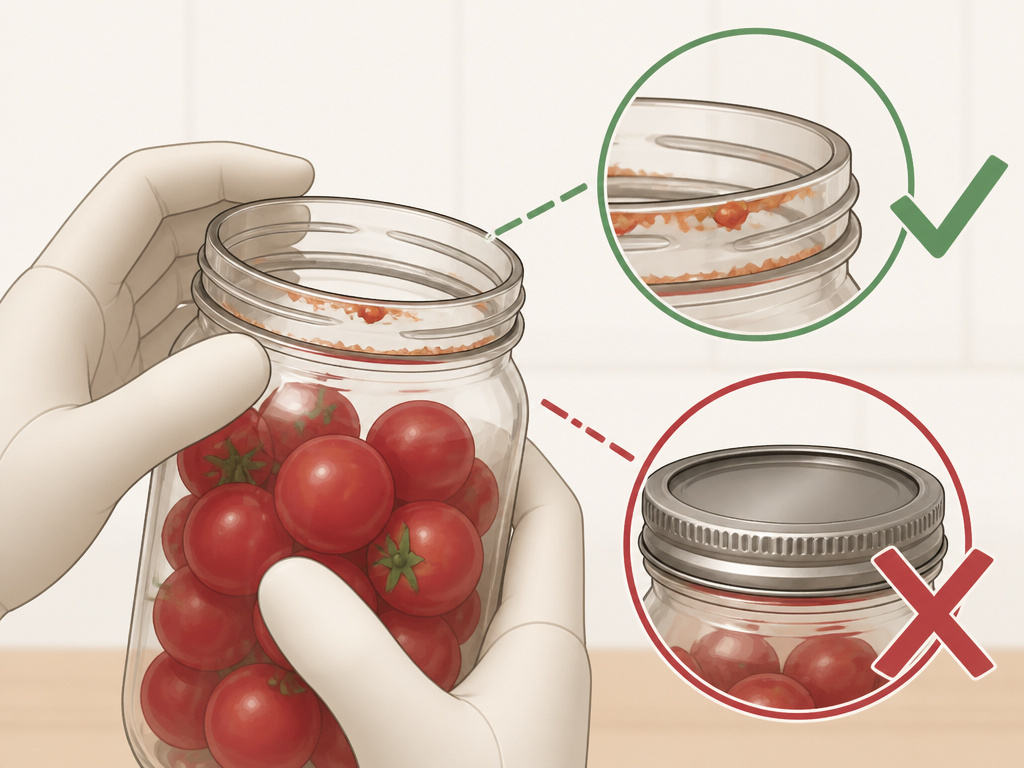 Preservation fails have clear causes. Here’s how to diagnose and fix them.
| Problem | Likely Cause | How to Fix / Prevent Next Time |
|---|---|---|
| Frozen tomatoes are a solid block | Not flash-freezing first | Always freeze on a tray before bagging. |
| Canned jar didn’t seal | Food residue on rim, over-tightened band | Wipe rim meticulously; tighten band fingertip-tight only. |
| Dried tomatoes developed mold | Insufficient drying time, stored while warm | Dry until leathery with no moisture pockets; cool completely before storing. |
| Canned tomatoes look cloudy | Minerals in hard water, starchy tomatoes | Use soft water if possible; it’s often a cosmetic issue, not safety. |
| Thawed tomatoes are watery | Natural result of cell rupture | Expect this; use them in recipes where liquid is welcome. |
Canning Safety Check
If a canned jar is unsealed, you have a 24-hour window to reprocess. Refrigerate the contents and eat within a few days, or empty the jar, wash it, use a new lid, and repeat the entire canning process. Do not simply re-boil the jar as-is. If you see any bulging, spurting liquid, or off odors after storage, discard the entire jar without tasting.
Frequently Asked Questions
Can you freeze cherry tomatoes whole without blanching?
Yes, you can freeze them whole without blanching. Wash, dry, and spread them on a tray to flash-freeze before transferring to a bag. Blanching is typically for peeling larger tomatoes, which isn’t necessary for cherries. They will be very soft when thawed.
How long do home-canned cherry tomatoes last?
Properly canned and sealed cherry tomatoes are safe to eat indefinitely if the seal remains intact. However, for best quality, color, texture, and flavor, plan to use them within 12 to 18 months. Store jars in a cool, dark place to maximize this quality period.
Do I need to peel cherry tomatoes before preserving?
No, peeling is not necessary for cherry tomatoes. Their skins are thin and tender, especially after cooking or freezing. For canning, you may puncture the skin with a toothpick to prevent splitting, but peeling is an unnecessary and tedious step.
What’s the best way to use frozen cherry tomatoes?
Use frozen cherry tomatoes directly from the freezer in cooked dishes where their softened texture blends in. They are perfect for soups, stews, chili, pasta sauces, and casseroles. Do not try to use them thawed in a salad or salsa.
Can I use dried cherry tomatoes like sun-dried tomatoes?
Absolutely. Home-dried cherry tomatoes are a perfect substitute for store-bought sun-dried tomatoes. Use them chopped in salads, blended into pesto, simmered in sauces, or rehydrated in warm water or oil. Their sweet, concentrated flavor is very similar.
Before You Go
Preserving cherry tomatoes boils down to matching a method to your goal. Reach for freezing when you need speed and have freezer space. Choose canning for pantry-ready, shelf-stable results. Opt for drying to create intense, chewy flavor bombs.
The one rule that applies to all three is to start with fresh, sound fruit and follow the tested guidelines from the extension services. Their measurements for acid and headspace aren’t suggestions, they’re the result of decades of safety testing. Whether you’re exploring preserving fruit in general or mastering the specifics of storing tomatoes fresh, that principle holds. A little precision during the preserving process delivers months of reliable flavor from a single harvest.
