
A Guide on How to Store Soup in Fridge to Keep It Safe
This post contains affiliate links. As an Amazon Associate, we earn from qualifying purchases.
To store soup in the fridge safely, you must cool it from cooking temperature to below 40°F within six hours, using a two-stage process. Divide hot soup into containers no deeper than three inches, chill it rapidly using an ice bath or by stirring in ice cubes, and refrigerate it once it reaches 75°F. Properly cooled and stored, soup lasts 3-4 days.
The six-hour clock starts the moment you turn off the heat. That’s the critical constraint most home cooks miss, and it changes how you handle a big pot. The goal isn’t just to get it into the fridge; it’s to race through the bacterial danger zone before toxins can form.
What follows: the specific temperature thresholds and timelines from university extensions, the container geometry that makes or breaks cooling speed, and the one restart option you have if the clock runs out. We’ll also cover why stacking soup containers is a mistake and how to handle thick chilis differently than broths.
Key Takeaways
- The entire cooling process, from 140°F to below 40°F, must finish within six hours to prevent bacterial toxin formation.
- Use containers no deeper than two to three inches. Depth is the single biggest factor in cooling speed.
- For broth-based soups, stir in ice cubes directly. For thick soups, place the sealed container in an ice bath.
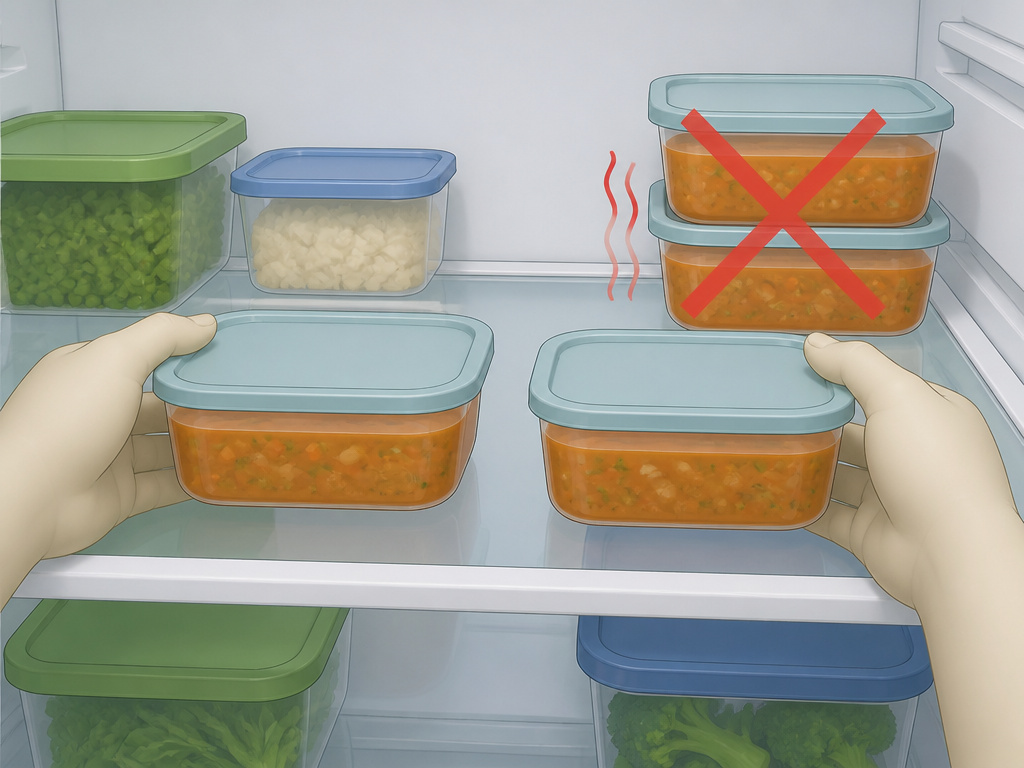
- Never stack warm containers in the fridge. Arrange them in a single layer on a shelf.
- If the soup hasn’t cooled to 70°F within two hours, reheat it to 165°F and restart the clock.
Why Cooling Speed Is Everything
Bacteria multiply fastest between 70°F and 120°F. A large pot of soup sitting at room temperature is a perfect incubator. The risk isn’t just spoilage; some bacteria produce heat-stable toxins that reheating won’t destroy.
The USDA danger zone is defined as 40°F to 140°F. Your job is to move the soup through that zone as quickly as possible. This isn’t a gentle suggestion. It’s the difference between a safe leftover and one that could cause illness, even if it looks and smells fine.
Common mistake: Letting a whole pot cool on the stove overnight. The center of that pot can stay in the danger zone for over eight hours, well past the safe limit. By morning, bacterial counts are high enough to risk food poisoning, regardless of a next-day reheat.
The science is straightforward: heat transfer. A deep pot has a small surface area relative to its volume. The soup at the edges cools while the center stays hot for hours. Dividing the soup into shallow, wide containers dramatically increases the surface area exposed to cool air or ice, slashing the cooling time.
The Two-Stage Cooling Method Explained
Michigan State University Extension specifies a two-stage cooling method for safety. This isn’t just best practice; it’s a measurable standard.
Stage 1: 140°F to 70°F within two hours.
This is the high-risk drop. Get the soup out of the upper danger zone fast. You can leave it on the counter for this stage, but only if you’ve already divided it into shallow containers. A full pot on the stove will fail this time limit.
Stage 2: 70°F to 40°F within four hours.
This stage usually requires active cooling. The soup needs to go into the refrigerator or be placed in an ice bath to hit the target. The total time for both stages must not exceed six hours.
| Stage | Temperature Range | Time Limit | Primary Method |
|---|---|---|---|
| 1 | 140°F → 70°F | ≤ 2 hours | Divide & counter-cool |
| 2 | 70°F → 40°F | ≤ 4 hours | Refrigerate or ice bath |
| Total | 140°F → 40°F | ≤ 6 hours |
If the soup hasn’t reached 70°F after two hours, you have one recourse. Reheat it to 165°F to kill any bacteria that may have started growing, then restart the cooling process immediately in better conditions, smaller containers, an ice bath. If it fails to reach 40°F within the total six-hour window, the Iowa State University food safety guide is clear: discard it.
Your Cooling Toolkit: Ice Baths, Cubes, and Containers
Your goal is maximum surface area and maximum cold contact. Here are the proven tools.
The Ice Bath Sink Method
Fill your sink with a couple of inches of cold water and ice. Place the pot or your sealed shallow containers directly into this bath. Stir the soup occasionally if it’s in a pot. The water conducts heat away far faster than air. This is the gold standard for rapid cooling and is explicitly recommended by the Ohio State University food safety resource.
The Ice Cube Stir-In
For broth-based soups, simply stir in a handful of clean ice cubes after turning off the heat. The ice melts, cools the soup instantly, and adds a little water to the broth. It’s fast, effective, and requires no extra equipment.
Container Geometry Is Non-Negotiable
The right storage containers make the process work. University extensions are specific: – Iowa State: “shallow containers, no more than two inches deep.” – Michigan State: “containers no deeper than 3 inches.”
A tall quart container might hold the same volume as two shallow ones, but it will take three times as long to cool. Use wide, flat containers like glass baking dishes or these best containers for freezing soup if you plan to freeze leftovers.
What About Just Putting the Pot in the Fridge?
Don’t. A hot pot raises the fridge’s internal temperature, endangering everything else inside, your milk, cheese storage, and cooked rice. It also slows the soup’s own cooling because the fridge compressor can’t keep up. Always cool first, then refrigerate.
Step-by-Step: From Pot to Fridge
 Follow this sequence to hit the six-hour target every time.
- Turn off the heat and immediately portion. Ladle the hot soup into your shallow containers, leaving a little headspace. Do this right away, the clock is ticking.
- Choose your cooling accelerator. For broths, stir in ice cubes. For chilis or chowders, place the sealed containers in an ice bath in the sink.
- Monitor the first drop. Use a food thermometer. You need to see 70°F within two hours. If you’re not close, move the containers to the ice bath.
- Transfer to the refrigerator. Once the soup is at or below 75°F, it’s safe to refrigerate. Place the containers on a shelf in a single layer, not stacked. Stacking insulates the bottom container and ruins cooling.
- Verify the final temperature. After four hours in the fridge, check that the soup is at or below 40°F. If your fridge temperature is correctly set at 37°F, this should be easy.
Where this goes sideways: Stacking containers straight from the ice bath. The bottom one sits in a pocket of warm air, its cooling stalls, and it can linger in the danger zone while the top one chills. That’s how one portion spoils and contaminates the rest.
Label each container with the contents and the date. A piece of masking tape and a marker work perfectly. This is part of a good how to organize a fridge system and prevents the “what is this and how old is it?” mystery.
How Long Does Soup Last in the Fridge?
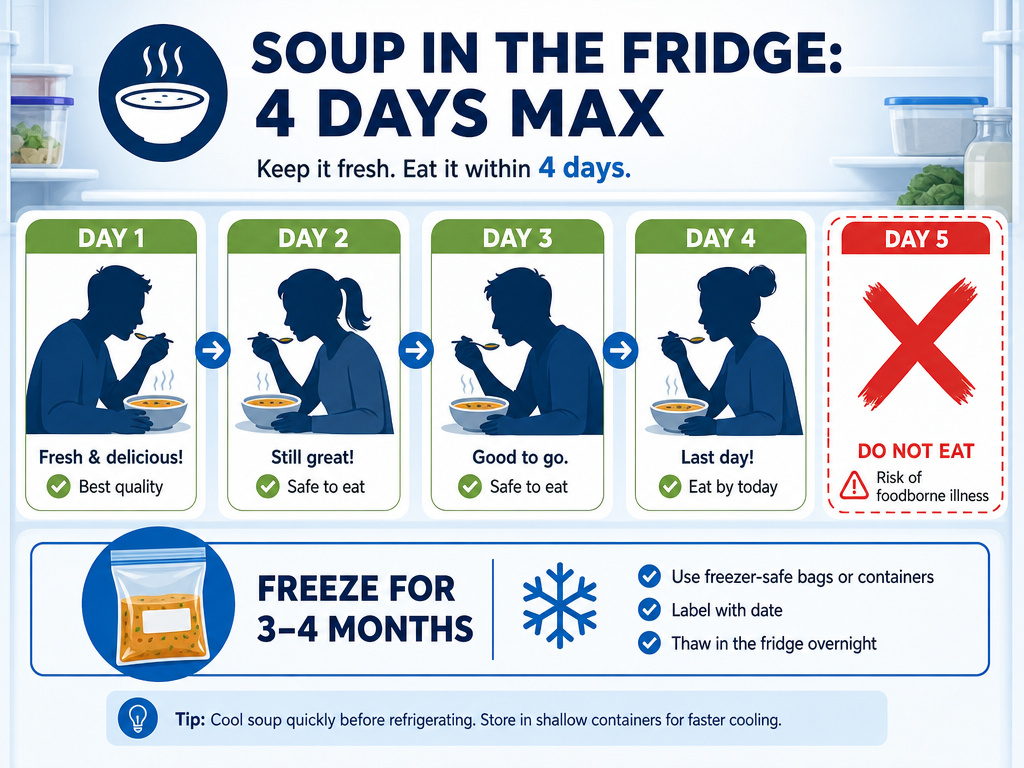 The consensus from Iowa State, Ohio State, and the USDA is consistent: 3 to 4 days.
That count starts the day you finish cooking and properly cool the soup, not the day you eat the first bowl. Day 1 is cooking day. By the end of Day 4, you should have eaten it, frozen it, or discarded it.
Some robust soups with high acid or salt content might seem fine on Day 5, but the 4-day rule is your safety buffer. Pathogenic bacteria don’t always produce obvious smells or visual cues. Adhering to the limit is the simplest way to manage risk.
If you won’t eat it within four days, freezing soup is your best option. Pour cooled soup into freezer bags, lay them flat to freeze, and they’ll keep for 3-4 months.
Reheating for Safety and Quality
Reheating isn’t just about warmth; it’s about pasteurization. You must bring the soup back to a temperature that kills any bacteria that may have survived storage.
The target is 165°F throughout. Use a thermometer. Bring soup to a boil on the stovetop, or microwave it in a covered container, stirring halfway through to eliminate cold spots. Merely warming it to “hot” isn’t enough.
For cream-based soups, reheat gently and avoid a rolling boil to prevent curdling. For soups with pasta or rice, note that these starches continue to absorb liquid and soften in the fridge. You may need to add a splash of broth or water when reheating.
Frequently Asked Questions
Can I put hot soup directly in the fridge?
No. It raises the fridge’s internal temperature, putting all other perishables at risk, and it cools the soup too slowly. Always cool soup to at least 75°F using an ice bath or divided containers before refrigerating.
My soup is very thick. How do I cool it quickly?
Thick soups like chili or chowder are the toughest. Use the ice bath method: place sealed, shallow containers directly into a sink of ice water. Stirring the soup inside the container every 20 minutes helps redistribute heat. The Michigan State University food safety news emphasizes this method for dense foods.
Why can’t I just leave the pot out overnight to cool?
Large pot’s center mass stays in the danger zone for far longer than the safe six-hour limit. This extended time allows bacteria to multiply and potentially produce toxins that reheating cannot destroy. Dividing and rapidly cooling is non-negotiable.
Does the type of container matter?
Material matters less than shape. Glass, stainless steel, and food-grade plastic are all fine. The critical factor is depth. A wide, 2-inch deep container cools exponentially faster than a narrow, 6-inch deep one, regardless of material.
How do I know if my stored soup has gone bad?
Visible mold, an off or sour smell, or bubbles forming on the surface are clear signs. However, some dangerous bacteria leave no obvious clues. Adhering to the 3-4 day storage rule and proper reheating is your primary defense. When in doubt, throw it out.
Can I freeze soup after it’s been in the fridge?
Yes, you can freeze refrigerated soup within its 3-4 day shelf life. For best quality, freeze it as soon as you know you won’t eat it in time. Thaw in the refrigerator overnight before reheating.
The Bottom Line
Storing soup safely is a race against a six-hour clock and a battle against geometry. Shallow wins over deep every time. An ice bath beats room temperature air. And a single layer on the fridge shelf beats a stacked tower.
The rules from extension services are specific for a reason: 2-inch depth, 165°F reheat, 40°F fridge temp. Follow them, and your food storage routine becomes a safeguard, not a gamble. The best soup is the one that nourishes you days later without a second thought.
