
The Complete Guide on How to Clean Your Freezer and Stop Frost
This post contains affiliate links. As an Amazon Associate, we earn from qualifying purchases.
To clean a freezer, you must unplug it, remove all food, and allow it to defrost completely. Then wipe down all interior surfaces with a solution of 2 tablespoons baking soda per quart of warm water, the exact ratio specified by Electrolux, Frigidaire, and Honeywell manuals. Dry everything thoroughly before restarting the appliance.
That ratio is the part most articles get wrong. They say “baking soda and water” and leave it there. The manuals give you a number because the concentration matters for cutting grease without leaving residue that can refreeze into a slick film. Skip the drying step and you’re just prepping a surface for faster frost buildup next month.
What follows: the unskippable safety step every manual leads with, the right tools for the gasket and the drain, how to handle an integrated ice maker, and the one pre-cleaning setting (on Bosch models) that can save your food if you use it four hours ahead.
Key Takeaways
- Unplug the freezer first. Every manufacturer manual leads with this warning because a live appliance near water is a direct shock hazard.
- Defrost when frost reaches ¼ to ½ inch thick (per Frigidaire). Thicker ice strains the compressor and wastes energy.
- Use the OEM-specified cleaning solution: 2 tbsp baking soda dissolved in 1 quart warm water. Stronger mixes can leave a film.
- Turn off the ice maker at the control panel before cleaning. Never put the plastic ice bin in the dishwasher, it cracks.
- Dry every surface, especially the door seal grooves, with a clean towel before plugging the freezer back in. Residual moisture is the primary cause of immediate refrosting.
The First Step Nobody Skips. Unplug and Defrost
Every single OEM manual. Electrolux, Frigidaire, Bosch, Honeywell, opens its cleaning section with the same instruction: disconnect the power. This isn’t just cautious advice. Water is an immediate byproduct of defrosting, and introducing it to a live electrical appliance is how you get a ground-fault shock. Pull the plug from the wall outlet. Don’t just turn the thermostat off.
Next, remove all the food. This is the moment you’ll discover forgotten items. Have a plan for them. A large cooler filled with ice packs works. Alternatively, group items tightly in insulated bags or boxes and place them in the coldest part of your refrigerator. The goal is to keep everything frozen or near-frozen.
Now, let the defrosting begin. Place old towels or shallow pans at the base of the unit to catch water. For an upright freezer, you might place a baking sheet on the bottom rack. For a chest freezer, lay towels across the bottom. Leave the door open to allow warm air in.
Before you start: Ensure the freezer is unplugged and all food is removed. Working around live electricity or attempting to speed-defrost with sharp tools near refrigerant lines risks serious shock or permanent system damage. The process takes hours; rushing it breaks things.
How long should you wait? Defrosting is complete when all ice has melted from the coils and interior walls and any standing water has been wiped or drained. In a typical home, this takes 4 to 8 hours. Using a fan to circulate air in the room can cut that time.
A freezer should be defrosted and cleaned when frost accumulation reaches ¼ to ½ inch in thickness, according to the Frigidaire Use & Care guide. This level of frost begins to insulate the cooling coils, forcing the compressor to work longer and consume more energy to maintain temperature.
Where this goes sideways: Trying to chip away thick ice with a knife or screwdriver. It’s tempting. Don’t. The evaporator coils and refrigerant lines are often hidden behind interior plastic panels. A slip can puncture a line, releasing refrigerant and requiring a professional repair that costs more than a new appliance. If you must speed things up, use a plastic spatula or a bowl of hot water placed inside the freezer (after unplugging), never metal.
The Baking Soda Solution and What to Avoid
With the freezer empty and dry, mixing your cleaner is next. The consensus across primary manuals is specific: 2 tablespoons of baking soda dissolved in 1 quart of warm water. Electrolux, Frigidaire, and Honeywell state this ratio verbatim.
Why baking soda? It’s a mild alkali that cuts through fatty residues from food packaging without being corrosive. It also neutralizes odors at the source, unlike perfumed cleaners that just mask them. Vinegar is acidic and can damage some plastics and seals over time. Bleach and ammonia-based cleaners are too harsh, can leave toxic residues, and their fumes are dangerous in an enclosed space.
| Cleaning Agent | Best For | Risk If Used |
|---|---|---|
| Baking Soda Solution (2 tbsp/qt) | General interior cleaning, odor neutralization | None when properly diluted and rinsed. |
| Mild pH-Neutral Detergent (Bosch) | Grease spots on walls and shelves | Residue if not rinsed thoroughly. |
| Clear Water Only (Bosch for gaskets) | Cleaning door seals without degradation | None. |
| Vinegar or Bleach Solutions | Not recommended for freezer interiors | Can damage plastics, corrode metal, leave harmful residue. |
Dip a soft cloth, sponge, or soft-bristle brush into your baking soda solution. Wring it out so it’s damp, not dripping. Start from the top and work down, wiping every interior surface: walls, shelves, dividers, and the ceiling. For textured surfaces or stubborn spots, a soft brush gets into crevices without scratching.
Pay special attention to the door gasket, the rubber seal around the perimeter. Wipe it clean with a cloth dampened with clear water (as Bosch advises) or a very mild soapy solution. Dry it completely with a towel. A clean, dry gasket seals properly; a sticky or damp one lets warm, moist air in, which is the root cause of frost.
Rinse your cloth in clean water, wring it, and go over all surfaces again to remove any baking soda film. Then, dry everything. I mean everything. Use a clean, dry towel to wipe down walls, shelves, and the gasket grooves. Any moisture left behind will be the first thing to freeze when you restart the unit.
The short version: Mix 2 tbsp baking soda per quart of warm water. Wipe, rinse, dry. Skip the fancy cleaners.
Cleaning the Ice Maker (If You Have One)
If your freezer has a built-in ice maker, it needs specific attention. The first step is always to turn it off at the control panel. The Electrolux and Frigidaire guides are explicit: “Turn off the ice maker when cleaning the freezer.” This prevents the mechanism from trying to cycle while the unit is off or empty.
Remove the ice bin. Empty any remaining ice. Here’s the part the manual stresses: do not put the ice bin in the dishwasher. The plastic isn’t typically dishwasher-safe and can warp or crack from the heat. Instead, wash it in your sink with warm water and a mild detergent. Rinse it thoroughly and dry it completely.
Common mistake: Leaving the ice maker on during cleaning. If the unit is powered but the water line is disconnected or the bin is out, the mechanism can run dry or jam. Always deactivate it at the control panel before you start.
While the bin is out, inspect the area. Wipe down the ice chute and the surrounding housing with your baking soda solution. If you see any discoloration or mold-like spots (often pink or black), a more targeted clean is needed. For this, use a dedicated appliance cleaner or a paste of baking soda and water, scrubbed gently with a soft brush. Rinse and dry meticulously.
Before replacing the bin, check the owner’s manual for your model. Some ice makers have a small water filter or a screen that needs periodic cleaning. If present, follow the manufacturer’s instructions for removal and rinsing.
Finally, once the entire freezer is clean, dry, and ready to be restarted, you can turn the ice maker back on at the control panel. Remember, as noted in the manuals, it may take up to 24 hours for ice production to begin or resume fully after a cleaning cycle.
The Tools and Supplies You Actually Need
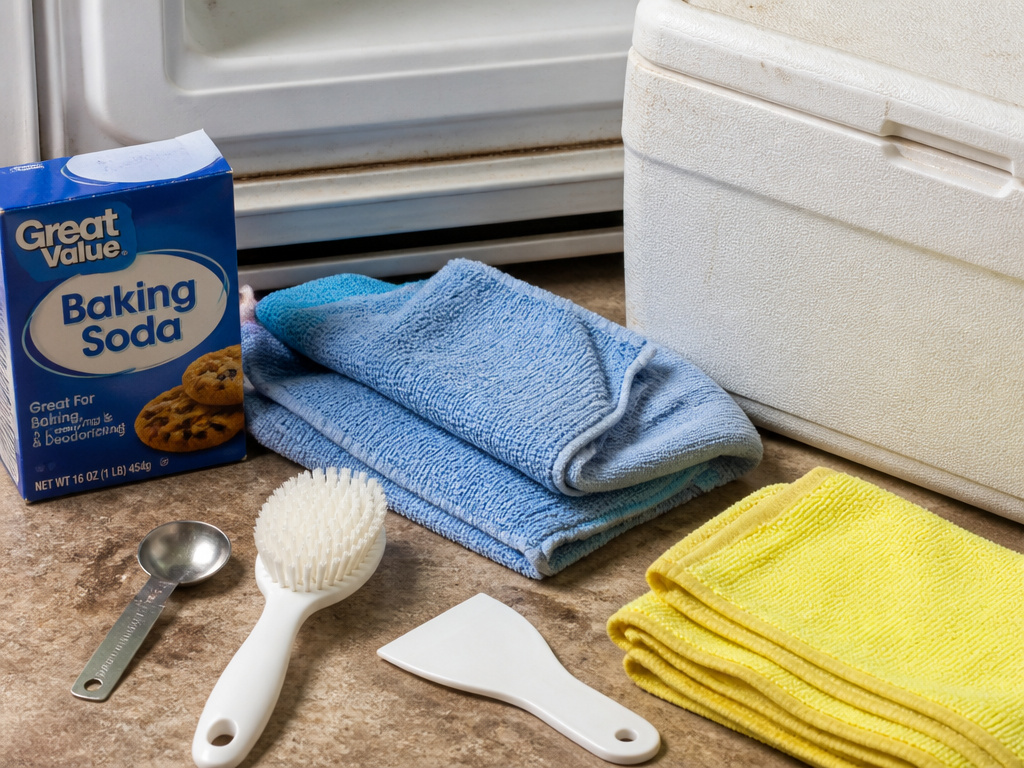
You don’t need a specialty kit. Gather these items before you start, and the job will flow without frantic searches.
- Old towels or absorbent cloths: For soaking up water during defrosting and for drying.
- A large cooler or insulated bags: For holding frozen food during the process.
- Baking soda: For the cleaning solution.
- A measuring tablespoon and a quart container: Precision matters for the solution.
- Several soft cloths or sponges: One for applying cleaner, one for rinsing.
- A soft-bristle brush (like a clean toothbrush): For textured surfaces and gasket grooves.
- A plastic spatula or scraper (optional): For gently encouraging thick ice layers during defrosting, never metal.
- Mild dish soap (if needed): For the ice bin or particularly greasy spots.
A handheld vacuum or a damp mop can be useful for cleaning up the final puddles of water around the base of the freezer after defrosting.
Edge Cases and Model-Specific Steps
The basic process fits most freezers, but your manual might have a critical extra step. Ignoring it can turn a simple clean into a service call.
Hot and Humid Climates: The Electrolux guide notes that hot, humid weather increases the internal rate of frost buildup. If you live in such an area, you may need to clean your freezer more frequently than the standard twice-a-year advice. The moisture in the air entering every time you open the door condenses and freezes faster.
Bosch’s “Super Freezing” Pre-Clean Step: Some Bosch models have a “super freezing” function. The manual recommends switching this on approximately 4 hours before cleaning. Why? This super-cools the interior and the food within. When you remove the food to clean, it stays frozen solid longer in your cooler, giving you more time to complete the job without thawing concerns.
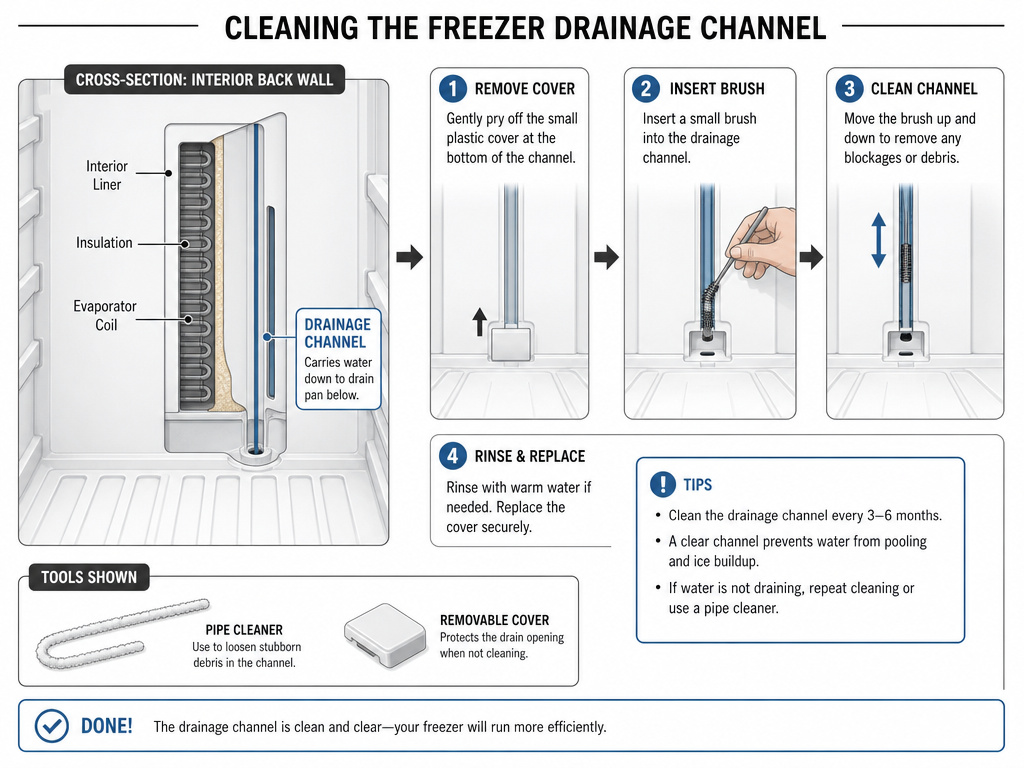
The Drainage Channel: Some upright freezers, particularly models with water dispensers, have a small drainage channel inside. If your manual mentions it (like the Bosch guide does), it needs to be checked. It’s usually behind a small removable cover near the bottom of the interior back wall. A pipe cleaner or small brush can clear any debris to ensure proper drainage after defrosting.
Persistent Odors After Cleaning: If a foul smell lingers after a standard clean, the issue might be deeper. Check for spilled liquids that have frozen under bottom drawers or shelves. Sometimes, freezer burn on old food can leave a persistent odor on nearby surfaces. A second, more thorough cleaning focusing on hidden areas, followed by placing an open box of baking soda inside the running freezer for a week, usually solves it.
How Often Should You Clean Your Freezer?
Manufacturers like Electrolux recommend a thorough cleaning at least twice a year. But your nose and eyes are better guides.
Clean your freezer when you notice: 1. Frost over ¼ inch thick on the coils or walls. 2. Any spills, especially from meat or dairy packages. 3. A persistent odor that isn’t coming from a specific food item. 4. It’s been 6 months since the last clean, make it a seasonal habit.
Regular cleaning is also a primary method for preventing freezer burn by maintaining a dry, stable environment. It also helps you take inventory, discard old items, and reorganize using proper freezer-safe containers.
For a more intensive deep freezer cleaning, perhaps before a major restock, you might pull the unit away from the wall to vacuum the condenser coils on the back, which improves efficiency.
Frequently Asked Questions
Can I use vinegar to clean my freezer?
You can, but most manufacturer manuals don’t recommend it. Vinegar is acidic and can degrade certain plastics and rubber gaskets over many uses. Baking soda is alkaline, better at cutting grease, and is explicitly recommended by Electrolux, Frigidaire, and Honeywell. If you use vinegar, dilute it heavily (one part vinegar to four parts water) and avoid contact with the door gasket.
How do I clean a freezer without defrosting it?
You can’t do a proper, thorough clean without defrosting. You can perform light maintenance: quickly wipe up spills, clean shelves individually in the sink, and wipe the door gasket. But to address frost buildup, odors, and grime on the walls and evaporator coils, a full defrost is necessary.
What’s the fastest way to defrost a freezer?
The safest fast method is to use a fan. After unplugging and removing food, place a box fan facing the open freezer. The circulating air dramatically speeds melting. You can also place bowls of hot water inside the freezer (not boiling) and close the door for 15-minute intervals. Never use a heat gun, hairdryer, or sharp tools.
Why does my freezer frost up so quickly after cleaning?
The most common reason is residual moisture. If you didn’t dry the interior and the door gasket thoroughly, that moisture refreezes instantly. The second reason is a worn or dirty door gasket that isn’t sealing, letting moist air in constantly. Clean the gasket carefully and check the seal. If it’s cracked or brittle, it needs replacement.
Do I need to clean the ice maker with a special solution?
No. The ice maker mechanism itself is typically self-cleaning. Your job is to clean the removable ice bin and the surrounding area with warm, soapy water or a baking soda solution. Never use harsh chemicals, as they could leave tastes or residues that affect your ice.
Before You Go
Cleaning a freezer is a straightforward, if somewhat tedious, task. The difference between a job that lasts and one that needs redoing in a month lies in the specifics: unplugging first, using the right concentration of baking soda, drying every surface, and knowing your model’s quirks like the Bosch super-freeze setting.
Treat it as biannual maintenance. You’ll save on energy, protect your food from freezer odors and burn, and avoid the panic of a broken appliance. When you’re done, take the opportunity to restock in an organized way, using clear freezer storage containers so you can see exactly what you have. Your next defrost will be even easier.
